opencv编译
For Android:
For android in mingw:
官网编译:
http://code.opencv.org/projects/opencv/wiki/Building_OpenCV4Android_from_trunk
也可查看源码根目录下的 platforms\android\android.toolchain.cmake 文件
设置 android ndk 环境变量:
export ANDROID_NDK=C:\android-ndk #设置android环境变量
mkdir build
cd build
cmake -G"MSYS Makefiles" -DCMAKE_BUILD_TYPE=Release -DCMAKE_TOOLCHAIN_FILE=../platforms/android/android.toolchain.cmake -DCMAKE_INSTALL_PREFIX=/usr/local/build ..
参数说明:
-G:产生工程文件
如果是用的MSYS shell和MSYS make,则用 "MSYS Makefiles“
如果是用的MINGW shell 和MINGW make,则用"MinGW Makefiles"
-DCMAKE_TOOLCHAIN_FILE:配置android工具链文件
-DCMAKE_BUILD_TYPE:编译类型(Debug、Release)
cmake --build . --target install --config Release
参数:
--build:编译
--target:目标 install 安装
--config:配置 编译 发行版本
For android in linux:
export ANDROID_NDK=/home/android-ndk #设置android环境变量
mkdir build
cd build
cmake -G"Unix Makefiles" -DCMAKE_TOOLCHAIN_FILE=../platforms/android/android.toolchain.cmake -DCMAKE_INSTALL_PREFIX=/usr/local/build ..
参数说明:
-G:产生工程文件
如果是用的MSYS shell和MSYS make,则用 "MSYS Makefiles“
如果是用的MINGW shell 和MINGW make,则用"MinGW Makefiles"
-DCMAKE_TOOLCHAIN_FILE:配置android工具链文件
其它参数可以工具链配置文件:=../platforms/android/android.toolchain.cmake
cmake --build . --target install --config Release
在源码根目录 platforms\scripts 下有在linux下编译android版本的脚本:
ABI_compat_generator.py* cmake_android_x86.sh*
camera_build.conf cmake_arm_gnueabi_hardfp.sh*
cmake_android_all_cameras.py* cmake_arm_gnueabi_softfp.sh*
cmake_android_arm.sh* cmake_carma.sh*
cmake_android_mips.sh* cmake_winrt.cmd
cmake_android_service.sh*
For android in windows 控制台:
安装需要的工具:
- android ndk:安装到 c:\android-ndk 目录下
- cmake:安装到 c:\cmake 目录下
- make:用android ndk中自带的make命令。位于%ANDROID_NDK%\prebuilt\windows\bin\make.exe
打开windows命令行,进入opencv源码目录
SET ANDROID_NDK=C:\android-ndk #设置android环境变量
SET PATH=%PATH%;c:\cmake\bin #设置cmake到环境变量中
mkdir build
cd build
cmake -G"Unix Makefiles" -DCMAKE_TOOLCHAIN_FILE=..\platforms\android\android.toolchain.cmake -DCMAKE_MAKE_PROGRAM="%ANDROID_NDK%\prebuilt\windows\bin\make.exe"-DANDROID_ABI="armeabi-v7a with NEON" ..
cmake--build.--targetinstall --config Release
-DCMAKE_TOOLCHAIN_FILE:配置工具链文件
-DCMAKE_MAKE_PROGRAM:指定make程序的位置,android工具链中自带了make程序
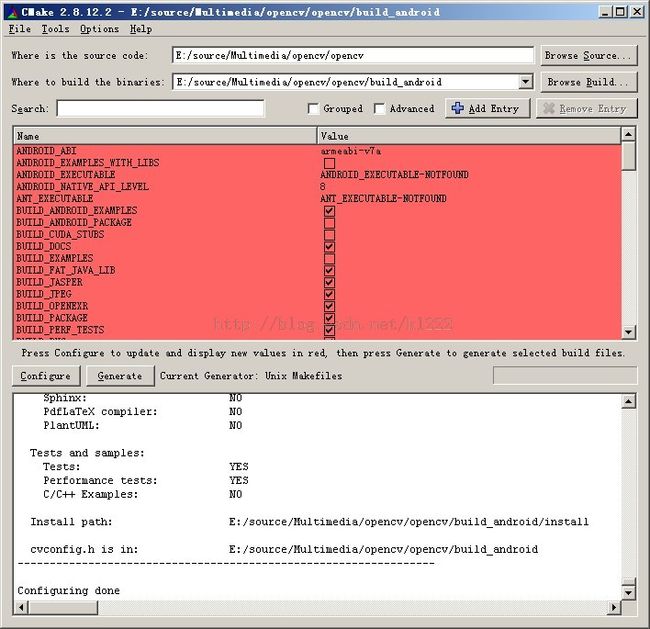
for android in windows cmake gui:
用android自带的make命令生成工程。
把android自带的make命令路径设置到环境变量中,然后打开cmake gui:
当然,你也可以用其它的生成方式,例如:mingw-make 或者 msys-make,前提是你把这些make命令路径设置到环境变量PATH中。然后再指定相应的产生者。
总结:
android下编译的方法:
1、把make命令路径设置到环境中。如果是命令行cmake,则用-DCMAKE_MAKE_PROGRAM 参数指定make命令位置。
2、设置与make命令相应的产生者。如果是命令行cmake,则用参数-G指定。
与make相关的参生者:
  MSYS Makefiles              = Generates MSYS makefiles.
  MinGW Makefiles             = Generates a make file for use with
                                mingw32-make.
  Unix Makefiles              = Generates standard UNIX makefiles.
3、指定cmake 工具链文件。如果是命令行cmake,则用-DCMAKE_TOOLCHAIN_FILE指定。
4、指定编译类型: -DCMAKE_BUILD_TYPE:编译类型(Debug、Release)
5、如果是命令行,用 cmake --build . 进行编译
$ cmake --build
Usage: cmake --build

    [options] [-- [native-options]]
Options:


     = Project binary directory to be built. --target = Build instead of default targets. --config = For multi-configuration tools, choose <cfg --clean-first = Build target 'clean' first, then build. (To clean only, use --target 'clean'.) --use-stderr = Don't merge stdout/stderr output and pass original stdout/stderr handles to the nati tool so it can use the capabilities of the calling terminal (e.g. colored output). -- = Pass remaining options to the native tool.
for winrt:
可直接源码根目录下: platforms\scripts\cmake_winrt.cmd
根据你安装的vs版本进行修改成你安装的版本,然后运行它.
例如:我用的是msvc 2013.把
set msvc_path=C:\Program Files\Microsoft Visual Studio 11.0
改成:
set msvc_path=C:\Program Files\Microsoft Visual Studio 12.0
把脚本文件 cmake_winrt.cmd 复制到源码根目录下。
运行脚本:
cmake_winrt.cmd
实际上是执行下面命令:
mkdir build_winrt_arm
cd build_winrt_arm
set msvc_path=C:\Program Files\Microsoft Visual Studio 12.0 #设置msvc工具路径
call "%msvc_path%\Common7\Tools\VsDevCmd.bat"
call "%msvc_path%\VC\bin\x86_arm\vcvarsx86_arm.bat"
cmake.exe -GNinja -DCMAKE_BUILD_TYPE=Release -DENABLE_WINRT_MODE=ON -DWITH_FFMPEG=OFF -DWITH_MSMF=OFF -DWITH_DSHOW=OFF -DWITH_VFW=OFF -DWITH_OPENEXR=OFF -DWITH_CUDA=OFF -DBUILD_opencv_gpu=OFF -DBUILD_opencv_python=OFF -DBUILD_opencv_java=OFF -DCMAKE_TOOLCHAIN_FILE=..\platforms\winrt\arm.winrt.toolchain.cmake %* ..
cmake --build . --target install --config Release
for linux:
make build_linux
cd build_linux
cmake .. #配置
cmake --build . --target install --config Release #编译并安装Release版本
for android in linux:
$ export ANDROID_NDK=/absolute/path/to/the/android-ndk #设置 android ndk 环境变量
$ mkdir build && cd build
$ cmake -DCMAKE_TOOLCHAIN_FILE=../platforms/android/android.toolchain.cmake \
-DANDROID_ABI="armeabi-v7a with NEON" \
-DANDROID_TOOLCHAIN_NAME=arm-linux-androideabi-${TOOLCHAIN_VERSION} \
-DANDROID_NATIVE_API_LEVEL=android-${PLATFORMS_VERSION} \
-DCMAKE_INSTALL_PREFIX=${PREFIX} \
$ make #或者 cmake --build . --target install --config Release
for windows:
for windows in windows 命令行:
1、设置cmake路径到环境变量中:
2、安装msvc
mkdir -p build_windows_mscvcd build_windows_mscvcmake \-DCMAKE_INSTALL_PREFIX=${PREFIX} \-DBUILD_SHARED_LIBS=OFF \-DBUILD_DOCS=OFF \-DBUILD_EXAMPLES=OFF \-DBUILD_ANDROID_EXAMPLES=OFF \-DBUILD_TESTS=OFF \-DBUILD_FAT_JAVA_LIB=OFF \-DBUILD_JASPER=OFF \-DBUILD_JPEG=OFF \-DBUILD_OPENEXR=OFF \-DBUILD_PERF_TESTS=OFF \-DBUILD_PACKAGE=OFF \-DBUILD_PNG=OFF \-DBUILD_TBB=OFF \-DBUILD_TIFF=OFF \-DBUILD_WITH_DEBUG_INFO=OFF \-DWITH_OPENCL=OFF \-DBUILD_opencv_video=OFF \-DBUILD_opencv_videostab=OFF \-DBUILD_opencv_ts=OFF \-DBUILD_opencv_java=OFF \-DWITH_WEBP=OFF \-DWITH_TIFF=OFF \-DWITH_JPEG=OFF \-DWITH_PNG=OFF \-DWITH_OPENEXR=OFF \-DBUILD_opencv_androidcamera=OFF \..cmake --build . --taget install --config Release
for windows in mingw:
用命令行编译:
mkdir -p build_windowscd build_windowscmake \-G"MinGW Makefiles"-DCMAKE_INSTALL_PREFIX=${PREFIX} \-DBUILD_SHARED_LIBS=OFF \-DBUILD_DOCS=OFF \-DBUILD_EXAMPLES=OFF \-DBUILD_ANDROID_EXAMPLES=OFF \-DBUILD_TESTS=OFF \-DBUILD_FAT_JAVA_LIB=OFF \-DBUILD_JASPER=OFF \-DBUILD_JPEG=OFF \-DBUILD_OPENEXR=OFF \-DBUILD_PERF_TESTS=OFF \-DBUILD_PACKAGE=OFF \-DBUILD_PNG=OFF \-DBUILD_TBB=OFF \-DBUILD_TIFF=OFF \-DBUILD_WITH_DEBUG_INFO=OFF \-DWITH_OPENCL=OFF \-DBUILD_opencv_video=OFF \-DBUILD_opencv_videostab=OFF \-DBUILD_opencv_ts=OFF \-DBUILD_opencv_java=OFF \-DWITH_WEBP=OFF \-DWITH_TIFF=OFF \-DWITH_JPEG=OFF \-DWITH_PNG=OFF \-DWITH_OPENEXR=OFF \-DBUILD_opencv_androidcamera=OFF \..cmake --build . --taget install --config Release
注意:必须要用cmake for windows 版本。
可能会出现的错误:
error: ‘struct IEnumPIDMap’ has virtual functions and accessible non-virtual destructor [-Werror=non-virtual-dtor]
修改 cmake/OpenCVCompilerOptions.cmake ,注释下面行:
# add_extra_compiler_option(-Werror=non-virtual-dtor)
for windows in windows cmake gui:

