页面最后更新:2012-11-07
Unity3D类人动画humanoid animations
动画和Mecanim术语表 A Glossary of Animation and Mecanim terms
使用类人动画 Working with humanoid animations
The Mecanim Animation System is particularly well suited for working with animations for humanoid skeletons. Since humanoid skeletons are a very common special case and are used extensively in games, Unity provides a specialized workflow, and an extended tool set for humanoid animations.
Mecanim动画系统是特别适合为类人骨架使用的。类人骨架是非常常用的特例并且在游戏中广泛使用。Unity为类人动画提供了一个特别的工作流,还有一个扩展工具集。
Because of the similarity in bone structure, it is possible to map animations from one humanoid skeleton to another, allowing retargeting and inverse kinematics. With rare exceptions, humanoid models can be expected to have the same basic structure, representing the major articulate parts of the body, head and limbs. The Mecanim system makes good use of this idea to simplify the rigging and control of animations. A fundamental step in creating a animation is to set up a mapping between the simplified humanoid bone structure understood by Mecanim and the actual bones present in the skeleton; in Mecanim terminology, this mapping is called an Avatar. The pages in this section explain how to create an Avatar for your model.
因为骨骼结构的类似性,使得把动画从一个类人骨架映射到另外一个类人骨架成为可能,也使得重定向和反向动力学成为可能。极少例外地,类人模型可以被认为是有相同的结构,有清晰的身体,头,四肢。Mecanim系统很好地利用这个主意来简化搭骨架和控制动画。创建动画的一个基本步骤是设置一个unity3d可理解的简化后的类人骨骼到骨架中实际骨骼的映射;在Mecanim的术语中,这个映射称为Avatar。这段的页面中解释了如何为你的模型创建Avatar。
- Creating the Avatar 创建Avatar
- Configuring the Avatar 配置Avatar
- Muscle setup 肌肉设置
- Avatar Body Mask 身体遮罩
- Retargeting of Humanoid animations 类人动画的重定向
- Inverse Kinematics (Pro only) 反向动力学(仅专业版)
创建Avatar Creating the Avatar
After a model file (FBX, COLLADA, etc.) is imported, you can specify what kind of rig it is in the Rig tab of the ModelImporter options.
在FBX导入之后,你可以在FBX导入器选项中的rig标签页指定是哪种类型的骨架。
Humanoid animations
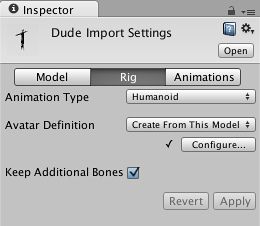
For a Humanoid rig, select Humanoid and click Apply. Mecanim will attempt to match up your existing bone structure to the Avatar bone structure. In many cases, it can do this automatically by analysing the connections between bones in the rig.
对于类人骨架,选择Humanoid然后单击Apply.Mecanim将会尝试匹配你的骨骼结构到Avatar骨骼结构。在大多情况下,它可以自动地分析骨骼之间的链接来完成这一过程。
If the match has succeeded, you will see a check mark next to the Configure... menu
如果匹配成功,你将会在Configure...按钮旁边看到一个对号
Also, in the case of a successful match, an Avatar sub-asset is added to the model asset, which you will be able to see in the project view hierarchy.
并且,在成功匹配的情况下,一个Avatar子资源会被增添到FBX资源,你可以再项目视图中看到它。
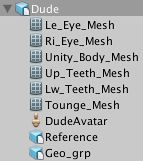
Models with and without an Avatar sub-asset
含有和不含Avatar的子资源

The inspector for an Avatar asset
Avatar资源的检视器
If Mecanim was unable to create the Avatar, you will see a cross next to the Configure ... button, and no Avatar sub-asset will be added. When this happens, you need to configure the avatar manually.
如果Mecanim不能床架Avatar,你将会看到一个叉号出现在Configure...按钮旁边,并且没有Avatar子资源被添加。当这种情况发生的时候,你需要手动配置avatar。
Non-humanoid animations 非类人动画
Two options for non-humanoid animation are provided: Generic and Legacy. Generic animations are imported using the Mecanim system but don't take advantage of the extra features available for humanoid animations. Legacy animations use the the animation system that was provided by Unity before Mecanim. There are some cases where it is still useful to work with legacy animations (most notably with legacy projects that you don't want to update fully) but they are seldom needed for new projects. See this section of the manual for further details on legacy animations.
提供了2种非类人动画:通用和旧版。通用动画是使用Mecanim系统导入但是不会获得类人动画的额外好处。旧版动画是使用Unity在Mecanim之前提供的动画系统。还有一些情况下旧版动画系统是有用的(大多是你不想完全更新项目的情况)但是他们很少在新的项目中使用。参看手册的这一段来了解旧版动画的更多细节。
(back to Avatar Creation and Setup)
(back to Mecanim introduction)
页面最后更新:2013-01-07
配置Avatar Configuring the Avatar
Since the Avatar is such an important aspect of the Mecanim system, it is important that it is configured properly for your model. So, whether theautomatic Avatar creation fails or succeeds, you need to go into the Configure Avatar mode to ensure your Avatar is valid and properly set up. It is important that your character's bone structure matches Mecanim's predefined bone structure and that the model is in T-pose.
Avatar是Mecanim的一个如此重要方面,它需要被配置地符合你的模型。因此不论自动Avatar创建失败或者成功,你都需要进入Avatar配置模式来确保你的Avatar是有效并且合适地配置了。你的角色骨骼匹配Mecanim的预定义骨骼结构并且模型是T字形姿势是非常重要的。
If the automatic Avatar creation fails, you will see a cross next to the Configure button.
如果自动Avatar创建失败,你将会看到一个叉号出现在Configure按钮旁边。
If it succeeds, you will see a check/tick mark:
腐乳它成功了,你将会看到一个对号出现在Configure...按钮旁边:
Here, success simply means all of the required bones have been matched but for better results, you might want to match the optional bones as well and get the model into a proper T-pose.
在这里,成功简仅仅意味着需要的骨骼被匹配上了,但是为了获得更好的结果,你可能会想也匹配上可选的骨骼以及让模型进入一种合适的T字姿势。
When you go to the Configure ... menu, the editor will ask you to save your scene. The reason for this is that in Configure mode, the Scene View is used to display bone, muscle and animation information for the selected model alone, without displaying the rest of the scene.
当你进入Configure...按钮,编辑器将会问你是否保存场景。之后进入Configure模式,场景视图用来单独显示指定模型的骨骼,肌肉和动画信息,不显示场景的其他部分。
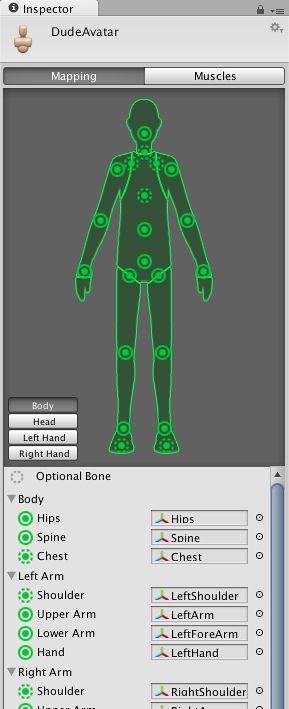
Once you have saved the scene, you will see a new Avatar Configuration inspector, with a bone mapping.
一旦你保存了场景,你就会看到一个带有骨骼映射的新Avatar配置检视器。
The inspector shows which of the bones are required and which are optional - the optional ones can have their movements interpolated automatically. For Mecanim to produce a valid match, your skeleton needs to have at least the required bones in place. In order to improve your chances for finding a match to the Avatar, name your bones in a way that reflects the body parts they represent (names like "LeftArm", "RightForearm" are suitable here).
检视器显示哪些骨骼是需要的还有哪些骨骼是可选的-可选的骨骼的运动可以自动用插值计算出来。为了让Mecanim产生有效的匹配,你的骨架需要至少含有必须的骨骼在适当的位置。为了提高查找匹配Avatar的机会,可以使用反映身体部位的名称命名你的骨骼(像“LeftArm”“RightForearm”这样的名称都是合适的)。
If the model does NOT yield a valid match, you can manually follow a similar process to the one used internally by Mecanim:-
如果模型没有产生一个有效的匹配,你可以手动按照类似Mecanim内部的处理方式做一下:
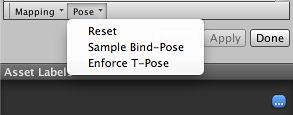
- Sample Bind-pose (try to get the model closer to the pose with which it was modelled, a sensible initial pose)
采样绑定姿势(尝试让模型更接近它建模时候的姿势,一个合理的最初姿势) - Automap (create a bone-mapping from an initial pose)
自动映射(从最初的姿势创建一个骨骼映射) - Enforce T-pose (force the model closer to T-pose, which is the default pose used by Mecanim animations)
强制T字姿态(强制让模型更接近T字姿态,这是Mecanim使用的默认姿势)。
If the auto-mapping (Mapping->Automap) fails completely or partially, you can assign bones by either draging them from the Scene or from the Hierarchy. If Mecanim thinks a bone fits, it will show up as green in the Avatar Inspector, otherwise it shows up in red.
如果自动映射(Mapping->Automap)完全或者部分失败,你可以通过从场景或者体系结构视图拖拽它们来赋值到骨骼。如果Mecanim认为骨骼合适,它会用绿色在Avatar检视器中显示,否则会以红色显示。
Finally, if the bone assignment is correct, but the character is not in the correct pose, you will see the message "Character not in T-Pose". You can try to fix that with Enforce T-Pose or rotate the remaining bones into T-pose.
最后如果骨骼被正确赋予了,但是角色不是在正确的姿势,你将会看到消息“Character not in T-Pose(角色不是在T字姿态)”。你可以尝试Enforce T-pose(强制T字姿态)或者旋转余下的骨骼到T字姿态。
Human Template files 人体模板文件
You can save the mapping of bones in your skeleton to the Avatar on disk as a "human template file" (extention *.ht), which can be reused by any characters that use this mapping. This is useful, for example, if your animators use a consistent layout and naming convention for all skeleton but Mecanim doesn't know how to interpret it. You can then Load the .ht file for each model, so that manual remapping only needs to be done once.
你可以用“人体模板文件”(扩展名*.ht)的形式保存骨骼到你Avatar骨架的映射到到磁盘上,你可以在任意角色上重用这个映射。这非常有用,比如,如果你的动画使用一致布局和命名约定到所有的骨架上但是Mecanim不知道如何解释它。你可以为模型载入.ht文件,这样手动重映射只需要做一次。
(back to Avatar Creation and Setup)
(back to Mecanim introduction)
页面最后更新:2012-11-05
肌肉设定 Muscle setup
Mecanim allows you to control the range of motion of different bones using Muscles.
Mecanim允许你使用肌肉(Muscles)控制不同骨骼上的各种动作尺度。
Once the Avatar has been properly configured, Mecanim will "understand" the bone structure and allow you to start working in the Muscles tab of the Avatar Inspector. Here, it is very easy to tweak the character's range of motion and ensure the character deforms in a convincing way, free from visual artifacts or self-overlaps.
一旦Avatar正确配置了,Mecanim将会“理解”骨骼的结构并且允许你开始在Avatar检视器中的Muscle是标签栏中开始工作。这里,很容易调整角色的动作尺度并且确保角色使用逼真的方式扭曲,避免过度造作和自我重叠。
You can either adjust individual bones in the body (lower part of the view) or manipulate the character using predefined deformations which operate on several bones at once (upper part of the view).
你可既可以在body(视图下部)来调整单独的动画或者使用预先定义的一次操作若干骨骼的扭曲(视图上部)来操作角色。
Muscle Clips 肌肉剪辑
In the Animation tab, you can set up Muscle Clips, which are animations for specific muscles and muscle groups.
在Animation标签栏,你可以建立肌肉剪辑(Muscle Clips),它是针对特定肌肉或者肌肉组的动画。
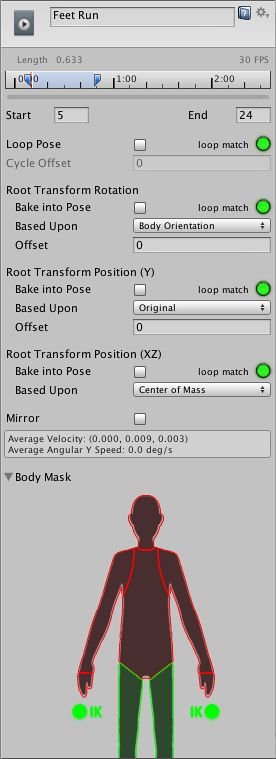
You can also define which body parts these muscle clips apply to.
你也可以定义肌肉动画应用到身体的哪个部分。
(back to Avatar Creation and Setup)
(back to Mecanim introduction)
页面最后更新:2012-11-01
资源准备和导入 Asset Preparation and Import
Humanoid meshes 类人网格
In order to take full advantage of Mecanim's humanoid animation system and retargeting, you need to have a rigged and skinned humanoid type mesh.
为了应用Mecanim的类人动画系统和重定向的所有好处,你需要有一个绑骨并蒙皮的类人网格。
- A character model is generally made up of polygons in a 3D package or converted to polygon or triangulated mesh, from a more complex mesh type before export.
一个角色模型通常是由3D包组成或者从一个导出前更加复杂的网格类型转换为多边形或者三角网格。 - A joint hierarchy or skeleton which defines the bones inside the mesh and their movement in relation to one another, must be created to control the movement of the character. The process for creating the joint hierarchy is known as rigging.
一个定义了一组网格内的骨骼和他们的之间的运动关系的关节体系或者骨架,必须是为了控制角色的运动而创建的。众所周知创建这样关节体系的过程称作搭骨架(rigging). - The mesh or skin must then be connected to the joint hierarchy in order to define which parts of the character mesh move when a given joint is animated. The process of connecting the skeleton to the mesh is known as skinning.
一个网格或者皮肤必须被链接到关节体系来定义给定关节被动画化时角色的某一部分网格如随之运动。这个链接骨架和网格的过程就是蒙皮。
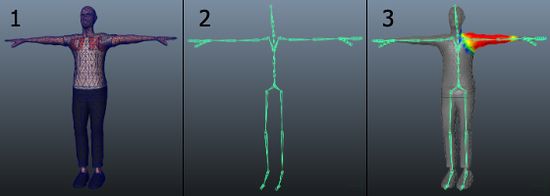
Stages for preparing a character (modeling, rigging, and skinning)
预备角色的步骤(建模,搭骨架,蒙皮)
How to obtain humanoid models
如何获取类人模型
There are three main ways to obtain humanoid models for with the Mecanim Animation system:
这里有三种重要的途径来获取用于Mecanim动画系统的类人模型:
- Use a procedural character system or character generator such as Poser, Makehuman or Mixamo. Some of these systems will rig and skin your mesh (eg, Mixamo) while others will not. Furthermore, these methods may require that you reduce the number of polygons in your original mesh to make it suitable for use in Unity.
使用一个程序化角色系统程者角色生成器诸如Poser,Makehuman或者Mixamo。其中一些系统会为你的网格搭骨架和蒙皮(比如,Mixamo)但是另外一些不会。此外,这些方法可能需要你减少原有网格上的面数来适应Unity。 - Purchase demo examples and character content from the Unity Asset Store.
从Unity Asset Store购买演示示例和角色内容 - Also, you can of course prepare your own character from scratch.
还有,你当然可以从草图开始准备自己的角色
Export & Verify 导出和验证
Unity imports a number of different generic and native 3D file formats. The format we recommend for exporting and verifying your model is FBX 2012 since it will allow you to:
Unity导入可以导入大量不同通用和本地3D文件格式。我们推荐的导出和验证你模型的格式是FBX2012因为它会让你可以:
- Export the mesh with the skeleton hierarchy, normals, textures and animation
导出带骨架层级的网格,法线,纹理和动画 - Re-import into your 3D package to verify your animated model has exported as you expected
重新导入进你的3D包来更验证你的动画模型 - Export animations without meshes
导出不带网格的动画
Further details 更多细节
The following pages cover the stages of preparing and importing animation assets in greater depth
下面的页面涵盖了更深入的准备和导入动画资源的步骤:
- Preparing your own character 准备你自己的角色
- Importing Animations 导入动画
- Splitting Animations 分割动画
(back to Mecanim introduction)
页面最后更新:2012-11-01
准备你自己的角色 Preparing your own character
There are three main steps in creating an animated humanoid character from scratch: modelling, rigging and skinning.
从草图开始创建动画化的类人角色有三个主要步骤:建模,搭骨架,蒙皮
Modelling 建模
This is the process of creating your own humanoid mesh in a 3D modelling package - 3DSMax, Maya, Blender, etc. Although this is a whole subject in its own right, there are a few guidelines you can follow to ensure a model works well with animation in a Unity project.
这是在3D建模工具包-3DSMax,Maya,Blender,诸如此类来建立你自己的类人网格的过程。尽管这是一个属于它们(建模工具)自己的主题,这里有一些你可以遵循的指导原则来保证一个模型可以很好的在Unity的动画系统中使用。
- Observe a sensible topology. The exact nature of a "sensible" structure for your mesh is rather subtle but generally, you should bear in mind how the vertices and triangles of the model will be distorted as it is animated. A poor topology will not allow the model to move without unsightly distortion of the mesh. A lot can be learned by studying existing 3D character meshes to see how the topology is arranged and why.
遵循合理的拓扑结构。一个“合理” 的网格结构的精确意义是非常微妙的,不过通常情况下,你应该牢记模型的顶点和三角面在动画化之后会怎样变形。一个不好的拓扑结构会让网格变形地非常难看。你可以从已有的3D角色网格学习很多拓扑结构是如何安排的以及这样安排的原因。 - Be mindful of the scale of your mesh. Do a test import and compare the size of your imported model with a "meter cube" (the standard Unity cube primitive has a side length of one unit, so it can be taken as a 1m cube for most purposes). Check the units your 3D package is using and adjust the export settings so that the size of the model is in correct proportion to the cube. Unless you are careful, it is easy to create models without any notion of their scale and consequently end up with a set of objects that are disproportionate in size when they are imported into Unity.
注意网格的缩放比例。做一次导入测试,比较导入的模型和一个“米立方”(大多情况下是一个边长1米的Unity标准立方体元素)。检测你的3D建模工具包使用的单位并且调整导出设定使得模型的尺寸处在相对这个立方体合适的比例。你必须小心,很容易创建出没有任何标注的缩放比例的模型并且最终会造成一些导入进unity之后不成比例的物体。 - Arrange the mesh so that the character's feet are standing on the local origin or "anchor point" of the model. Since a character typically walks upright on a floor, it is much easier to handle if its anchor point (ie, its transform position) is directly on that floor.
安放角色使得角色的脚站在坐标原点或者模型的“锚点”。角色通常是竖直地走在地面上,如果角色的锚点(也就是他的变换中心)在地面上会更容易控制。 - Model in a T-pose if you can. This will help allow space to refine polygon detail where you need it (e.g. underarms). This will also make it easier to position your rig inside the mesh.
如果你会的话,使用T字姿态建模。这会对在三维空间中细化化多边形细节(比如,腋下)有帮助。这也会使得放置骨架到网格中更容易。 - Clean up your model. Where possible, cap holes, weld verts and remove hidden faces, this will help with skinning, especially automated skinning processes.
清理你的模型。只要可能的话,覆盖孔洞,焊接顶点并且移除隐藏的面,这会对蒙皮有帮助,特别是自动蒙皮过程。
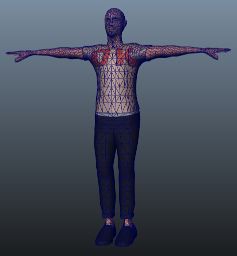
Skin Mesh - Modelled, textured and triangulated
蒙皮网格-建模后,有纹理并且已三角化的模型
Rigging 搭骨架
This is the process of creating a skeleton of joints to control the movements of your model.
这是创建骨架上的关节来控制你的模型进行运动的过程。
3D packages provide a number of ways to create joints for your humanoid rig. These range from ready-made biped skeletons that you can scale to fit your mesh, right through to tools for individual bone creation and parenting to create your own bone structure. Although the details are outside the scope of Unity, here are some general guidelines:
3D建模工具包提供了各种方法为类人骨架创建关节。从从已经构建好的可以缩放后放入网格的两足动物骨架,到创建特别骨骼的工具还有父子化骨骼结构。尽管这方面的细节超出了unity的范围,这里还是有一些通用的准则:
- Study existing humanoid skeletons hierarchies (eg, bipeds) and where possible use or mimic the bone structure.
学习已有的类人骨架体系(比如,两足动物)并且在可能的地方尽量模仿这样的骨骼架构 - Make sure the hips are the parent bone for your skeleton hierarchy.
确保臀部是整个骨架的根节点 - A minimum of fifteen bones are required in the skeleton.
在骨架中至少要有15个骨骼 - The joint/bone hierachy should follow a natural structure for the character you are creating. Given that arms and legs come in pairs, you should use a consistent convention for naming them (eg, "arm_L" for the left arm, "arm_R" for the right arm, etc). Possible hierarchies include:
角色的关节点/骨骼结构应该按照自然的结构建立。手臂和腿成对出现,你应该对骨骼使用一致的命名(比如“arm_L”命名左臂”“arm_R”命名右臂,诸如此类)。一个体系结构可能包含:- HIPS - spine - chest - shoulders - arm - forearm - hand
臀部-脊椎-胸部-肩膀-手臂-前臂-手 - HIPS - spine - chest - neck - head
臀部-脊椎-胸部-脖子-头 - HIPS - UpLeg - Leg - foot - toe - toe_end
臀部-大腿-小腿-脚-脚趾-脚趾尖
- HIPS - spine - chest - shoulders - arm - forearm - hand
Biped Skeleton, positioned in T-pose
两足动物骨架,放置成T字姿势
Skinning 蒙皮
This is the process of attaching the mesh to the skeleton
这是给骨架附加网格的过程
Skinning involves binding vertices in your mesh to bones, either directly (rigid bind) or with blended influence to a number of bones (soft bind). Different software packages use different methods, eg, assigning individual vertices and painting the weighting of influence per bone onto the mesh. The initial setup is typically automated, say by finding the nearest influence or using "heatmaps". Skinning usually requires a fair amount of work and testing with animations in order to ensure satisfactory results for the skin deformation. Some general guidelines for this process include:
蒙皮过程包括在你的网格中绑定顶点到骨骼,还有直接指定(硬绑定)或者混合多块骨骼的影响(软绑定)。不同的软件包使用不同的办法,比如,赋值给特别的顶点权重并且在网格上逐骨骼绘制影响到的顶点。最初的设定通常是自动化的,通过找最近的影响顶点或者使用“热度图”。蒙皮通常需要大量的工作并且使用动画测试来确保获得满意的皮肤变形效果。这个过程的一些指导准则如下:
- Using an automated process initially to set up some of the skinning (see relevant tutorials on 3DMax, Maya, etc.)
最开始使用自动蒙皮过程来设定皮肤(查看3DS Maya之类的相关教程) - Creating a simple animation for your rig or importing some animation data to act as a test for the skinning. This should give you a quick way to evaluate whether or not the skinning looks good in motion.
为你的骨骼创建一个简单的动画或者导入一些动画数据作为一个蒙皮结果的测试。这给你一个快捷的办法来评估你的蒙皮是否在运动中看起来很好。 - Incrementally editing and refining your skinning solution.
增量地编辑和细化你的蒙皮方案。 - Sticking to a maximum of four influences when using a soft bind, since this is the maximum number that Unity will handle. If more than four influences affect part of the mesh then at least some information will be lost when playing the animation in Unity.
坚持在软绑定的时候每个顶点最多使用4个骨骼,这是Unity支持的数目上限。如果超过4个骨骼,那么在Unity播放骨骼动画时至少会有一些信息被丢失。
Interactive Skin Bind, one of many skinning methods
众多蒙皮方法之一,交互式皮肤绑定。
(back to AssetPreparationandImport)
(back to Mecanim introduction)
页面最后更新:2012-11-01
导入动画 Importing Animations
Before a character model can be used, it must first be imported into your project. Unity can import native Maya (.mb or .ma) and Cinema 4D (.c4d) files, and also generic FBX files which can be exported from most animation packages (see this page for further details on exporting). To import an animation, simply drag the model file to the Assets folder of your project. When you select the file in the Project View you can edit the Import Settings in the inspector:-
在角色模型可用之前,它必须先被导入进你的项目。Unity可以导入原生Maya(.mb或者.ma)和Cinema4D(.c4d)文件,并且也广泛地支持大多建模工具包都可以导出的FBX文件(查看此页了解更多导出的细节)。要导入动画,只需简单地拖放模型文件到你项目中的Assets文件夹。当你在项目视图中选择文件的时候你可以在inspector中编辑它的导入设定。
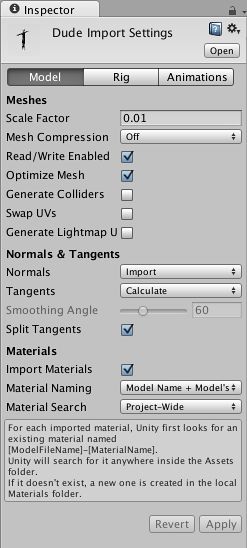
The Import Settings Dialog for a mesh
网格的导入设定对话框
See the FBX importer page for a full description of the available import options.
查看FBX导入器页面了解全部的可用导入选项描述。
Splitting animations 分割动画
(back to Mecanim introduction)
页面最后更新:2012-11-01
分割动画 Splitting Animations
An animated character typically has a number of different movements that are activated in the game in different circumstances. These movements are called Animation Clips. For example, we might have separate animation clips for walking, running, jumping, throwing, dying, etc. Depending on the way the model was animated, these separate movements might be imported as distinct animation clips or as one single clip where each movement simply follows on from the previous one. In cases where there is only a single clip, the clip must be split into its component animation clips within Unity, which will involve some extra steps in your workflow.
一个动画化的角色典型地会在游戏中不同的情况有多个不同的动作。这些动作称为动画剪辑。比如,我们可能针对走路,跑步,跳跃,投掷,死亡之类有不同的动画剪辑。依赖于模型被动画化的方法,这些分离的动作可能作为不同的动画剪辑导入,或者当每个动作是简单的之前动作的延续时作为单个动画剪辑导入。在只有一个动画剪辑的情况下,这个剪辑必须用Unity分割成它的子组件剪辑,这会在你的工作流中引入一些其他步骤。
Working with models that have pre-split animations
使用含有预先分割的动画的模型工作
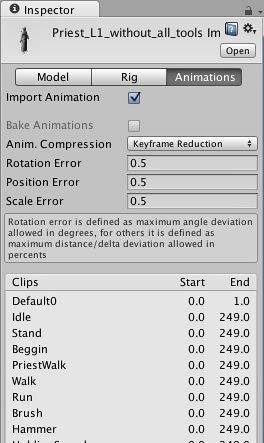
The simplest types of models to work with are those that contain pre-split animations. If you have an animation like that, the Animations tab in the Animation Importer Inspector will look like this:
使用起来最简单的模型类型是那些包含了预分割动画的。如果你有一个像那样的动画,动画导入器的Inspector中动画标签页会看起来像这样:
You will see a list available clips which you can preview by pressing Play in the Preview Window (lower down in the inspector). The frame ranges of the clips can be edited, if needed.
你将会看到一列可以在播放窗口中(inspector右下角)点击播放来预览的的动画剪辑。如果需要,帧范围可以被修改。
Working with models that have unsplit animations
使用含有未分割动画的模型工作
For models where the clips are supplied as one continuous animation, the Animation tab in the Animation Importer Inspector will look like this:
对于那些剪辑作为一个连续动画提供的模型,动画导入器Inspector中的动画标签页会看起来像这样:
In cases like this, you can define the frame ranges that correspond to each of the separate animation sequences (walking, jumping, etc). You can create a new animation clip by pressing (+) and selecting the range of frames that are included in it.
像这样4合1的情况,你可以定义符合分离动画序列(走,跳之类)的帧范围。你可以通过按下+创建一个新的动画剪辑并且选择包含动画的帧范围。
For example:
例如:
- walk animation during frames 1 - 33
走路动画在帧1-33 - run animation during frames 41 - 57
跑动画在帧41-57 - kick animation during frames 81 - 97
踢动画在帧81-97
The Import Settings Options for Animation 动画的导入设定
In the Import Settings, the Split Animations table is where you tell Unity which frames in your asset file make up which Animation Clip. The names you specify here are used to activate them in your game.
在导入设定中,分割动画表是你告诉unity哪些在你资源文件中的帧构成一个动画剪辑的地方。你在这里指定的名字将会在你的游戏中用来激活它们。
For further information about the animation inspector, see the Animation Clip component reference page.
更多关于动画inspector的内容,参看动画组件参考页。
Adding animations to models that do not contain them
增加模型不包含的动画
You can add animation clips to an Animation component even for models without muscle definitions (ie, non-Mecanim). You need to specify the default animation clip in the Animation property, and the available animation clips in the Animations property. The animation clips you add to such a non-Mecanim model should also be setup in a non-Mecanim way (ie, the Muscle Definition property should be set to None)
即使对那些没有肌肉定义的模型(也就是非Mecanim),你也可以增加动画剪辑到动画组件中。你需要在动画属性中指定默认的动画剪辑,并且在Animation属性中指定可用的动画剪辑。你在这个非Mecanim模型中指定的动画也需要使用非Mecanim的方式(也就是说,肌肉定义属性应该被设置为None)。
For models that have muscle definitions (Mecanim), the process is different:-
对于含有肌肉定义的模型(Mecanim),流程是不一样的:
- Create a New Animator Controller
创建一个新的动画控制器 - Open the Animator Controller Window
打开动画控制器窗口窗口 - Drag the desired animation clip into the Animator Controller Window
拖放想要的动画剪辑到动画控制器窗口 - Drag the model asset into the Hierarchy.
拖放模型资源到层级视图 - Add the animator controller to the Animator component of the asset.
增加动画控制器资源到资源的动画组件
Importing Animations using multiple model files
使用多个模型文件导入动画
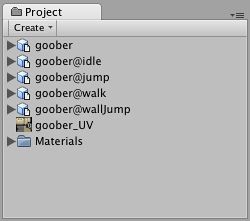
Another way to import animations is to follow a naming scheme that Unity allows for the animation files. You create separate model files and name them with the convention '[email protected]'. For example, for a model called "goober", you could import separate idle, walk, jump and walljump animations using files named "[email protected]", "[email protected]", "[email protected]" and "[email protected]". Only the animation data from these files will be used, even if the original files are exported with mesh data.
另外一种导入动画的方法是使用一个Unity允许的针对动画文件的命名方式。你创建不同的模型文件并且使用“模型名@动画名.fbx”的命名约定。比如,对一个叫“goober”的模型,你可以分别导入空闲,走路,跳跃和踢墙跳跃动画使用命名为“[email protected]”,“[email protected]”,“[email protected]”和“[email protected]”的文件。这些文件中只有动画数据会被使用,即使原有文件是同网格数据一起导出的。
An example of four animation files for an animated character (note that the .fbx suffix is not shown within Unity)
一个用4个动画文件的单个角色的例子(注意.fbx后缀在Unity中没有显示。
Unity automatically imports all four files and collects all animations to the file without the @ sign in. In the example above, the goober.mb file will be set up to reference idle, jump, walk and wallJump automatically.
Unity自动导入所有4个文件并且收集所有的动画到没有@标记的文件中。在上面的例子中,goober.mb文件将会自动建立到空闲,跳跃,走路和踢墙跳的引用。
For FBX files, simply export a model file with no animation ticked (eg, goober.fbx) and the 4 clips as goober@animname.fbx by exporting the desired keyframes for each (enable animation in the FBX dialog).
对于FBX文件,简单的导入一个没有动画的模型文件(也就是,goober.fbx)和4个命名为goober@动画名.fbx的剪辑,为每个文件导出想要的帧(在FBX对话框中选择)。
(back to Mecanim introduction)
页面最后更新:2013-01-15
