Android定制组件之Widget之昨天今天明天
传送门 ☞ 轮子的专栏 ☞ 转载请注明 ☞ http://blog.csdn.net/leverage_1229
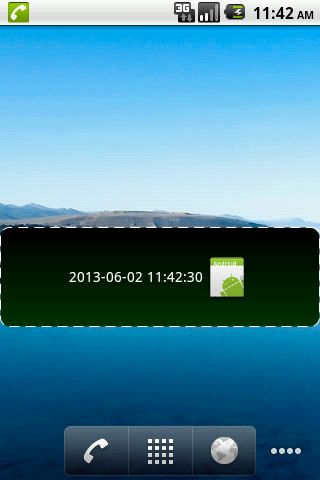
今天我们学习如何利用Widget来显示系统当前的日期和时间,下面给出该场景的案例:
1案例技术要点
(1)创建TimeWidgetProvider继承于AppWidgetProvide类,并重写如下两个方法:
onDeleted(...):当第一次向桌面添加Widgets的时候回调此方法
onEnabled(...):当最后一个同类型Widgets实例被删除时回调此方法
(2)创建TimerService继承于Service类,用于获取系统当前日期与时间。
(3)通过获取AppWidgetManager实例将TimerService和TimeWidgetProvider关联起来。
2案例代码陈列
AndroidManifest.xml
<?xml version="1.0" encoding="utf-8"?>
<manifest xmlns:android="http://schemas.android.com/apk/res/android"
    package="cn.lynn.widgets"
    android:versionCode="1"
    android:versionName="1.0" >

    <uses-sdk android:minSdkVersion="8" />
    <uses-permission android:name="android.permission.CALL_PHONE"/>
    <application
        android:icon="@drawable/ic_launcher"
        android:label="@string/app_name" >

        <receiver android:name=".TimeWidgetProvider">
            <intent-filter>
                <action android:name="android.appwidget.action.APPWIDGET_UPDATE" />
            </intent-filter>
            <meta-data android:name="android.appwidget.provider" android:resource="@xml/appwidget_info" />
        </receiver>

            <service android:name=".TimerService"></service>
    </application>

</manifest>
strings.xml
<?xml version="1.0" encoding="utf-8"?>
<resources>
    <string name="app_name">Lynn时间Widgets</string>
</resources>
main.xml
<?xml version="1.0" encoding="utf-8"?>
<LinearLayout xmlns:android="http://schemas.android.com/apk/res/android"
    android:layout_width="match_parent"
    android:layout_height="match_parent"
    android:orientation="vertical" >

    <TextView
        android:layout_width="match_parent"
        android:layout_height="wrap_content"
        android:text="@string/app_name" />

</LinearLayout>
Widget布局文件:time_appwidget.xml
<?xml version="1.0" encoding="utf-8"?>
<LinearLayout xmlns:android="http://schemas.android.com/apk/res/android"
    android:layout_width="match_parent"
    android:layout_height="match_parent"
    android:background="@drawable/rectangle"
    android:gravity="center">

    <TextView
        android:layout_width="wrap_content"
        android:layout_height="wrap_content"
        android:id="@+id/textView"
        android:textColor="#FFFFFF"
        android:textSize="14dp" />

    <ImageView
        android:layout_width="wrap_content"
        android:layout_height="wrap_content"
        android:src="@drawable/ic_launcher" />

</LinearLayout>
Widget背景文件:rectangle.xml
<?xml version="1.0" encoding="utf-8"?>
<shape
    xmlns:android="http://schemas.android.com/apk/res/android"
    android:shape="rectangle">
    <corners android:radius="9dp"/>
    <gradient
        android:angle="270"
        android:endColor="#003300"
        android:startColor="#000000" />
    <padding
        android:left="5dp"
        android:top="5dp"
        android:right="5dp"
        android:bottom="5dp" />

    <stroke
        android:width="1dp"
        android:color="#FFFFFF"
        android:dashWidth="10dp"
        android:dashGap="6dp" />
</shape>
Widget显示内容提供者:TimeWidgetProvider.java
package cn.lynn.widgets;


import android.appwidget.AppWidgetManager;
import android.appwidget.AppWidgetProvider;
import android.content.Context;
import android.content.Intent;

public class TimeWidgetProvider extends AppWidgetProvider {

    // 当用户从桌面上删除widgets的时候回调此方法
    @Override
    public void onDeleted(Context context, int[] appWidgetIds) {

    }

    // 当第一次向桌面添加Widgets时回调此方法
    @Override
    public void onEnabled(Context context) {
        context.startService(new Intent(context, TimerService.class));
    }


    // 当最后一个同类型Widgets实例被删除时回调此方法
    @Override
    public void onDisabled(Context context) {
        context.stopService(new Intent(context, TimerService.class));
    }

    @Override
    public void onUpdate(Context context, AppWidgetManager appWidgetManager, int[] appWidgetIds) {

    }

}
Widget服务管理类:TimerService.java
package cn.lynn.widgets;

import java.text.SimpleDateFormat;
import java.util.Date;
import java.util.Timer;
import java.util.TimerTask;

import android.app.PendingIntent;
import android.app.Service;
import android.appwidget.AppWidgetManager;
import android.content.ComponentName;
import android.content.Intent;
import android.net.Uri;
import android.os.IBinder;
import android.widget.RemoteViews;

public class TimerService extends Service {
    private Timer timer;

    @Override
    public void onCreate() {
        super.onCreate();
        timer = new Timer();
        timer.schedule(new TimeUpdateWork(), 0, 1000);
    }

    private final class TimeUpdateWork extends TimerTask{
        public void run() {
            SimpleDateFormat dateFormat = new SimpleDateFormat("yyyy-MM-dd HH:mm:ss");
            String time = dateFormat.format(new Date());
            RemoteViews remoteView = new RemoteViews(getPackageName(), R.layout.time_appwidget);
            remoteView.setTextViewText(R.id.textView, time);
            // 拨号意图
            PendingIntent pendingIntent = PendingIntent.getActivity(getApplicationContext(), 100,
                    new Intent(Intent.ACTION_CALL, Uri.parse("tel:18777777777")), 0);
            // 点击Widget拨打号码:18777777777
            remoteView.setOnClickPendingIntent(R.id.textView, pendingIntent);
            AppWidgetManager appWidgetManager = AppWidgetManager.getInstance(getApplicationContext());
            appWidgetManager.updateAppWidget(new ComponentName(getApplicationContext(), TimeWidgetProvider.class), remoteView);
        }
    }

    @Override
    public void onDestroy() {
        timer.cancel();
        timer = null;
        super.onDestroy();
    }

    @Override
    public IBinder onBind(Intent intent) {
        return null;
    }

}
