在VMware环境下,使用KGDB调试内核及内核模块---基于kernel 2.6.36
原文地址:在VMware环境下,使用KGDB调试内核及内核模块---基于kernel 2.6.36作者:mutes
参考博文:http://blog.csdn.net/jie12310/article/details/4564853
一、系统安装与配置
系统环境:
虚拟环境: VMWare Workstation 7.1.4(英文版)
操作系统: CentOS-6.0-i386(原内核2.6.32,将会把内核升级至2.6.36)
注:CentOS 是RedHat的一个社区版本.
(由于我们采用的linux kernel 2.6.36已经集成kgdb,kgdb再不需要单独下载)
在VM中安装CentOS 6(过程略过:详情请参见博客中的CentOS 6.0图解网络安装全过程)
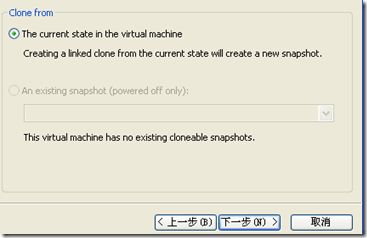
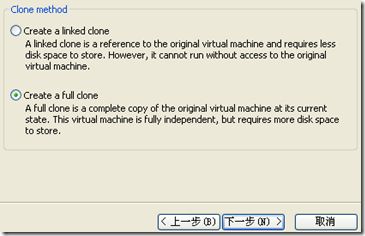
安装完成后,关闭计算机,然后Clone一台同样的计算机.步骤如下:
- 选中Create a full clone, 点击Next
- Virtual Machine name 输入Server(Targe),将克隆的机器命令为目标机.
说明一下,kgdb 需要两台计算机通过串口进行远程调试,两台计算机分别为:
- Client(Development):开发机,也称客户机,将在该计算机上进行程序的开发,GDB将在本计算机上运行.用 于输入命令控制Server(target)的运行. 我的机子IP为192.168.1.91
- Server(Target): 目标机,也称服务器,就是被调试的计算机,在Development机上开发好的内核模块程序将 拷贝到Target上运行,其运行受到Development命令的控制. 我的机子IP为192.168.1.94
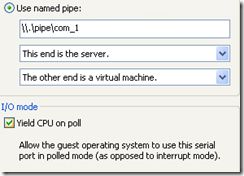
分别为两个系统增加一个串口,以"Output to named pipe"方式,其中:
- Client端选择"this end is the client", "the other end is a virtual machine"
- Server端选择"this end is the server", "the other end is a virtual machine"

备注: 两个pipe的名称要相同,并且选中下面的Connect at power on,及I/O mode 里面的Yield CPU on poll
串口添加完成后,使用如果命令测试: 注意上面使用的是com_1,串口设备应该是ttyS1
在Server上cat /dev/ttyS1
然后到Client上 echo "hello" > /dev/ttyS1
这时回到Server上,如果能看到输入的hello,说明串口通讯正常.
二、升级内核2.6.36(添加关于KGDB的选项)
说明一下,这里是要升级Server的内核,因为kgdb是要Server上运行的,但是编译需要在Client完成(或者你也可以在Server上编译,之后再拷贝到Client上),因为调试时Client上的gdb会用到编译的内核及源代码.Client也需要升级,保证Client同Server上的内核一致,这样Client上编译的模块拿到Server上加载就不会有什么问题.
1、首先下载kernel 2.6.36
我习惯在windows上下载,然后共享,再到linux使用smbclient连接,拷贝到Linux上.你也可以直接在linux上下载.
下载地址:ftp://ftp.kernel.org/pub/linux/kernel/v2.6/linux-2.6.36.tar.bz2
smbclient用法 : smbclient //192.168.1.91/share -U administrator 回车后,会提示输入admin的密码.之后就可以通过get获取了 192.168.1.91是我在windows主机的IP,share为共享名,-U后面是用户名
2、编译Kernel2.6.36
进入Client(Development)系统,将linux-2.6.36.tar.bz2拷贝到/usr/src目录下:
cd /usr/src
tar jxvf linux-2.6.36.tar.bz2
ln -s linux-2.6.36 linux
cd linux
make menuconfig
File System --> 下面把ext3,ext2都编译进内核(就是把前面的M变成*)
Kernel Hacking -->
选中Compile the kernel with frame pointers
选中(早期版本是KGDB:kernel debugging with remote gdb )
[*] KGDB: kernel debugger --->
<*> KGDB: use kgdb over the serial console
并确认以下两项也是选中的(他们应该默认是选中的)
> kernel debugging
> Compile the kernel with debug infoCONFIG_KGDB=y
CONFIG_KGDB_SERIAL_CONSOLE=y
选项在 Kernel hacking 里可以找到
同时,为了能在系统运行时中断系统并出发远程 gdb,必须打开内核 Magic Sys-Rq 键选项 :
CONFIG_MAGIC_SYSRQ=y
打开内核符号调试:
CONFIG_DEBUG_INFO=y
注意事项:
CONFIG_DEBUG_RODATA 必须被禁用,否则kgdb讲无法正常使用。对于其它选项,请按实际情况,或你的要求定制.在其它网友的说明里面,会有Serial port number for KGDB等选项,但是我使用的版本未找到这些选项,所以忽略过.
保存退出
make -j10 bzImage
-j10表示使用10个线程进行编译.
make modules
编译内核模块
3、将Client系统中的linux-2.6.36整个目录同步到Server上.
scp -r linux-2.6.36 root@Server(Target)IP:/usr/src/
在Client系统上运行下列命令:
cd /usr/src/linux
scp -r linux-2.6.36 192.168.1.94:/usr/src
The authenticity of host '192.168.1.94 (192.168.1.94)' can't be established.
RSA key fingerprint is b8:c5:c6:48:52:d8:43:39:4c:0a:17:b4:23:4d:10:08.
Are you sure you want to continue connecting (yes/no)? yes
Warning: Permanently added '192.168.1.94' (RSA) to the list of known hosts.[email protected]'s password:
.tmp_kallsyms2.S 100% 4992KB 4.9MB/s 00:00
.tmp_vmlinux1 100% 134MB 9.0MB/s 00:15
Makefile 100% 51KB 50.6KB/s 00:00
.config 100% 109KB 108.6KB/s 00:00
ffs-test.c 100% 12KB 12.4KB/s 00:00
系统会提示输入root的密码,输入完了就会开始复制文件了,(这里要注意,如果原系统已经是2.6.36的内核,可以只拷贝arch/i386/boot/bzImage,及System.map文件到Server上,然后修改/boot/grub/grub.conf,但由于我是从2.6.32升级上来,所以需要将整个linux原代码目录拷贝到Server上进行升级)
升级Srever系统的内核
进入Server(Target)系统,usr/src目录:
ln -s linux-2.6.36 linux
cd linux
make modules_install
安装内核模块
make install
安装内核
安装完成后,在/boot/目录下会有即个新添加的文件./boot/grub/grub.conf文件也会添加一个新的启动项,我的如下(行号不是文件的一部分):
1 # grub.conf generated by anaconda
2 #
3 # Note that you do not have to rerun grub after making changes to this file
4 # NOTICE: You have a /boot partition. This means that
5 # all kernel and initrd paths are relative to /boot/, eg.
6 # root (hd0,0)
7 # kernel /vmlinuz-version ro root=/dev/sda3
8 # initrd /initrd-[generic-]version.img
9 #boot=/dev/sda
10 default=2
11 timeout=5
12 splashimage=(hd0,0)/grub/splash.xpm.gz
13 hiddenmenu
14 title CentOS Linux (2.6.36)
15 root (hd0,0)
16 kernel /vmlinuz-2.6.36 ro root=UUID=621a2150-5762-493a-9074-dd0b25cc02a1 rd_NO_LUKS rd_NO_LVM rd_NO_MD rd_NO_DM LANG=zh_
CN.UTF-8 KEYBOARDTYPE=pc KEYTABLE=us crashkernel=auto rhgb quiet
17 initrd /initramfs-2.6.36.img
18 title CentOS Linux (2.6.32-71.29.1.el6.i686.debug)
19 root (hd0,0)
20 kernel /vmlinuz-2.6.32-71.29.1.el6.i686.debug ro root=UUID=621a2150-5762-493a-9074-dd0b25cc02a1 rd_NO_LUKS rd_NO_LVM rd_
NO_MD rd_NO_DM LANG=zh_CN.UTF-8 KEYBOARDTYPE=pc KEYTABLE=us crashkernel=auto rhgb quiet
21 initrd /initramfs-2.6.32-71.29.1.el6.i686.debug.img
22 title CentOS Linux (2.6.32-71.29.1.el6.i686)
23 root (hd0,0)
24 kernel /vmlinuz-2.6.32-71.29.1.el6.i686 ro root=UUID=621a2150-5762-493a-9074-dd0b25cc02a1 rd_NO_LUKS rd_NO_LVM rd_NO_MD
rd_NO_DM LANG=zh_CN.UTF-8 KEYBOARDTYPE=pc KEYTABLE=us crashkernel=auto rhgb quiet
25 initrd /initramfs-2.6.32-71.29.1.el6.i686.img
26 title centos (2.6.32-71.el6.i686)
27 root (hd0,0)
28 kernel /vmlinuz-2.6.32-71.el6.i686 ro root=UUID=621a2150-5762-493a-9074-dd0b25cc02a1 rd_NO_LUKS rd_NO_LVM rd_NO_MD rd_NO
_DM LANG=zh_CN.UTF-8 KEYBOARDTYPE=pc KEYTABLE=us crashkernel=auto rhgb quiet
29 initrd /initramfs-2.6.32-71.el6.i686.img
注意里面的NOTICE说明,我的系统/boot是一个独立的分区,所以下面配置的文件路径都是相对于/boot/目录的,像 /vmlinuz-2.6.36,实际到它的绝对位置应该是/boot/vmlinuz-2.6.36. 在你的系统上请根据实际情况处理.
修改一下grub.conf,修改成下面这样:
[root@just linux]# vim /boot/grub/grub.conf
1 # grub.conf generated by anaconda
2 #
3 # Note that you do not have to rerun grub after making changes to this file
4 # NOTICE: You have a /boot partition. This means that
5 # all kernel and initrd paths are relative to /boot/, eg.
6 # root (hd0,0)
7 # kernel /vmlinuz-version ro root=/dev/sda3
8 # initrd /initrd-[generic-]version.img
9 #boot=/dev/sda
10 default=2
11 timeout=5
12 splashimage=(hd0,0)/grub/splash.xpm.gz
13 hiddenmenu
14 title CentOS Linux (2.6.36)
15 root (hd0,0)
16 kernel /vmlinuz-2.6.36 ro root=UUID=621a2150-5762-493a-9074-dd0b25cc02a1 rd_NO_LUKS rd_NO_LVM rd_NO_MD rd_NO_DM LANG=zh_
CN.UTF-8 KEYBOARDTYPE=pc KEYTABLE=us crashkernel=auto rhgb quiet dboc=ttyS1,115200
17 initrd /initramfs-2.6.36.img
18 title CentOS Linux (2.6.36) Wait...(kernel debug)
19 root (hd0,0)
20 kernel /vmlinuz-2.6.36 ro root=UUID=621a2150-5762-493a-9074-dd0b25cc02a1 rd_NO_LUKS rd_NO_LVM rd_NO_MD rd_NO_DM LANG=zh_
21 CN.UTF-8 KEYBOARDTYPE=pc KEYTABLE=us crashkernel=auto rhgb quiet kgdboc=ttyS1,115200 kgdbwait
22 initrd /initramfs-2.6.36.img
23 title CentOS Linux (2.6.32-71.29.1.el6.i686.debug)
24 root (hd0,0)
25 kernel /vmlinuz-2.6.32-71.29.1.el6.i686.debug ro root=UUID=621a2150-5762-493a-9074-dd0b25cc02a1 rd_NO_LUKS rd_NO_LVM rd_
NO_MD rd_NO_DM LANG=zh_CN.UTF-8 KEYBOARDTYPE=pc KEYTABLE=us crashkernel=auto rhgb quiet
26 initrd /initramfs-2.6.32-71.29.1.el6.i686.debug.img
27 title CentOS Linux (2.6.32-71.29.1.el6.i686)
28 root (hd0,0)
29 kernel /vmlinuz-2.6.32-71.29.1.el6.i686 ro root=UUID=621a2150-5762-493a-9074-dd0b25cc02a1 rd_NO_LUKS rd_NO_LVM rd_NO_MD
rd_NO_DM LANG=zh_CN.UTF-8 KEYBOARDTYPE=pc KEYTABLE=us crashkernel=auto rhgb quiet
30 initrd /initramfs-2.6.32-71.29.1.el6.i686.img
31 title centos (2.6.32-71.el6.i686)
32 root (hd0,0)
33 kernel /vmlinuz-2.6.32-71.el6.i686 ro root=UUID=621a2150-5762-493a-9074-dd0b25cc02a1 rd_NO_LUKS rd_NO_LVM rd_NO_MD rd_NO
_DM LANG=zh_CN.UTF-8 KEYBOARDTYPE=pc KEYTABLE=us crashkernel=auto rhgb quiet
34 initrd /initramfs-2.6.32-71.el6.i686.img
说明:
第一个启动项在原来的基础上添加了kgdb的参数kgdboc=ttyS0,115200
kgdboc 的意思是 kgdb over console,这里将kgdb连接的console设置为ttyS1,波特率为115200,如果不在内核启动项中配置该参数,可以在进入系统后执行命令:
echo ttyS1 > /sys/module/kgdboc/parameters/kgdboc
第二个启动项,同第一个使用同一个内核,只是添加了kgdbwait参数
kgdbwait 使 kernel 在启动过程中等待 gdb 的连接。
我的启动菜单如下:
CentOS(2.6.36)
CentOS(2.6.36)Wait...(kernel debug)
CentOS Linux (2.6.32-71.29.1.el6.i686.debug)CentOS Linux (2.6.32-71.29.1.el6.i686)
CentOS Linux (2.6.32-71.el6.i686)
调用内核模块,就选择第一个,如果要调试内核启动过程,选择第二个.
三、内核调试
重启Server,通过启动菜单第二项CentOS(2.6.36)Wait...(kernel debug)进入系统. 只到系统出现:
kgdb: Waiting for connection from remote gdb
进入Client系统.
cd /usr/src/linux
gdb vmlinux
启动gdb开始准备调试:输出大致如下:
GNU gdb (GDB) Red Hat Enterprise Linux (7.1-29.el6)
Copyright (C) 2010 Free Software Foundation, Inc.
License GPLv3+: GNU GPL version 3 or later <http://gnu.org/licenses/gpl.html>
This is free software: you are free to change and redistribute it.
There is NO WARRANTY, to the extent permitted by law. Type "show copying"
and "show warranty" for details.
This GDB was configured as "i686-redhat-linux-gnu".
For bug reporting instructions, please see:
<http://www.gnu.org/software/gdb/bugs/>...
Reading symbols from /usr/src/linux-2.6.36/vmlinux...done.
(gdb) set remotebaud 115200
(gdb) target remote /dev/ttyS1
注意:有的文章讲:因为vmware的named piped不能被gdb直接使用,需要使用 socat -d -d /tmp/com_1 /dev/ttyS1转换,然后使用转换后的设备. socat需要自己下载安装. 但在我的环境中,直接使用并没有出错.
执行该命令后输出如下:
Remote debugging using /dev/ttyS1
kgdb_breakpoint (new_dbg_io_ops=0xc09f47e0) at kernel/debug/debug_core.c:969
969 wmb(); /* Sync point after breakpoint */
看到上面的内容说明已经连接成功,但Server上依然是假死状态,这时你可以像使用本地gdb一样设置断点(break),单步执行(step),或其它命令.
(gdb) cont
继续执行,Server就继续下面的系统初始化了.
系统启动完成后的内核调试:
进入Server后,执行命令
echo g > /proc/sysrq-trigger
系统同样会中断,进入假死状态,等待远程gdb的连接.KGDB可能会输出如下信息:
[New Thread 2164]
Program received signal SIGTRAP, Trace/breakpoint trap.
[Switching to Thread 2164]
kgdb_breakpoint (key=<value optimized out>) at kernel/debug/debug_core.c:969
969 wmb(); /* Sync point after breakpoint */
(gdb)
输入cont恢复正常
(gdb) cont
Continuing.
上面的命令(echo g > /proc/sysrq-trigger)可以有一个快捷键(ALT-SysRq-G)代替,当然前提是你编译内核时需要选中相关选项,并且需要修改配置文件:/etc/sysctl.conf , 我用了一下,不太好用.因为有的桌面系统中PrintScreen/SysRq键是用于截屏的.所以还是直接用命令来的好!
我在~/.bashrc中添加了一句(添加完保存后,要执行source ~/.bashrc应用该配置):
alias debug='echo g > /proc/sysrq-trigger'
之后就可以直接输入debug来使内核进入调试状态.
Server进入调试状态后,转换到Client系统,重复上面的步骤.
四. Linux内核模块(设备驱动)的调试
编写内核模块,及Makefile
我使用的例子是Linux Device Driver 3中的例子scull. 你可以从这里下载LDD3的所有例子程序.
进入Client系统,解压example.tar.gz,将其中的example/scull目录拷贝到/root/scull
然后执行:
cd /root/scull
make
编译应该会出错,因为Linux Device Driver 3的例子程序是基于2.6.10内核的,请参靠下面的说明修改这些错误:
编译scull驱动,完成后,scull目录应该多出了scull.ko及其它中间文件.
scp scull.ko root@targetIp:/root/
将scull.ko模块文件拷贝到Server上.系统应该会提示输入密码:
root@targetIp's password:
输入正确密码后,应该能看到如下信息,表示复制成功了:
scull.ko 100% 258k 258.0kb/s 00:00
进入Server系统输入:
cd /root/
insmod scull.ko
加载scull模块.
cat /sys/module/globalmem/sections/.text
显示scull模块的.text段地址.运行该命令后,会返回一个16进制的地址,如:
0xd099a000
echo g > /proc/sysrq-trigger
现在Server系统变成等待状态.
再次进入Client系统:
cd /usr/src/linux
gdb vmlinux
(gdb) set remotebaud 115200
(gdb) target remote /dev/ttyS1
kgdb_breakpoint (new_dbg_io_ops=0xc09f47e0) at kernel/debug/debug_core.c:969
969 wmb(); /* Sync point after breakpoint */
出现上面的信息表示连接成功,但此时还不可以设置断点.我试了N次,现在设置端点后,无论Server上对scull做什么操作,Client上的gdb都不会停止.也有人说这是gdb的BUG,gdb无法正常解析内核模块的符号信息. 说是下载kgdb网站上的gdbmod可以解决该问题,但我试了之后发现根本没有用. 所以只能通过命令手动加载相关符号信息:
(gdb) add-symbol-file /root/scull/scull.ko 0xd099a000
注意: 0xd099a000地址是在上面获取的,命令输入完了,系统会有如下提示信息(第二行后面的y是自己输入的:
add symbol table from file "/root/scull/scull.ko" at .text_addr = 0xd099a000 (y or n)y Reading symbols from /root/scull/scull.ko...done.
(gdb)break scull_write
Breakpoint 1 at 0xd099a2d9: file /root/scull/main.c,line 338.
(gdb)break scull_read
Breakpoint 2 at 0xd099a1a2: file /root/scull/main.c,line 294
(gdb)cont
Continuing
Client上的工作暂停,回到Server系统上:
Server现在处于运行状态,在Server上运行下面的命令:
cat /proc/devices | grep "scull"
查看scull模块分配的major.我的系统中返回如下:
253 scull 253 scullp 253 sculla
mknod /dev/scull c 253 0
253是刚才查询到的版本号.
echo "this is a test " > /dev/scull
测试输入函数:scull_write. 该命令输入完成后,进程应该会停下来, 请切换到Client系统.
cat /dev/scull
测试输出函数:scull_read. 该命令输入完成后,进程应该会停下来, 请切换到Client系统.
回到Client系统,应该能看到gdb的输出信息:
Breakpoint 1, scull_write (filp=0xce5870c0,buf=0xb7f44000 "this is a test/nias | /usr/bin/which --tty-only --read-alias --show-dot --show-tilde'/n",count=15,f_pos=0xce5c5f9c) at /root/scull/main.c:338 338 { (gdb)_
现在就可以像调试本地程序一样调试scull.ko模块了.
以同样的方法也可以调试其它函数.(初始化函数暂时没想到办法调试,因为使用这种方法需要先加载后,才可以进行调试)
如果可以,我想写一个脚本自动完成这个添加符号文件的过程,简化调试过程.
Linux Device Driver 3rd中的scull 例程在2.6.36上编译出错的问题
1。scripts/Makefile.build:46: *** CFLAGS was changed in "examples/scull/Makefile". Fix it to use EXTRA_CFLAGS。 停止。
解决方法:将 Makefile 中的 CFLAGS 改为 EXTRA_CFLAGS
2. examples/scull/main.c:17:26: error: linux/config.h: 没有该文件或目录
解决方法: 将 main.c 中的这条 include 语句注释掉。
3. examples/scull/access.c: 在函数‘scull_u_open’中: examples/scull/access.c:107: 错误: 提领指向不完全类型的指针
解决方法:access.c 中添加:#include <linux/sched.h>
4. examples/scull/access.c: 在函数‘scull_access_setup’中:
examples/scull/access.c:355: 警告: 格式字符串不是一个字面字符串而且没有待格式化的实参
解决方法:将 kobject_set_name(&dev->cdev.kobj, devinfo->name); 改为:
kobject_set_name(&dev->cdev.kobj, "%s", devinfo->name);
因为 kobject_set_name 有一个像 printf 一样的参数表。
补充 : 老外作的改动http://www.cs.fsu.edu/~baker/devices/lxr/source/2.6.25/ldd-examples/基本上已经可以编译了
[root@just linux]# make menuconfig
HOSTCC scripts/basic/fixdep
HOSTCC scripts/basic/docproc
HOSTCC scripts/basic/hash
HOSTCC scripts/kconfig/conf.o
HOSTCC scripts/kconfig/kxgettext.o
*** Unable to find the ncurses libraries or the
*** required header files.
*** 'make menuconfig' requires the ncurses libraries.
***
*** Install ncurses (ncurses-devel) and try again.
***
make[1]: *** [scripts/kconfig/dochecklxdialog] íó 1
make: *** [menuconfig] íó 2
[root@just linux]# yum install ncurses-devel

