七步实现directjngine、Ext Direct调用Java服务器端方法
最近学习Ext高级用法,发现Ext 3.x中的新特性之一的 Direct貌似不错。网上搜索,发现directjngine对Ext Direct 支持不错。于是去官网下载了directjngine[1].1.3.zip,算是比较新的项目包。
根据DirectJNgine_User_Guide,一步步搭建第一个directjngine的demo。
第一步,在web.xml中配置DirectJNgine Servlet.我配置的web.xml如下:
- <?xml version="1.0" encoding="UTF-8"?>
- <web-app version="2.5"
- xmlns="http://java.sun.com/xml/ns/javaee"
- xmlns:xsi="http://www.w3.org/2001/XMLSchema-instance"
- xsi:schemaLocation="http://java.sun.com/xml/ns/javaee
- http://java.sun.com/xml/ns/javaee/web-app_2_5.xsd">
- <!-- 以下为DirectJNgine servlet 默认配置-->
- <servlet>
- <servlet-name>DjnServlet</servlet-name>
- <servlet-class>com.softwarementors.extjs.djn.servlet.DirectJNgineServlet</servlet-class>
- <init-param>
- <param-name>debug</param-name>
- <param-value>true</param-value>
- </init-param>
- <init-param>
- <param-name>providersUrl</param-name>
- <param-value>djn/directprovider</param-value>
- </init-param>
- <!-- DirectJNgine servlet 默认配置-->
- <!-- api域:对应下面的各个param-name的前缀,可以设置多个不同的域-->
- <init-param>
- <param-name>apis</param-name>
- <param-value>
- mynamespace
- </param-value>
- </init-param>
- <!-- mynamespace对应上面的api域。MyAction对应生成的js相应的文件夹.服务器运行后,将在MyAction/下存放自动生成的3个js文件。这里的名称分别为
- MyActionApi.js,MyActionApi-debug.js,MyActionApi-min.js
- -->
- <init-param>
- <param-name>mynamespace.apiFile</param-name>
- <param-value>MyAction/MyActionApi.js</param-value>
- </init-param>
- <!-- mynamespace.对应上面的域."Ext.zhouyang"为命名空间所对应的值。会在页面加载时候用上. -->
- <init-param>
- <param-name>mynamespace.apiNamespace</param-name>
- <param-value>Ext.zhouyang</param-value>
- </init-param>
- <!-- mynamespace.对应上面的域. 要使用的类的全路径名 -->
- <init-param>
- <param-name>mynamespace.classes</param-name>
- <param-value>
- com.softwarementors.extjs.djn.MyAction.MyAction
- </param-value>
- </init-param>
- <load-on-startup>1</load-on-startup>
- </servlet>
- <servlet-mapping>
- <servlet-name>DjnServlet</servlet-name>
- <url-pattern>/djn/directprovider/*</url-pattern>
- </servlet-mapping>
- <welcome-file-list>
- <welcome-file>
- index.html
- </welcome-file>
- </welcome-file-list>
- </web-app>
相关的参数的注释说明,我已经加载web.xml中了。
第二步,使你的服务器端方法对JavaScript可见,其实就是说对客户端可见。
以我的demo为例,我想在hello.html中调用服务器端的方法。于是,我在hello.html中添加如下一段话。
- <!--以下为DirectJNgine的基础JS文件,放在djn目录下,直接引用就可以。-->
- <script type="text/javascript" src="../djn/djn-remote-call-support.js"></script>
- <script type="text/javascript" src="../ejn/ejn-assert.js"></script>
- <!--以上为DirectJNgine的基础JS文件.-->
- <script type="text/javascript" src="MyActionApi.js"></script>
前两个script引用,是用来调用directjngine提供的默认的一些操作函数。只需引用即可,不需要关注太多。
最后一个js,在启动服务器前,你是看不到的。因为它是directjngine项目,根据你的配置自动生成的。至于其中到底是怎样,下面我会详细介绍。
第三步,设计服务器端的方法。如函数名称,是否需要返回值等等。因为在hello.html页面,我将会调用方法。
具体调用代码将在最后的hello.html代码说明部分进行集中说明。
第四步,使用Java语言,编写服务器端的方法。附上代码如下:
- package com.softwarementors.extjs.djn.MyAction;
- import com.softwarementors.extjs.djn.config.annotations.DirectMethod;
- public class MyAction {
- @DirectMethod
- public String doEcho(String parm)
- {
- return "参数是" + parm;
- }
- @DirectMethod
- public String doShow()
- {
- return "i am not easy";
- }
- }
注意:
@DirectMethod这个标签很重要,就是通过这个标签和web.xml的一些配置,才会动态生成第二步中需要引入的js。这种书写方式下,你在Java代码中书写的方法名称就是你在前台JS调用的方法名称。如果你觉得这样子不安全,或是不专业。那么可以通过定义别名的方法对方法进行访问。书写形式如下:
@DirectMethod( method="nameyouwant")
这样子定义之后,前台JS调用服务器端方法时,方法的名称就是你红色定义的名称了。
把类编译好后,把class文件放入WEB-INF/classes相应的包目录下。要与web.xml中class文件的包的目录结构相同。
第五步,告诉DirectJNgine 去哪里寻找服务器端的方法。
在web.xml的配置中,有如下代码:
- <init-param>
- <param-name>mynamespace.classes</param-name>
- <param-value>
- com.softwarementors.extjs.djn.MyAction.MyAction
- </param-value>
- </init-param>
在这里需要注意,mynamespace.classes的红色部分,一定要与web.xml上面的apis变量的mynamespace相同。
其次,com.softwarementors.extjs.djn.MyAction.MyAction为第四步中书写的类的全路径名称,如果有多个类,则用英文逗号分隔。
第六步,为了让Extjs可以调用我们的服务器端方法,我们需要注册一个远程调用提供者即a remoting provider。你需要做的就是在hello.html代码中,加入如下语句,为某一个空间注册一个远程调用提供者:
- //此处通过命名空间,添加初始化远程调用API
- Ext.zhouyang.REMOTING_API.enableBuffer = 0;
- Ext.Direct.addProvider(Ext.zhouyang.REMOTING_API);
注意:上面的Ext.zhouyang为在web.xml变量中mynamespace.apiNamespace已经定义。
第七步,通过JavaScript进行调用服务器端的方法。
- MyAction.doShow(function(result, e){
- var t = e.getTransaction();
- if(e.status){
- out.append(
- String.format('<p><b>Successful call to {0}.{1} with response:</b><xmp>{2}</xmp></p>',
- t.action,
- t.method,
- Ext.encode(result)));
- }else{
- out.append(
- String.format('<p><b>Call to {0}.{1} failed with message:</b><xmp>{2}</xmp></p>',
- t.action,
- t.method,
- e.message));
- }
- out.el.scroll('b', 100000, true);
- });
- //doEcho函数,此函数有参数。
- var parm = txtparm.value; //要传入后台的参数
- MyAction.doEcho(parm, function(result, e){
- var t = e.getTransaction();
- if(e.status){
- out.append(String.format('<p><b>Successful call to {0}.{1} with response:</b><xmp>{2}</xmp></p>',
- t.action, t.method, Ext.encode(result)));
- }else{
- out.append(String.format('<p><b>Call to {0}.{1} failed with message:</b><xmp>{2}</xmp></p>',
- t.action, t.method, e.message));
- }
- out.el.scroll('b', 100000, true);
- });
上面的代码排版有点乱,这里先做些说明,这个demo的下载网址,我最后会附送。可以直接查看代码。
可以看到,对于函数的结构。如果需要传入参数,则把参数写在函数前面。
因为JavaScript调用服务器端方法是异步的,所以,最好的方法就是定义一个回调函数处理数据,而不是让程序终止。
所以,对于上面的两个方法,最后都定义了一个回调函数。这个函数的作用是用来处理服务器端返回的数据。
参数result是服务器端方法返回的数据,e是一个even对象,包括一个事务对象,这个对象包含action和method的名称和其他一些信息。
e.status表示服务器端成功执行了函数。如果返回false,则表示服务器端出现了错误。通过e.message就可以查看出错信息。
其他参数说明:
- <init-param>
- <param-name>debug</param-name>
- <param-value>true</param-value>
- </init-param>
如果设置为true,在tomcat的log目录下的stdout_2010****.log文件中会输入相关的打印信息。如:
- INFO : com.softwarementors.extjs.djn.servlet.DirectJNgineServlet - "Servlet GLOBAL configuration: debug=true, providersUrl=djn/directprovider, minify=true, batchRequestsMultithreadingEnabled=true, batchRequestsMinThreadsPoolSize=16, batchRequestsMaxThreadsPoolSize=80, batchRequestsMaxThreadsPerRequest=8, batchRequestsMaxThreadKeepAliveSeconds=60, gsonBuilderConfiguratorClass=com.softwarementors.extjs.djn.gson.DefaultGsonBuilderConfigurator, dispatcherClass=com.softwarementors.extjs.djn.servlet.ssm.SsmDispatcher, jsonRequestProcessorThreadClass=com.softwarementors.extjs.djn.servlet.ssm.SsmJsonRequestProcessorThread, contextPath=--not specified: calculated via Javascript--, createSourceFiles=true" ()
- INFO : com.softwarementors.extjs.djn.servlet.DirectJNgineServlet - "Servlet GLOBAL configuration: registryConfiguratorClass=" ()
- INFO : com.softwarementors.extjs.djn.servlet.DirectJNgineServlet - "Servlet APIs configuration: apis=mynamespace" ()
- INFO : com.softwarementors.extjs.djn.servlet.DirectJNgineServlet - "Servlet 'mynamespace' Api configuration: apiNamespace=Ext.zhouyang, actionsNamespace=, apiFile=MyAction/MyActionApi.js => Full api file: C:/Program Files/Apache Software Foundation/Tomcat 6.0/webapps/directdemo/MyAction/MyActionApi.js, classes=com.softwarementors.extjs.djn.MyAction.MyAction" ()
- INFO : com.softwarementors.extjs.djn.jscodegen.CodeFileGenerator - "Creating source files for APIs..." ()
如果非调试状态,则可以置为false。
完成上面的步骤后,启动tomcat,发现在/Tomcat 6.0/webapps/directdemo/MyAction目录下生成了三个文件。
如下:
MyActionApi.js,MyActionApi-debug.js,MyActionApi-min.js。其中的MyActionApi.js就是我们在第二步中引入的JavaScript。
它的作用相当于Server端代码的API一样,因为有它的存在,客户端的网页才知道服务器端都定义了些什么方法。我的demo中,生成的MyActionApi.js的代码如下:
- /**********************************************************************
- *
- * Code generated automatically by DirectJNgine
- * Copyright (c) 2009, Pedro Agulló Soliveres
- *
- * DO NOT MODIFY MANUALLY!!
- *
- **********************************************************************/
- Ext.namespace( 'Ext.zhouyang');
- Ext.zhouyang.PROVIDER_BASE_URL=window.location.protocol + '//' + window.location.host + '/' + (window.location.pathname.split('/').length>2 ? window.location.pathname.split('/')[1]+ '/' : '') + 'djn/directprovider';
- Ext.zhouyang.POLLING_URLS = {
- }
- Ext.zhouyang.REMOTING_API = {
- url: Ext.zhouyang.PROVIDER_BASE_URL,
- type: 'remoting',
- actions: {
- MyAction: [
- {
- name: 'doEcho'/*(String) => String */,
- len: 1,
- formHandler: false
- },
- {
- name: 'doShow'/*() => String */,
- len: 0,
- formHandler: false
- }
- ]
- }
- }
可以看到,包括函数名称,参数类型,参数个数等都有定义。
至此,directjngine、Ext Direct调用Java服务器端方法大功告成。
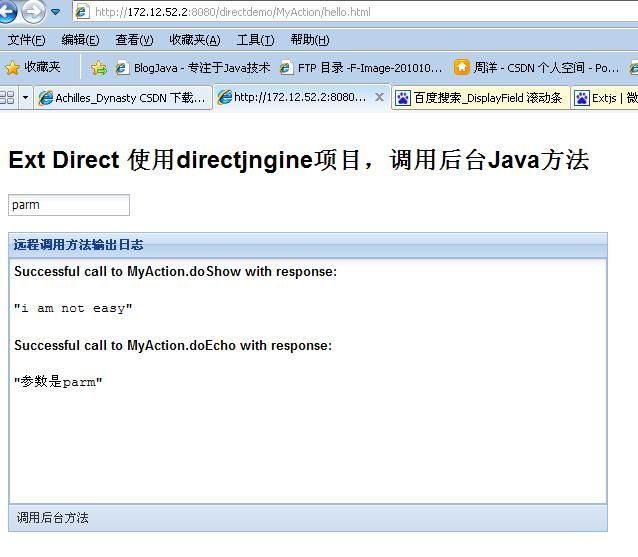
demo运行效果图如下:
demo下载地址如下,老规矩,不要下载分:
http://download.csdn.net/source/2768164
