android - SharedPreferes
SharedPreferes
SharedPreferences是Android平台上一个轻量级的存储类,主要是保存一些常用的配置比如窗口状态,一般在Activity中 重载窗口状态onSaveInstanceState保存一般使用SharedPreferences完成,它提供了Android平台常规的Long长 整形、Int整形、String字符串型的保存,它是什么样的处理方式呢?SharedPreferences类似过去Windows系统上的ini配置文件,但是它分为多种权限,可以全局共享访问,android123提示最 终是以xml方式来保存,整体效率来看不是特别的高,对于常规的轻量级而言比SQLite要好不少,如果真的存储量不大可以考虑自己定义文件格式。xml 处理时Dalvik会通过自带底层的本地XML Parser解析,比如XMLpull方式,这样对于内存资源占用比较好。
这种方式应该是用起来最简单的Android读写外部数据的方法了。他的用法基本上和 J2SE(java.util.prefs.Preferences)中的用法一样,以一种简单、 透明的方式来保存一些用户个性化设置的字体、颜色、位置等参数信息。一般的应用程序都会提供“设置”或者“首选项”的这样的界面,那么这些设置最后就可以 通过Preferences来保存,而程序员不需要知道它到底以什么形式保存的,保存在了什么地方。当然,如果你愿意保存其他的东西,也没有什么限制。只是在性能上不知道会有什么问题。
在Android系统中,这些信息以XML文件的形式保存在
/data/data/PACKAGE_NAME /shared_prefs 目录下。
SharedPreferences pre =getSharedPreferences("soft",
Context.MODE_WORLD_READABLE);
在这里我们可以调用 activity 为我们提供的方法,这个方法有两个参数:
1). 文件名 。 在这里要特别注意 。 因为在Android 中已经确定了 SharedPreferences 是以 xm l形式保存,所以,在填写文件名参数时,不要给定 ”.xml ” 后缀,android 会自动添加 。它是采用键值对的形式保存参数 。 当你需要获得某个参数值时 , 按照参数的键索引即可。
2). 第二个可以理解为创建模式和之前的文件存储的模式是一样的。
Context.MODE_PRIVATE
Context. MODE_APPENDMODE_APPEND
Context.MODE_WORLD_READABLE
Context.MODE_WORLD_WRITEABLE
实验步骤
1、 资源
| <string name="name_text">姓名</string> <string name="age_text">年龄</string> <string name="save_text">提交</string> |
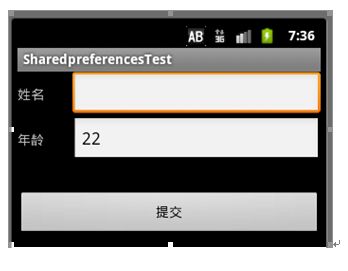
2、 布局
| <?xml version="1.0" encoding="utf-8"?> <LinearLayout xmlns:android="http://schemas.android.com/apk/res/android" android:layout_width="fill_parent" android:layout_height="fill_parent" android:orientation="vertical" >
<LinearLayout android:layout_width="fill_parent" android:layout_height="wrap_content" android:orientation="horizontal" >
<TextView android:layout_width="wrap_content" android:layout_height="wrap_content" android:layout_marginRight="30dp" android:text="@string/name_text" />
<EditText android:id="@+id/nameEt" android:layout_width="fill_parent" android:layout_height="wrap_content" /> </LinearLayout>
<LinearLayout android:layout_width="fill_parent" android:layout_height="wrap_content" android:orientation="horizontal" >
<TextView android:layout_width="wrap_content" android:layout_height="wrap_content" android:layout_marginRight="30dp" android:text="@string/age_text" />
<EditText android:id="@+id/ageEt" android:layout_width="fill_parent" android:layout_height="wrap_content" /> </LinearLayout>
<Button android:id="@+id/saveBtn" android:layout_marginTop="30dp" android:layout_width="fill_parent" android:layout_height="wrap_content" android:text="@string/save_text" /> </LinearLayout> |
3、 实现保存
| private void findViews() { nameEt = (EditText) this.findViewById(R.id.nameEt); ageEt = (EditText) this.findViewById(R.id.ageEt); saveBtn = (Button) this.findViewById(R.id.saveBtn);
saveBtn.setOnClickListener(new View.OnClickListener() {
public void onClick(View v) {
String name = nameEt.getText().toString().trim(); int age = Integer.valueOf(ageEt.getText().toString().trim());
SharedPreferences sharedPreferences = SharedpreferencesTestActivity.this .getSharedPreferences("myOption", MODE_PRIVATE); Editor editor = sharedPreferences.edit(); editor.putString("name" ,name); editor.putInt("age", age);
editor.commit(); } }); } |
4、 添加读取功能
资源添加
| <string name="read_text">读取</string> |
布局修改为
| … <TableLayout android:layout_width="fill_parent" android:layout_height="wrap_content" android:layout_margin="15dp" android:stretchColumns="*">
<TableRow > <Button android:id="@+id/saveBtn" android:layout_width="wrap_content" android:layout_height="wrap_content" android:layout_marginTop="30dp" android:text="@string/save_text" />
<Button android:id="@+id/readBtn" android:layout_width="wrap_content" android:layout_height="wrap_content" android:layout_marginTop="30dp" android:text="@string/read_text" /> </TableRow> </TableLayout> |
代码修改为
| public void onClick(View v) { SharedPreferences sp = getSharedPreferences("myOption", MODE_PRIVATE); String name="无名氏"; int age = -1;
switch (v.getId()) { case R.id.saveBtn: name = nameEt.getText().toString().trim(); age = Integer.valueOf(ageEt.getText().toString().trim());
Editor editor = sp.edit(); editor.putString("name", name); editor.putInt("age", age);
editor.commit(); break; case R.id.readBtn: name = sp.getString("name", "无名氏"); age = sp.getInt("age", -1); Toast.makeText(this, "姓名: "+name+ " 年龄: " +String.valueOf(age), Toast.LENGTH_SHORT).show(); break; } } |
5、 读取其它应用程序的SharedPreferences
首先保证创建SharedPreferences的工程中使用的是:
| Context.MODE_WORLD_READABLE+ Context.MODE_WORLD_WRITEABLE |
其次,当前工程中读取的代码为:
| try { Context otherContext = this.createPackageContext("cn.class3g.activity", Context.CONTEXT_IGNORE_SECURITY); SharedPreferences sp = otherContext.getSharedPreferences("myOption", MODE_PRIVATE);
String res = "姓名:"+ sp.getString("name", null).toString() + " 年龄:"+ String.valueOf(sp.getInt("age", -1)); Toast.makeText(this, res, Toast.LENGTH_LONG).show();
} catch (NameNotFoundException e) { e.printStackTrace(); } |
