cocos2d-x初学笔记05:添加角色Sprite
上一篇我们讲了怎么点击菜单从菜单界面进入到游戏界面,那么在游戏界面肯定会有许许多多的角色,比如说主角,敌人,NPC等,那么这些角色是如何添加进去的呢?接下来我们就来实现在场景中添加进一个主角。
首先新建一个工程,取名”SpriteTest“,然后导入主角图片。
(注意:我使用的cocos2d-x版本是2.0.4,系统是win7)下载地址
我们使用TestCpp项目里面的资源,在D:\cocos2d-2.0-x-2.0.4\samples\TestCpp\Resources\Images(你的目录有可能不一样)找到grossini.png复制到我们自己的项目中的Resources文件夹,然后在VS中右击项目选择添加->现有项,添加刚刚复制的图片到我们的项目SpriteTest即可。
为了方便起见,我们对新建的项目进行修改。我们知道,HelloWorld的scene()函数实例化了一个场景实例并运行,HelloWorld是一个布景类,它的init()函数对其进行初始化,并将初始化后得布景加入到运行的场景中,那么我们只需要在init()函数中添加进一个精灵图片作为主角即可,修改后的HelloWorld.cpp文件的init函数代码如下
bool HelloWorld::init()
{
    bool bRet = false;
    do
    {
        //////////////////////////////////////////////////////////////////////////
        // super init first
        //////////////////////////////////////////////////////////////////////////

        CC_BREAK_IF(! CCLayer::init());

        //////////////////////////////////////////////////////////////////////////
        // add your codes below...
        //////////////////////////////////////////////////////////////////////////

        // 1. Add a menu item with "X" image, which is clicked to quit the program.

        // Create a "close" menu item with close icon, it's an auto release object.
        CCMenuItemImage *pCloseItem = CCMenuItemImage::create(
            "CloseNormal.png",
            "CloseSelected.png",
            this,
            menu_selector(HelloWorld::menuCloseCallback));
        CC_BREAK_IF(! pCloseItem);

        // Place the menu item bottom-right conner.
        pCloseItem->setPosition(ccp(CCDirector::sharedDirector()->getWinSize().width - 20, 20));

        // Create a menu with the "close" menu item, it's an auto release object.
        CCMenu* pMenu = CCMenu::create(pCloseItem, NULL);
        pMenu->setPosition(CCPointZero);
        CC_BREAK_IF(! pMenu);

        // Add the menu to HelloWorld layer as a child layer.
        this->addChild(pMenu, 1);

		//取得屏幕大小
		CCSize size=CCDirector::sharedDirector()->getWinSize();
		//创建精灵作为主角,参数代表:图片的路径
	    CCSprite* sprite=CCSprite::create("grossini.png");
        //设置位置
		sprite->setPosition(ccp(size.width/2,size.height/2));
		//添加到布景
	    this->addChild(sprite);

        bRet = true;
    } while (0);

    return bRet;
}
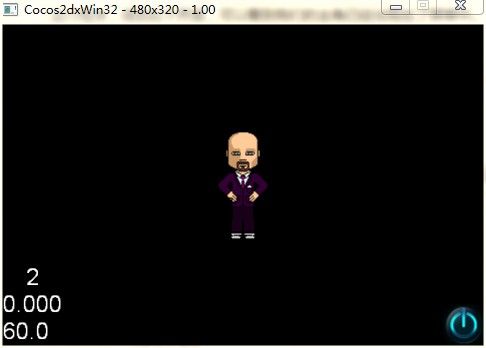
运行程序,得到如下界面,可以看到我们的主角已经出现在了屏幕中。
最后祝愿每一个奋斗在路上的人早日实现梦想!![]()
