用.Net打造一个移动客户端(Android/IOS)的服务端框架NHM(五)——Android端消息处理机制
一、NhmFramework Android端的消息处理机制原理
1、概要表述:在我们的框架中,Android客户端通过继承Application来控制整个应用程序的生命周期,在Application onCreate()方法中,我们将启动一个MainService,这个Service将负责Activity的异步消息处理(包括异步Http请求)、任务调度、数据共享等大部分持久化操作。那么这样做的目的何在呢?
1)异步消息处理:在Service 中实现异步消息处理是为了将Activity的界面显示的操作保持在一个单独的线程中,而将其他占用时间的操作(如访问服务器、解析数据、处理数据、 GPS定位等)放在一个新的线程中,这样UI界面将不会“等待”这些耗时过多的任务,也就是说在程序处理这些任务的时候,UI界面依然可以操作,不会卡死,实现更好的用户体验。当然,你也可以将耗时线程直接在Activity中新建,但这样的处理方式就无法管理众多的Task,不利于程序结构和代码复用。
2)任务调度:我们采用了一个类似栈的数据结构来管理Task,具体流程是这样的:
UI界面新建一个访问服务器的Task—>把这个Task压到Service的Task栈中—>MainService执行任务—>将结果更新到UI—>UI把结果显示出来
3)数据共享:MainService为Activity间传递参数提供了桥梁,尤其是一些可能被不同的Activity多次使用的数据,如GPS位置等,通过MainService保存变量比在Activity间直接传参更加方便。
2、要点理解:
1)我们知道,Android的Service本身并不是一个单独的Thread——也就是说,在这个Service启动的时候,并没有新的线程建立,于是我们必须自己来建立一个新的线程监听从UI发过来的任务请求,经过后台处理后再将结果发给UI,实现UI异步处理的需求。
2)继承Application也并不会建立新的线程,也就是说继承Application不会耗费更多的系统资源,即使你不继承、Application的生命周期也存在,你继承了,只是可以在生命周期中为程序在不同时序阶段“添加”更多的处理。
3)MainService中的消息近处理进程是通过一个While(true)循环来监视Task栈,任务栈里有任务了,就执行,执行结果通过消息的方式发到UI层,做过C/S的读者肯定都会了解这样的机制。
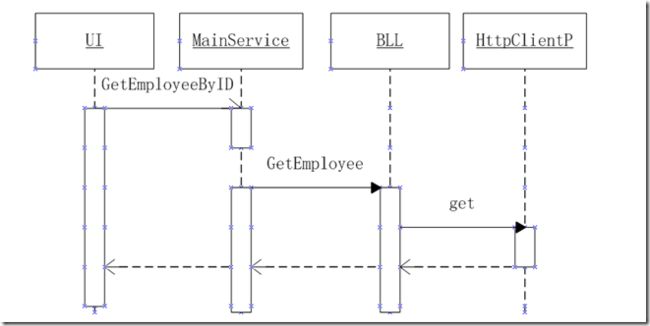
3、GetEmployeeByID为例的时序图:
二、Android程序的启动与完全退出
1、启动:Android程序的启动入口,是在manifest.xml中声明 <action android:name="android.intent.action.MAIN" />,而在这之前,如果你已经继承了Application,并且在manifest.xml中声明这个继承,系统将会执行你的 Application类。在我们的项目中,MainService就是在Application中启动的。
2、退出:还记得2011年年中的时候,一些Android应用被爆出无法完全退出的风波,抛开蓄意的成分,单从技术层面来讲,Android的退出确实不是一条命令那么简单。首先,如果你的程序中有多个Activity,则必须所有的Activity都要执行 Finish();其次如果你的程序新建了Service,则这个Service需要执行intent.stopService()方法;而 Process.killProcess()在不同的Android版本又有不同的解读……所以我们最应该先弄懂的是,怎么判断一个Android程序是否完全退出了。
1)打开Eclipse,Debug你的程序,在Debug选项卡下会看到下图这样的状态:
2)切换到DDMS,在Devices中,你会看到这样的状态:
可以看到,最下面那个进程(DDMS中查看的是进程process,Debug中查看的是线程thread)就是我们正在调试的程序。此时我退出程序,如果这个进程不见了,则证明完全退出。也就是要在DDMS中看是否这个进程被kill了,才能判断是真正的完全退出。
那正确的退出方法是什么样的呢?Android程序的正确退出要遵循如下顺序:
1)遍历所有Activity执行Finish()方法;
2)遍历你程序中建立的Service,并且stopService();
3)killprocess
除此之外,你还要特别注意执行以上操作的位置:Service不能自己停止自己,所以如果你要stopService()必须在Application 里,killproces也是同理。如果你在Service里执行了stopService()等操作,也不会有错误提示,但在DDMS中,你会发现这个 process依然存在,虽然偶此时Debug窗口中你的程序已经Disconnect,而且在模拟器中程序也已经“不见了”——只要你遍历所有 Activity并执行finish()方法,那么模拟器中正在运行的程序就会消失,看起来好像“退出”程序一样,而在后台,可能依然有你建立的 Service在运行。
这里给出我的AndroidMenifest.xml和MainApp.Java
AndroidMenifest.xml
|
1
2
3
4
5
6
7
8
9
10
11
12
13
14
15
16
17
18
19
20
|
<?
xml
version
=
"1.0"
encoding
=
"utf-8"
?>
<
manifest
xmlns:android
=
"http://schemas.android.com/apk/res/android"
package
=
"nhm.atraining"
android:versionCode
=
"1"
android:versionName
=
"1.0"
>
<
uses-sdk
android:minSdkVersion
=
"7"
/>
<
uses-permission
android:name
=
"android.permission.INTERNET"
/>
<
uses-permission
android:name
=
"android.permission.GET_TASKS"
/>
<
uses-permission
android:name
=
"android.permission.WRITE_EXTERNAL_STORAGE"
/>
<
application
android:debuggable
=
"true"
android:icon
=
"@drawable/ic_launcher"
android:label
=
"@string/app_name"
android:name
=
"com.nhm.training.logic.MainApp"
>
<
service
android:name
=
"com.nhm.training.logic.MainService"
>
<
intent-filter
>
<
action
android:name
=
"com.nhm.training.logic.MainService"
></
action
>
</
intent-filter
>
</
service
>
<
activity
android:label
=
"@string/app_name"
android:name
=
".MainActivity"
>
<
intent-filter
>
<
action
android:name
=
"android.intent.action.MAIN"
/>
<
category
android:name
=
"android.intent.category.LAUNCHER"
/>
</
intent-filter
>
</
activity
>
</
application
>
</
manifest
>
|
|
1
|
|
|
1
|
MainApp.Java
|
|
1
2
3
4
5
6
7
8
9
10
11
12
13
14
15
16
17
18
19
20
21
22
23
24
25
26
27
28
29
30
31
32
33
|
public
class
MainApp
extends
Application {
public
MainApp mApp;
@Override
public
void
onCreate() {
mApp =
this
;
Intent serv =
new
Intent(
"com.nhm.training.logic.MainService"
);
this
.startService(serv);
super
.onCreate();
}
@Override
public
void
onTerminate() {
// TODO Auto-generated method stub
super
.onTerminate();
}
public
void
destroy() {
// TODO Auto-generated method stub
for
(Activity ac : MainService.allActivity) {
ac.finish();
}
Intent it =
new
Intent(
"com.nhm.training.logic.MainService"
);
this
.stopService(it);
android.os.Process.killProcess(android.os.Process.myPid());
System.exit(
0
);
}
}
|
三、利用MainService实现异步Task机制
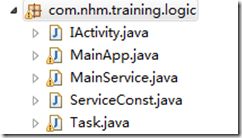
通过上面的原理,相信读者已经理解了MainService的主要作用,下面我们就来实现MainService。在com.nhm.training.logic包中,包含了任务处理所需要的各个类,下面逐个解释下它们的作用。
IActivity: 是一个接口声明,声明了void init()和void refresh(Object ...param)两个接口,其作用主要是要求各个Activity必须实现初始化和更新方法才能实现Task机制。
MainApp:继承于Application,主要负责控制应用程序在启动和退出的时候开启和停止MainService,在后期使用第三方API时(如百度地图)可能也会在Application层做某些处理。
MainService:完成整个Task消息处理机制,在MainService onCreate()时抛出新线程监听Task,当有Task进入时执行任务、任务结束后发消息到UI。
ServiceConst:保存一些必要的静态常量。
Task:描述任务的类,包括任务ID、任务参数等。
本想为MainService先画一个UML Class Diagraim再给出代码,结果机器的Rose出了点问题,反向JAVA工程总是异常退出,唉,所以就直接给出代码吧,还望各位读者海涵。代码比较长,没有类图还真不太好看啊。
|
1
2
3
4
5
6
7
8
9
10
11
12
13
14
15
16
17
18
19
20
21
22
23
24
25
26
27
28
29
30
31
32
33
34
35
36
37
38
39
40
41
42
43
44
45
46
47
48
49
50
51
52
53
54
55
56
57
58
59
60
61
62
63
64
65
66
67
68
69
70
71
72
73
74
75
76
77
78
79
80
81
82
83
84
85
86
87
88
89
90
91
92
93
94
95
96
97
98
99
100
101
102
103
104
105
106
107
108
109
110
111
112
113
114
115
116
117
118
119
120
121
122
123
124
125
126
127
128
129
130
131
132
133
134
135
136
137
138
139
140
141
142
143
144
145
146
147
148
149
150
151
152
153
154
155
156
157
158
159
160
161
162
163
164
165
166
167
168
169
170
171
172
173
174
175
176
177
178
179
180
181
182
183
184
185
186
187
188
189
190
191
192
193
194
195
196
197
198
199
200
201
202
203
204
205
206
207
208
209
210
211
212
213
214
215
216
217
218
219
|
public
class
MainService
extends
Service
implements
Runnable {
public
static
ArrayList<Activity> allActivity =
new
ArrayList<Activity>();
public
static
int
lastActivityId;
public
static
String lastActivityName;
private
UEHandler ueHandler;
public
static
List<Task> tasklist =
new
ArrayList<Task>(
0
);;;
public
static
ArrayList<Task> allTask =
new
ArrayList<Task>();
// 从集合中通过name获取Activity对象
public
static
Activity getActivityByName(String name) {
for
(
int
i = allActivity.size() -
1
; i >=
0
; i--) {
Activity ac = allActivity.get(i);
if
(ac.getClass().getName().indexOf(name) >=
0
) {
return
ac;
}
}
return
null
;
}
// 添加
public
static
void
newTask(Task task) {
allTask.add(task);
}
public
boolean
isrun =
true
;
@Override
public
IBinder onBind(Intent intent) {
// TODO Auto-generated method stub
return
null
;
}
// 更新UI
private
Handler hand =
new
Handler() {
@Override
public
void
handleMessage(Message msg) {
// TODO Auto-generated method stub
super
.handleMessage(msg);
Bundle bTCCGF = msg.getData();
String acname = bTCCGF.getString(
"acName"
);
IActivity ia = (IActivity) MainService.getActivityByName(acname);
switch
(msg.what) {
case
ServiceConst.GET_EMPLOYEE_ERROR:
ia.refresh(ServiceConst.GET_EMPLOYEE_ERROR, msg.obj);
break
;
case
ServiceConst.TASK_GET_EMPLOYEE:
ia.refresh(ServiceConst.GET_EMPLOYEE_OK, msg.obj);
break
;
}
}
};
public
void
setCurrentActivityName() {
ActivityManager activityManager = (ActivityManager) getApplicationContext()
.getSystemService(Context.ACTIVITY_SERVICE);
List<RunningTaskInfo> forGroundActivity = activityManager
.getRunningTasks(
1
);
RunningTaskInfo currentActivity;
currentActivity = forGroundActivity.get(
0
);
String activityName = currentActivity.topActivity.getClassName();
lastActivityName = activityName;
}
// 执行任务
public
void
doTask(Task task) {
setCurrentActivityName();
Message mess = hand.obtainMessage();
mess.what = task.getTaskID();
// 定义刷新UI的变化
tasklist.add(task);
HashMap paramIn = (HashMap) task.getTaskParam();
HashMap paramOut =
new
HashMap();
String acname = String.valueOf(paramIn.get(
"acname"
));
paramOut.put(
"acName"
, acname);
Employees emp =
null
;
switch
(task.getTaskID()) {
case
ServiceConst.TASK_GET_EMPLOYEE:
try
{
int
uid = (Integer.valueOf(String.valueOf(paramIn
.get(
"EmployeeID"
))));
emp = Bll.GetEmployeeByID(uid);
mess.obj = emp;
}
catch
(Exception e) {
mess.what = ServiceConst.GET_EMPLOYEE_ERROR;
}
if
(emp ==
null
) {
mess.what = ServiceConst.GET_EMPLOYEE_ERROR;
}
break
;
}
Bundle bc =
new
Bundle();
bc.putString(
"acName"
, acname);
mess.setData(bc);
hand.sendMessage(mess);
// 发送更新UI的消息给主线程
allTask.remove(task);
// 执行完任务
}
@Override
public
void
run() {
// TODO Auto-generated method stub
while
(isrun) {
Task lastTask =
null
;
synchronized
(allTask) {
if
(allTask.size() >
0
) {
// 取任务
lastTask = allTask.get(
0
);
// 执行任务
doTask(lastTask);
}
}
// Log.d("debug main Service", ".............");
try
{
Thread.sleep(
1000
);
}
catch
(Exception e) {
}
}
}
@Override
public
void
onCreate() {
// TODO Auto-generated method stub
// Log.d("debug main Service Oncreate", ".............");
super
.onCreate();
ueHandler =
new
UEHandler(
this
);
// 设置异常处理实例
Thread.setDefaultUncaughtExceptionHandler(ueHandler);
isrun =
true
;
Thread t =
new
Thread(
this
);
t.start();
}
@Override
public
void
onDestroy() {
// TODO Auto-generated method stub
super
.onDestroy();
isrun =
false
;
}
// alertUser 提示用户网络状态错误
public
static
void
AlertNetError(
final
Context con) {
AlertDialog.Builder ab =
new
AlertDialog.Builder(con);
ab.setTitle(R.string.NoRouteToHostException);
ab.setMessage(R.string.NoSignalException);
ab.setNegativeButton(R.string.apn_is_wrong1_exit,
new
OnClickListener() {
@Override
public
void
onClick(DialogInterface dialog,
int
which) {
// TODO Auto-generated method stub
dialog.cancel();
// exitApp(con);
((MainApp) ((Activity) con).getApplication())
.destroy();
}
});
ab.setPositiveButton(R.string.apn_is_wrong1_setnet,
new
OnClickListener() {
@Override
public
void
onClick(DialogInterface dialog,
int
which) {
// TODO Auto-generated method stub
dialog.dismiss();
con.startActivity(
new
Intent(
android.provider.Settings.ACTION_WIRELESS_SETTINGS));
}
});
ab.create().show();
}
public
static
void
promptExit(
final
Context con) {
// 创建对话框
LayoutInflater li = LayoutInflater.from(con);
View exitV = li.inflate(R.layout.exitdialog,
null
);
AlertDialog.Builder ab =
new
AlertDialog.Builder(con);
ab.setView(exitV);
// 设定对话框显示的View对象
ab.setPositiveButton(R.string.exit,
new
OnClickListener() {
public
void
onClick(DialogInterface arg0,
int
arg1) {
// TODO Auto-generated method stub
((MainApp) ((Activity) con).getApplication()).destroy();
}
});
ab.setNegativeButton(R.string.cancel,
null
);
// 显示对话框
ab.show();
}
public
static
void
init() {
// TODO Auto-generated method stub
}
}
|
四、客户端扩展——命令拼接与加密
上一篇我们已经提到了,要用一个HashMap来保存从客户的到服务器的参数,这样做的目的是为了更加清晰的在BLL层中描述发送到URL的参数。代码如下:
|
1
2
3
4
5
6
7
8
9
10
11
12
13
14
15
16
17
18
19
20
21
22
23
24
25
26
27
28
29
30
31
32
33
34
35
|
/**
* 将URL参数哈希表转换为加密字符串
* @param map
* @return
*/
public
static
String toURLParam(HashMap map) {
String cmd = String.valueOf(map.get(
"cmd"
));
//明确空cmd为"unknown"
if
(cmd.equals(
null
) || cmd.equals(
""
)) {
cmd =
"unknown"
;
}
//添加公共参数字段,如imei,gps位置等,这里例子仅添加一个当前时间
map.put(
"now"
, (
new
Date()).toString());
//HASHMAP先转换为JSON
JSONObject jstest =
new
JSONObject(map);
String jsparam = jstest.toString();
//加密压缩JSON,加入你自己的加密算法
jsparam = DESEncoder.encrypt(jsparam);
String enc =
""
;
//最外层用Base64Encode包装一下,注意将Base64的字符表中的 + 和 / 替换
try
{
enc =
new
BASE64Encoder().encode(jsparam.getBytes(
"UTF-8"
));
}
catch
(UnsupportedEncodingException e) {
// TODO Auto-generated catch block
enc=
""
;
e.printStackTrace();
}
return
enc;
}
|
举一个例子说明在BLL层中如何实现HTTP请求
|
1
2
3
4
5
6
7
8
9
10
11
12
13
14
15
16
17
18
19
20
21
22
23
24
25
26
27
28
29
30
31
32
33
34
35
36
37
|
public
static
Employees GetEmployeeByID(
int
id)
{
HashMap param =
new
HashMap();
param.put(
"cmd"
,
"GetEmployee"
);
param.put(
"method"
,
"ByID"
);
param.put(
"id"
, id);
//将此HashMap转换为加密字符串
String parmstr = URLParamUtils.toURLParam(param);
String paramstrall = baseURL+
"api/android_process.aspx?a="
+ parmstr;
Employees emp =
new
Employees();
try
{
//使用Http.get()连接 返回JsonArray
JSONArray json = get(paramstrall,
null
,
true
).asJSONArray();
String jsonfirst = json.get(
0
).toString();
Log.d(
"BLL"
,
"Start gson.fromJson"
);
//新建Gson对象并设置与服务器发来相同格式的Date类型
Gson gson =
new
GsonBuilder().setDateFormat(
"yyyy-MM-dd HH:mm:ss"
).create();
//反序列化Json数据为 Employees类型
emp = gson.fromJson(jsonfirst, Employees.
class
);
Log.d(
"BLL"
,
"End gson.fromJson"
);
}
catch
(NException e) {
// TODO Auto-generated catch block
emp=
null
;
e.printStackTrace();
}
catch
(JSONException e) {
// TODO Auto-generated catch block
emp=
null
;
e.printStackTrace();
}
return
emp;
}
|
|
1
|
|
|
1
|
|
五、客户端UI——MainActivity
有了上面的基础,MainAcitivity就很简单了。在Activity onCreate()的时候,组建任务并将任务压到任务栈,任务在MainService新建的线程中执行,而前台可以用一个Progress显示“正在读取”的进度条,当Task执行完成后,回发到Activity更新,Activity根据返回的参数情况显示出来。下面给出MainActivity代码:
|
1
2
3
4
5
6
7
8
9
10
11
12
13
14
15
16
17
18
19
20
21
22
23
24
25
26
27
28
29
30
31
32
33
34
35
36
37
38
39
40
41
42
43
44
45
46
47
48
49
50
51
52
53
54
55
56
57
58
59
60
61
62
|
public
class
MainActivity
extends
Activity
implements
IActivity {
/** Called when the activity is first created. */
protected
static
View process;
// 加载条
//后退键显示退出提示
@Override
public
boolean
onKeyDown(
int
keyCode, KeyEvent event) {
// TODO Auto-generated method stub
if
(keyCode == KeyEvent.KEYCODE_BACK) {
MainService.promptExit(
this
);
return
true
;
}
return
super
.onKeyDown(keyCode, event);
}
@Override
public
void
onCreate(Bundle savedInstanceState) {
super
.onCreate(savedInstanceState);
setContentView(R.layout.main);
process =
this
.findViewById(R.id.progress);
//默认显示进度条
process.setVisibility(View.VISIBLE);
//将Activity保存在MainService中
MainService.allActivity.add(
this
);
//建立参数HashMAP
HashMap param =
new
HashMap();
param.put(
"EmployeeID"
,
new
Integer(
2
));
param.put(
"acname"
,
"MainActivity"
);
//建立Task
Task task =
new
Task(ServiceConst.TASK_GET_EMPLOYEE, param);
//压入MainService的任务栈
MainService.newTask(task);
}
@Override
public
void
init() {
// TODO Auto-generated method stub
}
@Override
public
void
refresh(Object... param) {
// TODO Auto-generated method stub
//处理UI更新
TextView tvEmpName = (TextView)
this
.findViewById(R.id.empName);
// 隐藏进度条
process.setVisibility(View.GONE);
switch
(((Integer) (param[
0
])).intValue()) {
case
ServiceConst.GET_EMPLOYEE_OK:
//服务器返回正确的情况
Employees emp = (Employees) param[
1
];
tvEmpName.setText(emp.getFirstName());
break
;
case
ServiceConst.GET_EMPLOYEE_ERROR:
//服务器返回错误的情况
tvEmpName.setText(
"error occered"
);
break
;
}
}
}
|
五、服务端扩展——客户端命令解析处理
在客户端向服务器端发出HTTP请求时,实际上是请求了服务器端的网址:http://localhost:8080/api/android_process.aspx?a= 加密字符串 ,我们需要在服务端解析Request.Querystring["a"]、解密字符串、还原成JSONObject,并在服务端的BLL层做相应处理。下面给出服务端android_process.aspx和EmployeeBLL.aspx的C#代码:
|
1
2
3
4
5
6
7
8
9
10
11
12
13
14
15
16
17
18
19
20
21
22
23
24
25
26
27
28
29
30
31
32
33
34
35
36
37
38
39
|
public
partial
class
android_process : System.Web.UI.Page
{
string
instr;
JSONObject paramJSON;
protected
void
Page_Load(
object
sender, EventArgs e)
{
string
rst=
""
;
try
{
//获得加密串
instr = Request.QueryString[
"a"
];
//解析加密串为JSONObject
string
orgStr = EncryptHelper.DecodeBase64WithDES(instr);
paramJSON = JSONConvert.DeserializeObject(orgStr);
//取cmd命令,如果取得空值或获取失败,则返回错误
string
cmd =
""
;
cmd = paramJSON[
"cmd"
].ToString();
if
(String.IsNullOrEmpty(cmd))
{
lt_rtn.Text =
"{rst:error}"
;
return
;
}
//根据cmd命令跳转逻辑
switch
(cmd)
{
case
"GetEmployee"
:
rst = EmployeeBLL.getEmployeeInfo(paramJSON);
break
;
}
}
catch
(Exception)
{
lt_rtn.Text =
"{rst:error}"
;
}
lt_rtn.Text = rst;
}
}
|
|
1
2
3
4
5
6
7
8
9
10
11
12
13
14
15
16
17
18
|
public
static
class
EmployeeBLL
{
public
static
string
getEmployeeInfo(JSONObject paramJSON)
{
string
method = paramJSON[
"method"
].ToString();
string
rtn =
""
;
switch
(method)
{
case
"ByID"
:
int
id =
int
.Parse(paramJSON[
"id"
].ToString());
EmployeeEntity ee =
new
EmployeeEntity(id);
rtn = ee.toJson();
break
;
}
return
rtn;
}
}
|
六、模拟器调试
下面我们再模拟器里Debug一下:
一)正常测试:
二)异常测试
在正常测试中,我们要获得ID=2的员工的姓名,这里我们将ID改为-1,由于这个员工不存在,服务端将返回异常,我们看看客户端的处理。
可以看到客户端正确处理了异常。
总结
这次的课程我们通过一个驻留内存的Service实现了Android的异步任务机制,并将这种异步处理应用到Http访问中,读者可以继续扩展,利用这样的机制来处理GPS、上传等耗时操作。
从下一篇开始,我们将分成两个分支,一个分支继续学习Android与.net服务器交互的知识,另一个分支,将转向IOS平台,让IOS也支持我们的.net服务端。


