VS2012 RC 编译Qt 4.8.2完整过程
注:本文转载自http://www.cnblogs.com/russinovich/archive/2012/06/30/2571032.html 略加本人自己修改
【弱弱的说一句,我现在用的是VS2010,安装了qt-win-opensource-4.8.4-vs2010.zip和qt-vs-addin-1.1.11-opensource.zip之后貌似不用编译里面的库,直接可以用,反正因为这些走了很多的弯路很麻烦,mark一下,初学者要注意了哦~】
背景:
最近用VS2012越来越爱不释手。但是Qt只提供VS2010的官方的安装包,暂时还不支持新版本的VS。于是,我需要手动用编译Qt4.8.2。过程也不复杂写下来做个记录吧。
说明:
我以前编译Qt时喜欢用静态编译,这样做的好处是不需要VS的运行时库,也不需要qt的库,部署起来很方便。缺点就是Debug版本编译出来非常大,哪怕是个很小的功能编译出来基本上都15M左右,而且编译过程很耗时。现在我直接使用动态编译。我使用的Qt安装包是qt-win-opensource-4.8.2-vs2010.exe
编译步骤:
1. 建立环境变量
QMAKESPEC win32-msvc2010 // 注意
QTDIR S:\QT\4.8.2 // Qt的安装目录
Path S:\QT\4.8.2\bin;
注意: QMAKESPEC 还是 win32-msvc2010 因为如果要改成win32-msvc2012,需要改很多相关的配置。又麻烦又不安全。而且使用win32-msvc2010并不影响我们的结果。
2. 修改 Qt安装目录\Qt\4.8.2\mkspecs\win32-msvc2010\qmake.conf用vs2012打开
在12行的地方将
QMAKE_COMPILER_DEFINES += _MSC_VER=1600 WIN32 当中的1600改成1700
在19行的地方
QMAKE_CFLAGS = -nologo -Zm200 -Zc:wchar_t-
改为
QMAKE_CFLAGS = -nologo -Zm200 -Zc:wchar_t
3. 在开始菜单中找到 VS2012 x86 Native Tools Command Prompt 并运行
这一步非常简单但很重要,一定要选择VS2012目录下的bat文件
4. 在控制台中,切换到Qt的安装目录下。使用如下参数进行配置
configure.exe -platform win32-msvc2010 -opensource -debug-and-release -shared -qt-sql-sqlite -plugin-sql-sqlite -qt-zlib -qt-libpng -qt-libmng -qt-libtiff -qt-libjpeg -qmake -process -rtti -dbus -webkit -script -scripttools -no-dbus
[此版本可以支持ODBC]
configure -platform win32-msvc2010 -debug-and-release -opensource -script -scripttools -shared -fast -qt-sql-sqlite -plugin-sql-sqlite -no-qt3support -qt-zlib -qt-libpng -qt-libmng -qt-libtiff -qt-libjpeg -qt-style-windowsxp -qt-style-windowsvista -sse2 -mmx -sse -qt-sql-oci -qt-sql-odbc -plugin-sql-oci -plugin-sql-odbc -mp -graphicssystem opengl -I
5. nmake 开始编译。 不过在编译过程中会遇到几个错需要手动修改一下代码。
6. 第一个错误如下:
.\wtf/HashSet.h(180) : error C2664: 'std::pair<_Ty1,_Ty2>::pair(const std::pair<_Ty1,_Ty2> &)' : cannot convert parameter 1 from 'std::pair<_Ty1,_Ty2>' to 'const std::pair<_Ty1,_Ty2> &'
在Qt的Src目录搜索这个HashSet.h 会出现三个文件但是需要修改的只有如下路径的文件【这个个人纠结了很久】
安装目录\src\3rdparty\webkit\Source\JavaScriptCore\wtf\HashSet.h
将180行左右所在的函数以及它下面的函数用下面的代码替换:
template<typename T, typename U, typename V>
inline pair<typename HashSet<T,U,V>::const_iterator, bool> HashSet<T,U,V>::add(const ValueType &value)
{
auto p= m_impl.add(value);
return make_pair(typename HashSet<T,U,V>::const_iterator(p.first), p.second);
}template<typename Value, typename HashFunctions, typename Traits>
template<typename T, typename HashTranslator>
inline pair<typename HashSet<Value, HashFunctions, Traits>::iterator, bool>
HashSet<Value, HashFunctions, Traits>::add(const T& value)
{
typedef HashSetTranslatorAdapter<ValueType, ValueTraits, T, HashTranslator> Adapter;
typedef typename HashSet<Value, HashFunctions, Traits>::iterator iter_type;
auto& temp = m_impl.template addPassingHashCode<T, T, Adapter>(value, value);
return make_pair((iter_type)temp.first, temp.second);
}
7. 继续 nmake 遇到第二个错误
platform\DefaultLocalizationStrategy.cpp(327) : error C2001: newline in constant
platform\DefaultLocalizationStrategy.cpp(327) : fatal error C1057: unexpected end of file in macro expansion
这个错误的原因是因为代码里面的非英文的引号造成的。
在安装目录中搜索到该文件并打开,在327行可以找到:
原始的错误代码如下:
return WEB_UI_STRING("Look Up “<selection>”", "Look Up context menu item with selected word").replace("<selection>", truncatedStringForLookupMenuItem(selectedString));
大家注意 <selection> 单词前后的引号。就是它造成编译报错。修改成下面的代码
return WEB_UI_STRING("Look Up \"<selection>\"", "Look Up context menu item with selected word").replace("<selection>", truncatedStringForLookupMenuItem(selectedString));
8. 再次nmake,好了到这里为止,就剩下漫长的等待了。我一般是睡觉之前编译,一晚上的时间足够了。
9. 补充,有个开源工具叫jom,也是qt官方的,它支持多核编译,可以大大加快编译速度。
使用的方法也很简单jom –j 8 你有几个核就写几。我是8个核
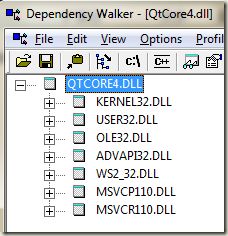
简单的看一下效果吧!
注意最后两个DLL是VS2012的运行时库,说明我们已经编译成功了!
好消息是这两处Bug已经报给Qt官方了,我相信在以后的版本中不会在有类似的问题了。
https://bugreports.qt-project.org/browse/QTBUG-23590
