spring security详解
目录:
一spring security的配置
二 UserDetailsService实现简单登陆
三 使用dataSource数据源进行登陆
四登陆后逻辑处理
五 remember-me 记住密码
六 权限层级控制
七 国际化错误信息
八 自定义过滤器,加入到security的chain中
九 使用HTTPS
一spring security的配置
首先,先把项目的整体结构以及整体配置贴出来,后面介绍中会将其中的功能模块一个一个的细讲解,稍安勿躁,一步一步的往下看:
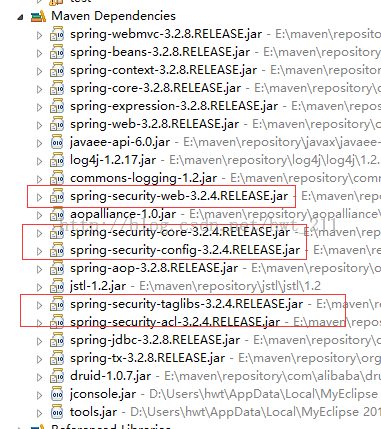
本例使用springMVC+spring security进行测试,需要导入的jar包:
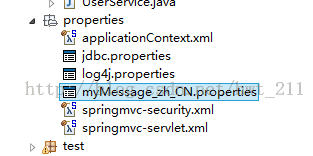
项目基本结构:
环境搭建,主要是三个配置文件:web.xml, applicationContext.xml, springmvc-security.xml 以及 springmvc-servlet.xml
1,web.xml
<?xml version="1.0" encoding="UTF-8"?>
<web-app version="3.0"
xmlns="http://java.sun.com/xml/ns/javaee"
xmlns:xsi="http://www.w3.org/2001/XMLSchema-instance"
xsi:schemaLocation="http://java.sun.com/xml/ns/javaee
http://java.sun.com/xml/ns/javaee/web-app_3_0.xsd">
<display-name></display-name>
<welcome-file-list>
<welcome-file>index.jsp</welcome-file>
</welcome-file-list>
<!-- 上下文配置文件路径 -->
<context-param>
<param-name>contextConfigLocation</param-name>
<param-value>
classpath:properties/applicationContext.xml,
classpath:properties/springmvc-security.xml
</param-value>
</context-param>
<!-- 上下文加载监听器 -->
<listener>
<listener-class>org.springframework.web.context.ContextLoaderListener</listener-class>
</listener>
<!-- 防止session溢出 -->
<listener>
<listener-class>org.springframework.web.util.IntrospectorCleanupListener</listener-class>
</listener>
<!-- 中文过滤器 -->
<filter>
<filter-name>characterFilter</filter-name>
<filter-class>org.springframework.web.filter.CharacterEncodingFilter</filter-class>
<init-param>
<param-name>encoding</param-name>
<param-value>UTF-8</param-value>
</init-param>
<init-param>
<param-name>forceEncoding</param-name>
<param-value>true</param-value><!-- 强制进行转码 -->
</init-param>
</filter>
<filter-mapping>
<filter-name>characterFilter</filter-name>
<url-pattern>/*</url-pattern>
</filter-mapping>
<!-- 然后接着是SpringSecurity必须的filter 优先配置,让SpringSecurity先加载,防止SpringSecurity拦截失效,记住,filer的名字必须要用springSecurityFilterChain
-->
<filter>
<filter-name>springSecurityFilterChain</filter-name>
<filter-class>org.springframework.web.filter.DelegatingFilterProxy</filter-class>
</filter>
<filter-mapping>
<filter-name>springSecurityFilterChain</filter-name>
<url-pattern>/*</url-pattern>
</filter-mapping>
<!-- springmvc的servlet -->
<servlet>
<servlet-name>springmvc</servlet-name>
<servlet-class>org.springframework.web.servlet.DispatcherServlet</servlet-class>
<init-param>
<param-name>contextConfigLocation</param-name>
<param-value>classpath:properties/springmvc-servlet.xml</param-value>
</init-param>
<load-on-startup>1</load-on-startup>
</servlet>
<servlet-mapping>
<servlet-name>springmvc</servlet-name>
<url-pattern>*.action</url-pattern>
</servlet-mapping>
</web-app>
二,applicationContext.xml
<?xml version="1.0" encoding="UTF-8"?>
<beans
xmlns="http://www.springframework.org/schema/beans"
xmlns:xsi="http://www.w3.org/2001/XMLSchema-instance"
xmlns:p="http://www.springframework.org/schema/p"
xmlns:context="http://www.springframework.org/schema/context"
xsi:schemaLocation="http://www.springframework.org/schema/beans
http://www.springframework.org/schema/beans/spring-beans-3.2.xsd
http://www.springframework.org/schema/context
http://www.springframework.org/schema/context/spring-context-3.2.xsd">
<!-- 加载配置文件 -->
<context:property-placeholder location="classpath:properties/jdbc.properties"/>
<!-- 扫描包,controller不扫描 -->
<context:component-scan base-package="com.springsecurity">
<context:exclude-filter type="annotation" expression="org.springframework.stereotype.Controller"/>
</context:component-scan>
<bean id="dataSource" class="com.alibaba.druid.pool.DruidDataSource"
init-method="init" destroy-method="close">
<property name="url" value="${druid.url}" />
<property name="username" value="${druid.username}" />
<property name="password" value="${druid.password}" />
<property name="maxActive" value="${druid.maxActive}" />
<property name="minIdle" value="${druid.minIdle}" />
<property name="maxWait" value="${druid.maxWait}" />
<property name="timeBetweenEvictionRunsMillis" value="${druid.timeBetweenEvictionRunsMillis}" />
<property name="minEvictableIdleTimeMillis" value="${druid.minEvictableIdleTimeMillis}" />
<property name="connectionProperties" value="config.decrypt=true" />
<property name="filters" value="config,stat,wall,log4j" />
</bean>
</beans>
三,springmvc-servlet.xml
<?xml version="1.0" encoding="UTF-8"?>
<beans xmlns="http://www.springframework.org/schema/beans"
xmlns:xsi="http://www.w3.org/2001/XMLSchema-instance" xmlns:p="http://www.springframework.org/schema/p"
xmlns:context="http://www.springframework.org/schema/context"
xmlns:mvc="http://www.springframework.org/schema/mvc"
xsi:schemaLocation="http://www.springframework.org/schema/beans http://www.springframework.org/schema/beans/spring-beans-3.2.xsd
http://www.springframework.org/schema/mvc
http://www.springframework.org/schema/mvc/spring-mvc-3.2.xsd
http://www.springframework.org/schema/context
http://www.springframework.org/schema/context/spring-context-3.2.xsd">
<!-- 扫描包 -->
<context:component-scan base-package="com.springsecurity.action" />
<!-- 加载资源路径 -->
<mvc:resources location="/resources/" mapping="/resources/**" />
<mvc:annotation-driven/>
<!-- jsp页面视图处理 @author黄文韬 -->
<bean class="org.springframework.web.servlet.view.ContentNegotiatingViewResolver">
<property name="order" value="1"></property>
<property name="defaultContentType" value="text/html" />
<property name="ignoreAcceptHeader" value="true"></property>
<property name="mediaTypes">
<map>
<entry key="json" value="application/json" />
<entry key="html" value="text/html" />
</map>
</property>
<property name="viewResolvers">
<list>
<bean class="org.springframework.web.servlet.view.InternalResourceViewResolver">
<property name="viewClass" value="org.springframework.web.servlet.view.JstlView" />
<property name="prefix" value="/WEB-INF/pages/" />
<property name="suffix" value=".jsp" />
</bean>
</list>
</property>
</bean>
</beans>
四,springmvc-security.xml(以下是一个完整的配置,在后面介绍中会对其中的功能拆开讲解,并对某些逐步深入)
<?xml version="1.0" encoding="UTF-8"?>
<beans xmlns="http://www.springframework.org/schema/beans" xmlns:xsi="http://www.w3.org/2001/XMLSchema-instance"
xmlns:security="http://www.springframework.org/schema/security"
xsi:schemaLocation="http://www.springframework.org/schema/beans
http://www.springframework.org/schema/beans/spring-beans-3.2.xsd
http://www.springframework.org/schema/security
http://www.springframework.org/schema/security/spring-security-3.2.xsd">
<security:debug/>
<!-- Spring-Security 的配置 -->
<!-- filters="none" 不过滤这些资源-->
<security:http pattern="/images/**" security="none"/>
<security:http pattern="/js/**" security="none" />
<security:http pattern="/index.jsp" security="none" />
<!--
auto-config="true"
注意use-expressions=true.表示开启表达式,否则表达式将不可用
常用内建表达式
表达式说明
hasRole([role])返回 true 如果当前主体拥有特定角色。
hasAnyRole([role1,role2])返回 true 如果当前主体拥有任何一个提供的角色 (使用逗号分隔的字符串队列)
principal允许直接访问主体对象,表示当前用户
authentication允许直接访问当前 Authentication对象 从SecurityContext中获得
permitAll一直返回true
denyAll一直返回false
isAnonymous()如果用户是一个匿名登录的用户 就会返回 true
isRememberMe()如果用户是通过remember-me 登录的用户 就会返回 true
isAuthenticated()如果用户不是匿名用户就会返回true
isFullyAuthenticated()如果用户不是通过匿名也不是通过remember-me登录的用户时, 就会返回true。
-->
<security:http use-expressions="true" access-denied-page="/WEB-INF/pages/common/noAuth.jsp">
<!-- 对权限角色进行处理,见下面配置的权限层级控制 -->
<security:expression-handler ref="expressHandler"/>
<!--
login-page:默认指定的登录页面. authentication-failure-url:出错后跳转页面. default-target-url:成功登陆后跳转页面
login-processing-url="" 表单提交的action的url拦截
username-parameter="username" 表单username的name值,默认j_username,
password-parameter="password" 表单password的name值,默认j_password
-->
<security:intercept-url pattern="/user/**" access="hasRole('ROLE_USER')" />
<!-- 这里要注意配置url的时候以/开头,同事不要被上面的拦截重新截获 -->
<security:form-login login-page="/common/loginPage.action"
authentication-failure-url="/common/failure.action"
default-target-url="/main/main.action"
username-parameter="username" password-parameter="password"/>
<!--
invalidate-session:指定在退出系统时是否要销毁Session。logout-success-url:退出系统后转向的URL。logout-url:指定了用于响应退出系统请求的URL。其默认值为:/j_spring_security_logout。
-->
<security:logout logout-url="/securitylogout" invalidate-session="true" delete-cookies="JSESSIONID" logout-success-url="/user/logout.action" />
<security:remember-me key="myspringsecurity" data-source-ref="dataSource"
token-validity-seconds="3600000" remember-me-parameter="rememberme" />
<!--
max-sessions:允许用户帐号登录的次数。范例限制用户只能登录一次。exception-if-maximum-exceeded:
默认为false,此值表示:用户第二次登录时,前一次的登录信息都被清空。当exception-if-maximum-exceeded="true"时系统会拒绝第二次登录。
-->
<security:session-management>
<security:concurrency-control error-if-maximum-exceeded="true" max-sessions="10"/>
</security:session-management>
<security:intercept-url pattern="/main/delete.action" access="hasRole('ROLE_ADMIN')"/>
</security:http>
<!-- 给filterchain加自己的过滤器 ,可以通过after , before , position来定义加入的位置-->
<!-- <security:custom-filter ref="" /> -->
<!-- 指定一个自定义的authentication-manager :customUserDetailsService -->
<security:authentication-manager alias="theAuthenticationManager">
<security:authentication-provider> <!-- user-service-ref="userService" -->
<security:jdbc-user-service data-source-ref="dataSource" id="jdbcUserService"
users-by-username-query="select username,password,enabled from user where username = ?"
authorities-by-username-query="select username, authority from user where username = ?"
role-prefix="ROLE_"/>
<security:password-encoder ref="passwordEncoder">
<security:salt-source user-property="username"/>
</security:password-encoder>
<!-- 可以把权限配置在配置文件中 -->
<!-- <security:user-service>
<security:user name="hwt" password="3ba941370bf5329ad9a714f404ed33e6" authorities="ROLE_USER,ROLE_ADMIN" />
<security:user name="kevin" password="f39084b3dc1be24f36b2494738197105" authorities="ROLE_USER" />
</security:user-service> -->
</security:authentication-provider>
</security:authentication-manager>
<!-- 对密码进行MD5编码 -->
<bean id="passwordEncoder" class="org.springframework.security.authentication.encoding.Md5PasswordEncoder">
</bean>
<!--
通过 customUserDetailsService,Spring会控制用户的访问级别.
也可以理解成:以后我们和数据库操作就是通过customUserDetailsService来进行关联.
-->
<!-- <bean id="userService" class="com.springsecurity.service.UserService" /> -->
<!-- 自定义登陆错误提示,可以取出mymessages.properties的国际化消息-->
<bean id="messageSource" class="org.springframework.context.support.ReloadableResourceBundleMessageSource">
<property name="basename" value="classpath:properties/myMessage_zh_CN" />
</bean>
<bean id="localeResolver" class="org.springframework.web.servlet.i18n.AcceptHeaderLocaleResolver" />
<!-- 配置rememberme -->
<bean id="rememberMeAuthenticationFilter" class="org.springframework.security.web.authentication.rememberme.RememberMeAuthenticationFilter">
<constructor-arg index="0" ref="theAuthenticationManager"/>
<constructor-arg index="1" ref="rememberMeServices"/>
</bean>
<bean id="rememberMeServices" class="org.springframework.security.web.authentication.rememberme.PersistentTokenBasedRememberMeServices">
<!-- 标志key -->
<constructor-arg index="0" value="myspringsecurity"/>
<constructor-arg index="1" ref="jdbcUserService"/>
<constructor-arg index="2" ref="tokenRepository"/>
</bean>
<bean id="rememberMeAuthenticationProvider" class="org.springframework.security.authentication.RememberMeAuthenticationProvider">
<!-- 标志key -->
<constructor-arg value="myspringsecurity"/>
</bean>
<!-- 自动保存数据到数据库中 -->
<bean id="tokenRepository" class="org.springframework.security.web.authentication.rememberme.JdbcTokenRepositoryImpl">
<property name="createTableOnStartup" value="false"/>
<property name="dataSource" ref="dataSource"/>
</bean>
<!-- 权限层级控制 -->
<bean id="roleHierarchy" class="org.springframework.security.access.hierarchicalroles.RoleHierarchyImpl">
<property name="hierarchy" value="ROLE_ADMIN > ROLE_USER"/>
</bean>
<bean id="expressHandler" class="org.springframework.security.web.access.expression.DefaultWebSecurityExpressionHandler">
<property name="roleHierarchy" ref="roleHierarchy"/>
</bean>
</beans>
接下来的主要是对spring security的简单配置,分别通过userService以及dataSource来进行登录处理,权限控制,以及记住密码,权限层级,自定义过滤器等功能进行一一讲解,主要是针对springmvc-security.xml的文件配置进行讲解,上述的其他配置不需要修改:
二 UserDetailsService实现简单登陆
Springmvc-security.xml中配置:
<!-- Spring-Security 的配置 -->
<!-- filters="none" 不过滤这些资源-->
<security:http pattern="/images/**" security="none"/>
<security:http pattern="/js/**" security="none" />
<security:http pattern="/index.jsp" security="none" />
<security:http use-expressions="true" access-denied-page="/WEB-INF/pages/common/noAuth.jsp">
<!--
login-page:默认指定的登录页面. authentication-failure-url:出错后跳转页面. default-target-url:成功登陆后跳转页面
login-processing-url="" 表单提交的action的url拦截
username-parameter="username" 表单username的name值,默认j_username,
password-parameter="password" 表单password的name值,默认j_password
-->
<security:intercept-url pattern="/user/**" access="hasRole('ROLE_USER')" />
<!-- 这里要注意配置url的时候以/开头,同事不要被上面的拦截重新截获 -->
<security:form-login login-page="/common/loginPage.action"
authentication-failure-url="/common/failure.action"
default-target-url="/main/main.action"
username-parameter="username" password-parameter="password"/>
</security:http>
<!-- 指定一个自定义的authentication-manager :customUserDetailsService -->
<security:authentication-manager alias="theAuthenticationManager">
<security:authentication-provider user-service-ref="userService" >
<!-- 将username作为盐值,对密码进行加密 -->
<security:password-encoder ref="passwordEncoder">
<security:salt-source user-property="username"/>
</security:password-encoder>
</security:authentication-provider>
</security:authentication-manager>
<!-- 对密码进行MD5编码 -->
<bean id="passwordEncoder" class="org.springframework.security.authentication.encoding.Md5PasswordEncoder">
</bean>
写一个service实现UserDetailsService:
public class UserService implements UserDetailsService{
@Override
public UserDetails loadUserByUsername(String username)
throws UsernameNotFoundException {
//模拟从数据库中取出的用户名
//可以注入直接的业务层处理类来得到用户的用户名和密码
String dbUsername = "hwt";
String password = "123456";
//密码加密
String ecPd = new Md5PasswordEncoder().encodePassword(password, dbUsername);
UserDetails userDetails = new User(dbUsername, ecPd, true,true,true,true,getAuthorities(1));
return userDetails;
}
//定义用户权限,一个用户可以有多个权限,以下代码没有体现,可以自行实现
Private Collection<GrantedAuthority> getAuthorities(Integer role) {
List<GrantedAuthority> authList = new ArrayList<GrantedAuthority>();
// 所有的用户默认拥有ROLE_USER权限
if (role == 0) {
authList.add(new SimpleGrantedAuthority("ROLE_USERS"));
}
// 如果参数role为1.则拥有ROLE_ADMIN权限
if (role == 1) {
authList.add(new SimpleGrantedAuthority("ROLE_ADMIN"));
}
return authList;
}
}
并在springmvc-security.xml中实例化
<!--
通过 userService,Spring会控制用户的访问级别.
也可以理解成:以后我们和数据库操作就是通过customUserDetailsService来进行关联.
-->
<bean id="userService" class="com.springsecurity.service.UserService" />
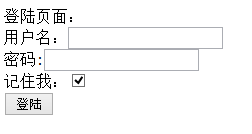
登陆页面:
<%@ page language="java" import="java.util.*" pageEncoding="UTF-8"%>
<%@taglib uri="http://java.sun.com/jstl/core" prefix="c" %>
<!DOCTYPE HTML PUBLIC "-//W3C//DTD HTML 4.01 Transitional//EN">
<html>
<head>
<title>login</title>
</head>
<body>
<div>登陆页面:</div>
<div>
<!-- 这里的action,username,password的名字是在springmvc-security.xml的
ecurity:form-login中配置,有默认值,也可以自己配置
-->
<form action="${pageContext.request.contextPath}/j_spring_security_check" method="post">
用户名:<input type="text" name="username" value=""/><br/>
密码:<input type="password" name="password" value="" /><br/>
记住我:<input type="checkbox" name="rememberme"/><br/>
<input type="submit" value="登陆"/>
</form>
</div>
</body>
</html>
还有一种通过xml配置权限来实现登陆,不使用userDetailService
<security:authentication-manager alias="theAuthenticationManager">
<security:authentication-provider> <!-- user-service-ref="userService" -->
<security:password-encoder ref="passwordEncoder">
<security:salt-source user-property="username"/>
</security:password-encoder>
<!-- 可以把权限配置在配置文件中 -->
<security:user-service>
<security:user name="hwt" password="3ba941370bf5329ad9a714f404ed33e6" authorities="ROLE_USER,ROLE_ADMIN" />
<security:user name="kevin" password="f39084b3dc1be24f36b2494738197105" authorities="ROLE_USER" />
</security:user-service>
</security:authentication-provider>
</security:authentication-manager>
三 使用dataSource数据源进行登陆
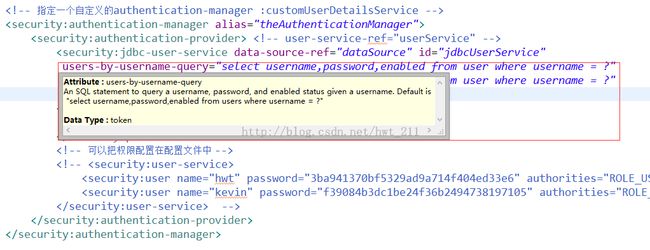
本例采用mysql,首先我们通过查看users-by-username-query以及authorities-by-username-query 的配置说明可以看出来我们有以下字段:username,password,enabled,authority
正常情况下,我们需要建立一个用户表,用户角色表,角色表,但是为了简单演示,我就建立了一个表,包括以上字段,当然,实际项目中肯定不只是有这些字段,只是在配置上面配置文件中的sql语句时,把需要的字段查出来即可:
首先,在applicationContext.xml中配置数据库,设置datasource
<bean id="dataSource" class="com.alibaba.druid.pool.DruidDataSource"
init-method="init" destroy-method="close">
<property name="url" value="${druid.url}" />
<property name="username" value="${druid.username}" />
<property name="password" value="${druid.password}" />
<property name="maxActive" value="${druid.maxActive}" />
<property name="minIdle" value="${druid.minIdle}" />
<property name="maxWait" value="${druid.maxWait}" />
<property name="timeBetweenEvictionRunsMillis" value="${druid.timeBetweenEvictionRunsMillis}" />
<property name="minEvictableIdleTimeMillis" value="${druid.minEvictableIdleTimeMillis}" />
<property name="connectionProperties" value="config.decrypt=true" />
<property name="filters" value="config,stat,wall,log4j" />
</bean>
然后在springmvc-security.xml中配置dataSource操作:
<!-- 指定一个自定义的authentication-manager :customUserDetailsService -->
<security:authentication-manager alias="theAuthenticationManager">
<security:authentication-provider> <!-- user-service-ref="userService" -->
<security:jdbc-user-service data-source-ref="dataSource" id="jdbcUserService"
users-by-username-query="select username,password,enabled from user where username = ?"
authorities-by-username-query="select username, authority from user where username = ?"
role-prefix="ROLE_"/>
<security:password-encoder ref="passwordEncoder">
<security:salt-source user-property="username"/>
</security:password-encoder>
<!-- 可以把权限配置在配置文件中 -->
<!-- <security:user-service>
<security:user name="hwt" password="3ba941370bf5329ad9a714f404ed33e6" authorities="ROLE_USER,ROLE_ADMIN" />
<security:user name="kevin" password="f39084b3dc1be24f36b2494738197105" authorities="ROLE_USER" />
</security:user-service> -->
</security:authentication-provider>
</security:authentication-manager>
四 登陆后逻辑处理
对于登陆成功后,我们很多情况需要对登陆后进行一些不同的业务逻辑处理,所以我们需要对登陆验证成功后的操作进行扩展,针对上面的配置,我们指定了一个跳转的链接,这样显然不合理,我们需要对登陆后进行一些扩展处理:
<security:form-login login-page="/user/loginPage.action"
authentication-failure-url="/common/failure.action"
login-processing-url="/user/j_spring_security_check"
default-target-url="/main/main.action" //如果不配置,就会返回到登陆前的页面
username-parameter="username" password-parameter="password"/>
修改default-target-url="",改为 authentication-success-handler-ref=””
<!-- 这里要注意配置url的时候以/开头,同时不要被上面的拦截重新截获-->
<security:form-login login-page="/user/loginPage.action"
authentication-failure-url="/common/failure.action"
login-processing-url="/user/j_spring_security_check"
authentication-success-handler-ref="loginSuccessHandler"
username-parameter="username" password-parameter="password"/>
<bean id="loginSuccessHandler"
class="com.springsecurity.handler.LoginSuccessHandler"></bean>
写一个登陆成功处理类:
public class LoginSuccessHandler implements AuthenticationSuccessHandler {
@Override
public void onAuthenticationSuccess(HttpServletRequest request,
HttpServletResponse response, Authentication authentication)
throws IOException, ServletException {
//得到登录前的页面url
String prevUrl = "";
String URL = request.getHeader("Referer");
String args = request.getQueryString();
if (URL == null) {
prevUrl = "";
} else {
if (args != null) {
prevUrl = URL + "?" + args;
} else {
if (URL.contains("/user/loginPage")
|| URL.contains("/user/registePage")) {
prevUrl = "";
} else {
prevUrl = URL;
}
}
}
if (prevUrl == null || prevUrl.equals("")) {
prevUrl = "http://" + request.getServerName() + ":"
+ request.getServerPort()
+ request.getServletContext().getContextPath();
}
response.sendRedirect(prevUrl);
}
}
五 remember-me 记住密码
一,对springmvc-security.xml中进行配置:
<security:http use-expressions="true" access-denied-page="/WEB-INF/pages/common/noAuth.jsp">
<!--
login-page:默认指定的登录页面. authentication-failure-url:出错后跳转页面. default-target-url:成功登陆后跳转页面
login-processing-url="" 表单提交的action的url拦截
username-parameter="username" 表单username的name值,默认j_username,
password-parameter="password" 表单password的name值,默认j_password
-->
<security:intercept-url pattern="/user/**" access="hasRole('ROLE_USER')" />
<!-- 这里要注意配置url的时候以/开头,同事不要被上面的拦截重新截获 -->
<security:form-login login-page="/common/loginPage.action"
authentication-failure-url="/common/failure.action"
default-target-url="/main/main.action"
username-parameter="username" password-parameter="password"/>
<!--
invalidate-session:指定在退出系统时是否要销毁Session。logout-success-url:退出系统后转向的URL。logout-url:指定了用于响应退出系统请求的URL。其默认值为:/j_spring_security_logout。
-->
<security:logout logout-url="/securitylogout" invalidate-session="true" delete-cookies="JSESSIONID" logout-success-url="/user/logout.action" />
<!-- 记住密码 -->
<security:remember-me key="myspringsecurity" data-source-ref="dataSource"
token-validity-seconds="3600000" remember-me-parameter="rememberme" />
</security:http>
<!-- 配置rememberme -->
<bean id="rememberMeAuthenticationFilter" class="org.springframework.security.web.authentication.rememberme.RememberMeAuthenticationFilter">
<constructor-arg index="0" ref="theAuthenticationManager"/>
<constructor-arg index="1" ref="rememberMeServices"/>
</bean>
<bean id="rememberMeServices" class="org.springframework.security.web.authentication.rememberme.PersistentTokenBasedRememberMeServices">
<!-- 标志key -->
<constructor-arg index="0" value="myspringsecurity"/>
<constructor-arg index="1" ref="jdbcUserService"/>
<constructor-arg index="2" ref="tokenRepository"/>
</bean>
<bean id="rememberMeAuthenticationProvider" class="org.springframework.security.authentication.RememberMeAuthenticationProvider">
<!-- 标志key -->
<constructor-arg value="myspringsecurity"/>
</bean>
<!-- 自动保存数据到数据库中 -->
<bean id="tokenRepository" class="org.springframework.security.web.authentication.rememberme.JdbcTokenRepositoryImpl">
<property name="createTableOnStartup" value="false"/>
<property name="dataSource" ref="dataSource"/>
</bean>
需要建立一个表(persistent_logins),用来记录:
在进入登陆页面的时候,进行一些判断:
/**
* 前往登陆页面
* @return
*/
@RequestMapping("loginPage.action")
public String toLoginPage(){
//是不是记住密码
//并验证用户名和密码
Authentication authentication = SecurityContextHolder.getContext().getAuthentication();
if (authentication != null) {
if(RememberMeAuthenticationToken.class.isAssignableFrom(authentication.getClass())){
return "redirect:/main/main.action";
}
}
return "common/login";
}
在页面也可以验证是不是通过记住密码登陆的:
<%@ page language="java" import="java.util.*" pageEncoding="UTF-8"%>
<%@ taglib prefix="sec" uri="http://www.springframework.org/security/tags"%>
<!DOCTYPE HTML PUBLIC "-//W3C//DTD HTML 4.01 Transitional//EN">
<html>
<head>
<title>success</title>
</head>
<body>
<sec:authorize access="isRememberMe()">
<h2># This user is login by "Remember Me Cookies".</h2>
</sec:authorize>
<sec:authorize access="isFullyAuthenticated()">
<h2># This user is login by username / password.</h2>
</sec:authorize>
<a href="${pageContext.request.contextPath }/securitylogout">退出</a>
<div>
<div>${user.username}</div>
<div>${msg}</div>
<ul>
<li>消息消息息消息息消息息消息息消息息消息息消息<a href="${pageContext.request.contextPath}//main/delete.action">【删除】</a></li>
<li>消息消息息消息息消息息消息息消息息消息息消息<a href="${pageContext.request.contextPath}//main/delete.action">【删除】</a></li>
</ul>
</div>
</body>
</html>
六 权限层级控制
如果一个用户用ROLE_ADMIN权限,那么他应该能够拥有ROLE_USER的权限,但是现在需要配置hasRole(‘ROLE_ADMIN’) or hasRole(‘ROLE_USER’)
或者在数据库中赋予两条权限的记录给用户同时赋予ROLE_ADMIN和ROLE_USER的权限,这样显然不合理:
所以我们需要定义权限的层级关系,比如ROLE_AMDIN > ROLE_USER
在springmvc-security.xml中配置<security:expression-handler ref=""/>
<security:http use-expressions="true" access-denied-page="/WEB-INF/pages/common/noAuth.jsp">
<!-- 对权限角色进行处理,见下面配置的权限层级控制 -->
<security:expression-handler ref="expressHandler"/>
<!--
login-page:默认指定的登录页面. authentication-failure-url:出错后跳转页面. default-target-url:成功登陆后跳转页面
login-processing-url="" 表单提交的action的url拦截
username-parameter="username" 表单username的name值,默认j_username,
password-parameter="password" 表单password的name值,默认j_password
-->
<security:intercept-url pattern="/user/**" access="hasRole('ROLE_USER')" />
<!-- 这里要注意配置url的时候以/开头,同事不要被上面的拦截重新截获 -->
<security:form-login login-page="/common/loginPage.action"
authentication-failure-url="/common/failure.action"
default-target-url="/main/main.action"
username-parameter="username" password-parameter="password"/>
<!--
invalidate-session:指定在退出系统时是否要销毁Session。logout-success-url:退出系统后转向的URL。logout-url:指定了用于响应退出系统请求的URL。其默认值为:/j_spring_security_logout。
-->
<security:logout logout-url="/securitylogout" invalidate-session="true" delete-cookies="JSESSIONID" logout-success-url="/user/logout.action" />
<security:remember-me key="myspringsecurity" data-source-ref="dataSource"
token-validity-seconds="3600000" remember-me-parameter="rememberme" />
<!--
max-sessions:允许用户帐号登录的次数。范例限制用户只能登录一次。exception-if-maximum-exceeded:
默认为false,此值表示:用户第二次登录时,前一次的登录信息都被清空。当exception-if-maximum-exceeded="true"时系统会拒绝第二次登录。
-->
<security:session-management>
<security:concurrency-control error-if-maximum-exceeded="true" max-sessions="10"/>
</security:session-management>
<security:intercept-url pattern="/main/delete.action" access="hasRole('ROLE_ADMIN')"/>
</security:http>
<!-- 权限层级控制 -->
<bean id="roleHierarchy" class="org.springframework.security.access.hierarchicalroles.RoleHierarchyImpl">
<property name="hierarchy" value="ROLE_ADMIN > ROLE_USER"/>
</bean>
<bean id="expressHandler" class="org.springframework.security.web.access.expression.DefaultWebSecurityExpressionHandler">
<property name="roleHierarchy" ref="roleHierarchy"/>
</bean>
七 国际化错误信息
现在我们的错误消息需要显示中文,此时,我们可以找到
spring-security-core-3.2.4.RELEASE.jar中的消息文件:
但是我们打开其中的messages_zh_CN.properties中的文件时,发现很多错误信息都太专业了,不适合做用户的交互提醒,所以我们可以将这个文件拷贝到我们项目中的properties/的配置文件包下面,并自定义其中的提醒。
并在springmvc-security.xml中配置:
<!-- 自定义登陆错误提示,可以取出mymessages.properties的国际化消息-->
<bean id="messageSource" class="org.springframework.context.support.ReloadableResourceBundleMessageSource">
<property name="basename" value="classpath:properties/myMessage_zh_CN" />
</bean>
<bean id="localeResolver" class="org.springframework.web.servlet.i18n.AcceptHeaderLocaleResolver" />
八 自定义过滤器,加入到security的chain中
有时候对于某些需求我们需要自定义过滤器,并加入到security中,那么可以很简单的配置一个<security:custom-filter>并能够指定加入的位置:
<!-- 给filterchain加自己的过滤器 ,可以通过after , before , position来定义加入的位置-->
<security:custom-filter ref="" after="LAST"/>
- FIRST
- CHANNEL_FILTER
- SECURITY_CONTEXT_FILTER
- CONCURRENT_SESSION_FILTER
- WEB_ASYNC_MANAGER_FILTER
- HEADERS_FILTER
- CSRF_FILTER
- LOGOUT_FILTER
- X509_FILTER
- PRE_AUTH_FILTER
- CAS_FILTER
- FORM_LOGIN_FILTER
- OPENID_FILTER
- LOGIN_PAGE_FILTER
- DIGEST_AUTH_FILTER
- BASIC_AUTH_FILTER
- REQUEST_CACHE_FILTER
- SERVLET_API_SUPPORT_FILTER
- JAAS_API_SUPPORT_FILTER
- REMEMBER_ME_FILTER
- ANONYMOUS_FILTER
- SESSION_MANAGEMENT_FILTER
- EXCEPTION_TRANSLATION_FILTER
- FILTER_SECURITY_INTERCEPTOR
- SWITCH_USER_FILTER
- LAST
九 使用HTTPS
对于tomcat如何配置https请参考:
http://jingyan.baidu.com/article/a948d6515d3e850a2dcd2ee6.html
对于spring security的默认对应关系是:http 80 https 443 ; http:8080 https:8443
如果需要自定义端口号的话,在<security:http>中定义:
<!-- 在https登陆的时候需要配置端口 -->
<security:port-mappings>
<security:port-mapping http="8089" https="8443"/>
</security:port-mappings>
对于要使用访问的url:
<security:intercept-url pattern="/main/main.action" access="hasRole('ROLE_ADMIN')" requires-channel="https"/>
需要demo源码的请留下邮箱!


