【翻译】Sencha Touch 2入门:创建一个实用的天气应用程序之一
原文标题:Getting Started with Sencha Touch 2: Build a Weather Utility App (Part 1)
原文地址:http://www.sencha.com/blog/getting-started-with-sencha-touch-2-build-a-weather-utility-app-part-1/
作者:Lee Boonstra
Lee is a technical trainer at Sencha. She’s located in Amsterdam and has experience in both front-end and back-end development. Lee spends her spare time developing web and mobile apps. She is writing a cookbook for O'Reilly about Sencha Touch.
在这三个部分的Sencha Touch教程中,将会创建一个简单的我是否需要带伞的实用应用程序,它会从worldweatheronline.com提供的Web服务中加载天气信息。基于天气代码,该应用程序可以预测需要不需要带伞。
在本教程,需要为应用程序编写代码。在下一个教程,重点是创建酷的Sencha Touch主题和如何使用PhoneGap将应用程序转为本地应用程序。
本教程有以下要求:
- Sencha Touch 2.3或更高版本
- Sencha Cmd 4.x
- 一个现代浏览器
- 编辑器
以下是一些附加资源:
可以在这里查看该应用程序并运行它。
最终代码可以在这里下载。
有一些教程所需的好东西——控制器和功能
生成和运行示例应用程序
首先要做的是在硬盘上创建Sencha的文件夹。下载Sencha Touch 2.3并解压到新创建的Sencha文件夹。现在,要为应用程序创建文件夹,我将它命名为dinumu,是“Do I Need My Umbrella”的首字母组合。
现在,在命令行(命令提示符货Mac OS X终端),进入Sencha框架文件夹(cd sencha/touch-2.3.x)并运行以下命令来生成Sencha Touch MVC的目录结构:
sencha generate app -name Dinmu -path ../dinmu
以上命令会为应用程序“我需要带伞么”生成完整的MVC结构。它的命名空间为Dinmu,是所有类的前缀。检查一下已创建的目录结构。
现在可以通过命令行来启动Web服务器——使用Sencha文件夹作为路径。(如果想使用已有的Apache服务器,可以跳过这个步骤。)在Mac OS X,可能需要权限来执行以下命令:如果运行的时候出现权限错误,需要在命令前加上前缀sudo。
sencha fs web -p 80 start -map /path/to/sencha/folder/
以上命令将启动内置的Jetty服务器,由于需要确保CLI窗口打开以保持服务器运行,因而需要打开一个新的CLI窗口来执行以下命令。
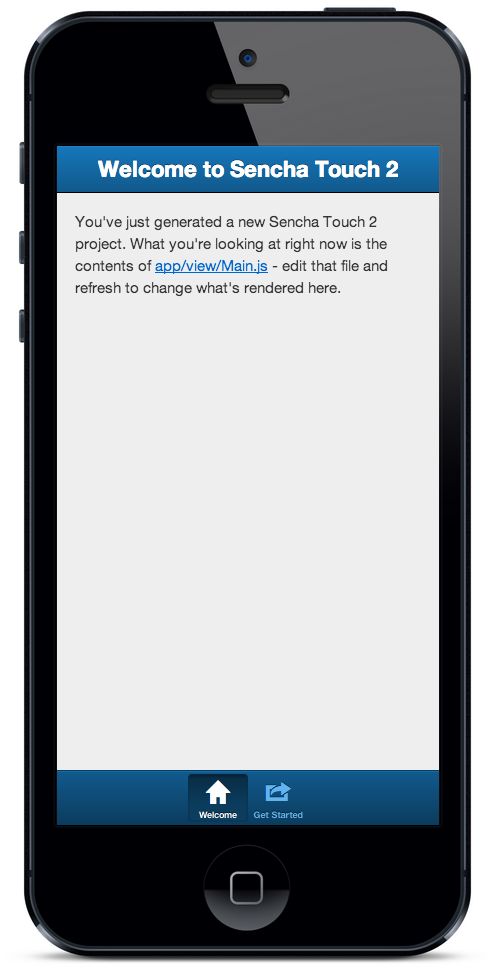
下面来测试生成的Sencha Touch应用程序。打开现代浏览器(如Google Chrome货Safari)并输入:http://localhost/dinmu,将会看到下图所示的Sencha演示应用程序接口,在底部标签面板带有两个演示页:
数据包
下一步要做的是生成模型来定义数据。在应用程序中需要保存的设置包括:id、city(城市)、country(国家)、units(单位)和geolocation(地理定位)。这些数据将会作为模型的字段来进行定义。Sencha Cmd可以用来搭建这个模型。在dinmu文件夹内,运行以下命令:
sencha generate model Setting id,city,country,units,geo:boolean
以上命令会为应用程序创建模型。命令中包含了类名 Setting,在最后的字符串中包含了用来定义字段的所有字段名称。再次检查一下目录结构。
在编辑器中打开app/model/Setting.js。要注意Dinmu.model.Setting相当于app/model/Setting.js。这就是要实现的Setting模型,Sencha Cmd会去定义一个Setting模型类。它派生于Sencha Touch框架的模型实现Ext.data.Model,且包含了所有的字段和字段类型。
字段id将作为应用程序中每一个模型记录的标识。为了让它表现为唯一的id值,需要去配置它。在fields数组前,添加配置项idProperty和identifier。
idProperty: 'id',
identifier: 'uuid',
由于要使用到Sencha的唯一id类,因而需要将该类导入(import)到应用程序中,这可通过 requires配置项来实现,在requires配置项中天类 Ext.data.identifier.Uuid。
requires: ['Ext.data.identifier.Uuid'],
下一步要做的是为模型创建一些验证( validations)。在 fields数组后,创建一个 validations数组,该数组将包含用来验证字段是否包含数据的验证对象。
validations: [{
    type: 'presence',
    field: 'city',
    message: "Please provide a city."
    }, {
    type: 'presence',
    field: 'country',
    message: "Please provide a country."
    }
],
由于希望将本地设置数据保存在设备,所以最后一步要做的是添加一个客户端代理。
在这里将使用本地存储(localstorage)。本地存储代理可确保所有的数据保存到浏览器的本地存储中。在validations数组后添加以下代码来定义代理对象:
proxy: {
    type: 'localstorage',
    id: 'weathersettings'
}
视图组件
Sencha Cmd生成的的标准的标签面板界面看上去不错,但这并适合任何应用程序。“我需要带伞么”应用程序需要需要的是滑动(carousel )界面。
在IDE或文本编辑器,打开app/view/Main.js文件。
当前的Dinmu.view.Main实现派生于Sencha Touch的Ext.tab.Panel类,并通过tabBarPosition属性将标签放置到了屏幕底部。
这并不是所需的,所以要将“tabBarPosition:bottom”删除,并将extend的值修改为Ext.Carousel以便从Sencha Touch的Ext.Carousel类派生。现在,,在浏览器打开并运行http://localhost/dinmu,会看到创建的Sencha示例应用程序内,标签页界面已被替换为滑动视图界面,可以通过水平滑动来切换视图。
下面来删除更多的默认组件。在这里,不需要演示视频,因此要在requires数组中删除Ext.Video。还需要清空items数组,这样就可将他们替换为新的子组件。
第一个子组件对象(默认为容器)只有html属性,该属性可以设置为占位符文本:Settings Form(设置表单),以便稍后再编写代码。第二个子组件对象包含属性itemid(值为mainview)和属性cls(值为textview)。还有添加一个direction属性,值为vertical,以便能垂直滑动。
Ext.define('Dinmu.view.Main', {
    extend: 'Ext.Carousel',
    xtype: 'main',
    requires: [
        'Ext.TitleBar'
    ],
    config: {
        direction: 'vertical',
        items: [{
            html: 'Settings Form'
        },{
            itemId: 'mainview',
            cls: 'textview'
        }]
    }
});
在浏览器查看应用程序,会觉得很平淡。下面,在顶部添加一个标题栏( titlebar)和在底部添加一个工具栏。在“Settings Form”对象前,创建一个新的对象,该对象将通过“ xtype: ‘titlebar’”来添加一个Ext.TitleBar的新实例到Viewport(屏幕)。在标题栏内,将 cls属性的值设置为 title来定义样式。设置 docked属性为 top来将标题栏放置到屏幕顶部。使用 title属性来设置标题为“ Do I need my Umbrella?”。
{
    xtype: 'titlebar',
    cls: 'title',
    docked: 'top',
    title: 'Do I need my Umbrella?'
},
可以使用相同方式来在底部放置一个工具栏。不错,这次的 xtype值不是 titlebar,而是 toolbar。属性 cls设置为 footer。属性 docked的值为 bottom以便将工具栏放置在屏幕底部。将 titile属性修改为 html属性,并设置为版权信息。还需要添加 ui属性,值为 light,以便创建一种轻型的外观和感觉。不要忘记将 Ext.Toolbar添加到问顶部的 requires属性,以便能正确加载框架类。
{
xtype: 'toolbar',
cls: 'footer',
ui: 'light',
docked: 'bottom',
html: '<span>Powered by © Sencha Touch</span>'
},
下一步是在顶部标题栏创建一些按钮。
标题栏将包含一个 items数组,在items数组中将添加两个按钮,一个是在设置屏幕显示的后退按钮,一个是在默认屏幕显示的设置按钮。在这里不需要设置 xtype的值为 button,因为 Ext.TitleBar的默认子组件就是 button(按钮)。后退按钮默认状态是隐藏的,且在标题栏中是左对齐的。设置按钮,将显示为设置齿轮图标。
确认代码是否如以下一样:
Ext.define('Dinmu.view.Main', {
extend: 'Ext.Carousel',
xtype: 'main',
requires: [
'Ext.TitleBar',
'Ext.Toolbar'
],
config: {
direction: 'vertical',
items: [
{
xtype: 'titlebar',
cls: 'title',
docked: 'top',
title: 'Do I need my Umbrella?',
items: [{
cls: 'back',
hidden: true,
ui: 'back',
action: 'back',
align: 'left',
text: 'back'
},
{
iconCls: 'settings',
action: 'settings',
ui: 'plain',
align: 'right'
}]
},
{
html: 'Settings Form'
},{
itemId: 'mainview',
cls: 'textview'
},
{
xtype: 'toolbar',
cls: 'footer',
ui: 'light',
docked: 'bottom',
html: '<span>Powered by © Sencha Touch</span>'
}]
}
});
打开浏览器并运行http://localhost/dinmu,将会看到一个齿轮按钮显示在 Ext.TitleBar的右边。
表单
现在,开始创建一个表单。你知道吗?这一样可以使用生成的方式来创建。在命令行,切换到dinmu目录并运行以下命令来生成Sencha Touch表单:
sencha generate form SettingsView geo:toggle,units:select,city,country
下面检查以下已经构建好的表单类。打开app/view/SettingsView.js文件,Dinmu.view.SettingsView类的xtype属性被设置为settingsview,这样,就可以在items数组中使用xtype属性来创建类。
现在来实现这个,打开Dinmu.view.Main (app/view/Main.js),在代码中找到设置子组件。默认情况下,如果没有知道xtype属性,将会设置为容器。在这里,需要将xtype属性设置为settingsview,所以要添加“ xtype: ‘settingsview’”到主视图代码。不要忘记将Dinmu.view.SettingsView添加到requires数组以确保该类能加载到内存。
为了让它好看起来更好看,可以在SettingsView的Ext.form.Panel中添加一个字段集(fieldset)。在字段集中,将包含4个新字段和提交按钮。字段集是表单面板(formpane)的子组件,而它的子组件是表单字段和按钮。
要在配置对象内items数组创建第二个items数组(在title属性后)。嵌套的第二个items数组将作为子组件。父的items数组将包含一个xtype属性,值为fieldset,还有title属性,值为“Your Location”(你的位置),以及instructions(说明)属性。
要确保子的items数组包含所有的字段和按钮。最终代码如下:
Ext.define('Dinmu.view.SettingsView', {
    extend: 'Ext.form.Panel',
    xtype: 'settingsview',

    config: {
        items:[{
            xtype: 'fieldset',
            title: 'SettingsView',
            instructions: 'In case you do not want the app to detect your location you can enter the city and country.',
            items: [
                {
                    name: 'geo',
                    xtype: 'togglefield',
                    label: 'Geo'
                },
                {
                    name: 'units',
                    xtype: 'selectfield',
                    label: 'Units'
                },
                {
                    name: 'city',
                    xtype: 'textfield',
                    label: 'City'
                },
                {
                    name: 'country',
                    xtype: 'textfield',
                    label: 'Country'
                },
                {
                    xtype: 'button',
                    text: 'Submit',
                    ui: 'confirm'
                }
            ]
        }]
    }
});
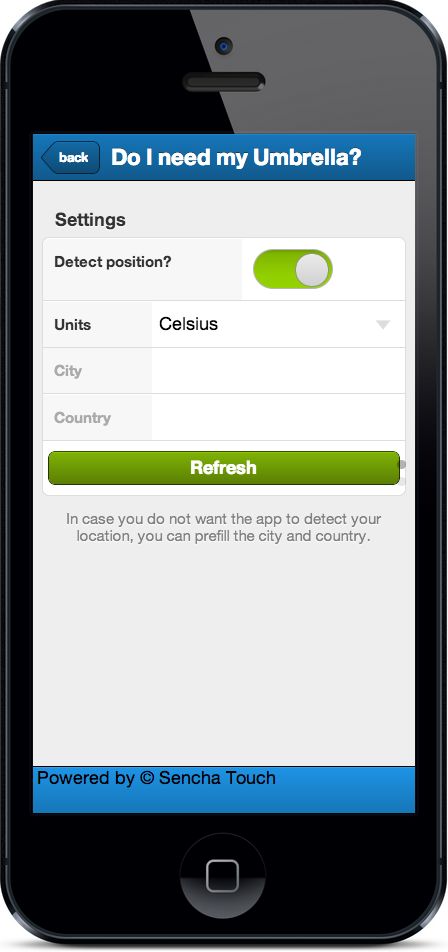
打开浏览器并运行http://localhost/dinmu,将会看到带有标题的设置表单和一些说明,不过选择单位字段有些古怪,它没有值。
下面来为单位的 selectfield添加一些值。
创建一个带有两个对象的 options数组。一个对象带有“ text: ‘Fahrenheit’”和“ value: ‘f’”,而另一个带有“ text: ‘Celsius’”和“ value: ‘c’”。
在 togglefield的标签GEO没有任何意思,所以需要将标签修改为“ Auto detect?”。由于这里的标签文本需要更多的空间,所以需要设置 labelWidth为 55%。将geo字段的 value属性设置为 1以便默认情况下启用地理定位。
可通过添加“ disabled: true”来禁用单位、城市和国家字段。
使用“ Refresh”来提到原有的按钮文本“ Submit”。添加 margin属性,值为“ 10 5”,还要添加 action属性,值为 refresh,以便等下引用按钮:
{
    xtype: 'button',
    text: 'Refresh',
    action: 'refresh',
    margin: '10 5'
    ui: 'confirm'
}
你可能会注意到控制器台会输出一些警告。Ext.Loader的机制会以正确的顺序将Sencha Touch框架的类加载到内存中,而该机制需要根据使用到的表单字段去加载类,所以需要创建requires数组,代码如下:
requires: [
    'Ext.form.FieldSet',
    'Ext.field.Toggle',
    'Ext.field.Select',
    'Ext.field.Text',
    'Ext.Button'
],
现在,界面已经完成了。
下面是settingsview:的完整代码:
Ext.define('Dinmu.view.SettingsView', {
    extend: 'Ext.form.Panel',
    xtype: 'settingsview',
    requires: [
        'Ext.form.FieldSet',
        'Ext.field.Toggle',
        'Ext.field.Select',
        'Ext.field.Text',
        'Ext.Button'
    ],
    config: {
        items:[{
            xtype: 'fieldset',
            title: 'SettingsView',
            instructions: 'In case you do not want the app to detect your location you can enter the city and country.',
            items: [
                {
                    name: 'geo',
                    xtype: 'togglefield',
                    label: 'Auto Detect?',
                    labelWidth: '55%',
                    value: '1'
                },
                {
                    name: 'units',
                    xtype: 'selectfield',
                    options: [
                    {
                        text: 'Fahrenheit',
                        value: 'f'
                    },
                    {
                         text: 'Celsius',
                         value: 'c'
                    }],
                    label: 'Units',
            disabled: true
                },
                {
                    name: 'city',
                    xtype: 'textfield',
                    label: 'City',
                    disabled: true
                },
                {
                    name: 'country',
                    xtype: 'textfield',
                    label: 'Country',
                    disabled: true
                },
                {
                    xtype: 'button',
                    text: 'Refresh',
                    action: 'refresh',
                    margin: '10 5',
                    ui: 'confirm'
                }
            ]
        }]
    }
});
等一下,主视图中的东西呢?是的,这需要动态将数据诸如到页面中,隐藏,需要一些逻辑来实现这个,所以需要创建一个控制器。
创建控制器
控制器(controller)可以将设置模型(应用程序的数据)和设置视图粘合起来。它将包含对所以视图组件的引用,并分发事件。切换到dinmu文件夹并运行以下命令:
sencha generate controller Main
以上命令将创建主控制器。在编辑器中打开app/controller/Main.js文件,将会看到一个带有空的引用对象(refs)和一个空的control对象的控制器。
下一步,要创建引用来引用视图组件main、settingsview、标题栏的设置和后台按钮以及表单字段和刷新按钮。组件的选择符有点类似CSS选择符,最终代码如下:
refs: {
    mainView: 'main',
    settingsView: 'settingsview',

    btnSettings: 'main button[action=settings]',
    btnRefresh: 'settingsview button[action=refresh]',
    btnBack: 'main button[action=back]',

    toggleGeo: 'settingsview togglefield',
    fieldCity: 'settingsview textfield[name=city]',
    fieldCountry: 'settingsview textfield[name=country]',
    fieldUnits: 'settingsview selectfield'
},
现在需要为包含事件的所有视图组件定义引用,代码如下:
control: {
    'btnRefresh': {
        tap: 'onRefresh'
    },
    'btnSettings': {
        tap: 'onSettingsBtnTap'
    },
    'btnBack': {
        tap: 'onBackBtnTap'
    },
    'toggleGeo': {
        change: 'onToggle'
    },
    'mainView': {
        activeitemchange: 'onCarouselChange'
    }
}
在使用浏览器测试事件之前,必须将控制器挂接到app.js的MVC入口。打开app.js,创建一个controllers数组,与requires数组不同,这里只需要定义Main就可将主控制器映射到app/controller/Main.js文件。
controllers: [
    'Main'
],
现在,需要添加一些逻辑。返回Dinmu.controller.Main并在goodies-tutorial目录添加功能。这个可以在controller.txt文件中找到。
使用提供的函数替换掉launch函数。
设置Store和单例模式
Store封装了一个模型对象的客户端缓存。Store也可以设置代理并可以为所包含的模型实例(记录)提供排序、过滤、分析和查询等功能。
目前这个应用程序需要一个Store来保存所以用户设置。
很不幸,不可以使用Sencha Cmd来创建Store。下面,在app/store目录下创建一个名为Setting.js的新文件。在文件中,定义一个新类Dinmu.store.Settings,该类派生于Ext.data.Store。在config对象中,添加model属性,连接到Setter模型。此外,还有设置成自动加载。
Ext.define('Dinmu.store.Settings', {
    extend: 'Ext.data.Store',
    requires: ['Dinmu.model.Setting'],
        config: {
            model: 'Dinmu.model.Setting',
            autoLoad: true
    }
});
打开controller/Main.js文件,在config对象中创建一个stores数组并添加Dinmu.store.Settings。
stores: 'Dinmu.store.Settings',
有时,最好通过MVC文件夹以外的文件夹来分离业务逻辑。
在app文件夹,创建yield名为utils的新文件夹。创建Functions.js文件,并将类名定义为Dinmu.utils.Functions。该类将包含singleton属性,值为true。现在,类已经是单例模式的类,不能为它创建多个实例,不过这样的好处是可以在代码的任何地方调用该类的方法。
Ext.define('Dinmu.utils.Functions', {
    singleton: true,
    //singleton methods here
});
在app.js文件的requires数组中添加Dinmu.utils.Functions。
打开goodies-tutorial文件夹中的functiong.txt文件,将所以代码复制utils/Functions.js中。
这些代码包含了从http://api.worldweatheronline.com/请求天气数据所需的功能。如果想使用自己的API_KEY,可以通过编辑Functions.js顶部的API_KEY属性来修改它。它还包含了从设置请求地理定位和在主视图模板注入数据的逻辑。如果对这些逻辑有兴趣,可以查看functions.txt文件在注释中的描述。
要测试逻辑,可以打开Google Chrome开发者工具,切换到控制台标签页,并输入:Dinmu.utils.Functions.getWeather(‘London’)。它将会返回一个伦敦的天气信息对象并在主视图显示一些文本。
至此,应用程序“我需要带伞么”就已经完成了!可以在浏览器打开并运行http://localhost/dinmu。下一步要做的是改善应用程序的主题和生成应用程序。这将在下一篇博客教程中讲述。
如果你觉得本教程对你很有帮助,且想报名参加Sencha Touch或Ext JS的培训,可以看看遍布世界各地的开发课程或参加在线培训。在报名参加的培训和开发Sencha的应用程序后,你可以获取Sencha认证来证明你的技术。通过我们的快速跟踪培训课程可以为你节省200美元的Sencha认证费用。

