jrebel插件实现热部署
1. help-->install new software....
2.点击Add... Name:jrebel, location: http://www.zeroturnaround.com/update-site/
3.获取插件信息后选择安装JRebel,勾选看图附件 jrebel插件勾选图.png
4.之后next,直到finish. 重启eclipse.
二、配置jrebel:
1.重启完毕后,开始设置JRebel参数,进入Eclipse后选择Window——>Performance。
2.在左侧选择JRebel,然后点击Browser…按钮选择你的jRebel.jar存放路径。
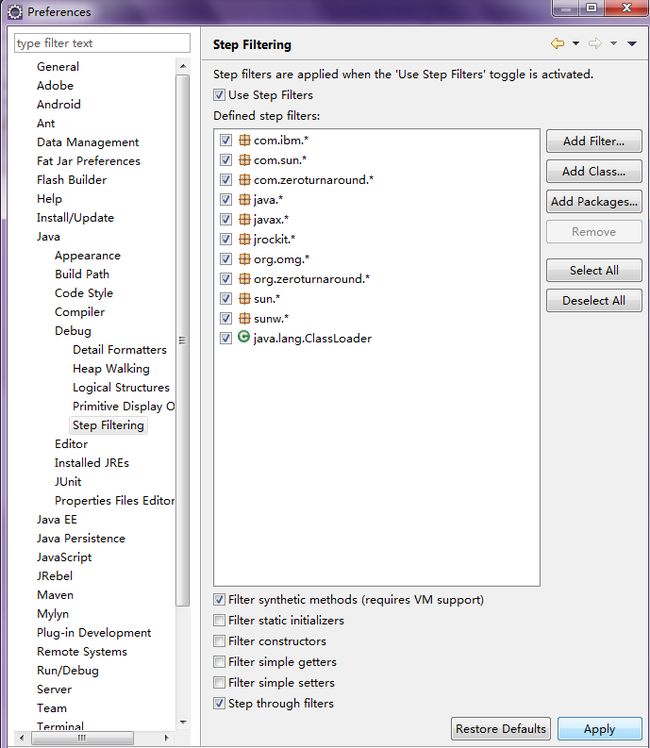
3.在左侧选择Java—Debug—Step Filtering,然后勾选Use Step Filters和Filter synthetic methods (requiresVM support)。点击Add Filter按钮添加add com.zeroturnaround.*和org.zeroturnaround.*。看图附件jrebel配置图.png
4.确认你勾选了Eclipse的自动编译,菜单中Project——>Build Automatically。
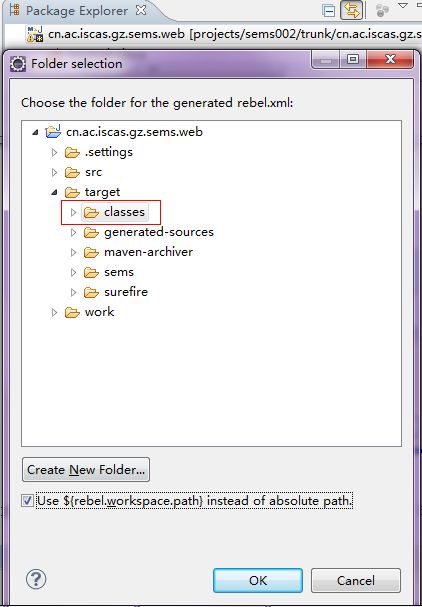
5.在你所需的项目中右键点击选择JRebel-->Generate rebel.xml... 选择项目中的classes文件夹,这样它就可以监控该文件夹下的所有.class文件了。看图附件 选择classes文件夹.png
6.继续在你所需要的项目中右键点击选择JRebel-->Generate rebel.xml in src/main/resources(我建的是maven项目);这样它就会在src/main/resources文件夹下生成一个类似如下结构内容的rebel.xml文件。
- <?xml version="1.0" encoding="UTF-8"?>
- <application xmlns:xsi="http://www.w3.org/2001/XMLSchema-instance"
- xmlns="http://www.zeroturnaround.com"
- xsi:schemaLocation="http://www.zeroturnaround.com http://www.zeroturnaround.com/alderaan/rebel-2_0.xsd">
- <classpath>
- <dir
- name="D:/Workspaces/eclipse for sems2/cn.ac.iscas.gz.sems.web/target/classes">
- </dir>
- </classpath>
- </application>
如果你有很多个联动的maven项目,则只需要在<classpath>内加<dir>元素就OK了。
三、配置服务器,使服务器具有jrebel热部署的支持(以tomcat服务器为例)。
1.在Eclipse的Server选项卡中点击右键New—Server新建一个服务器(如果没有该选项卡,可以从菜单的Window——Show View--other--servers中打开)
2.我选的是Tomcat v5.5 Server(根据自己具体使用的来选择)。
3.双击新建好的服务,进入Overview配置参数...
4.选择Open lauch configuration,在(x)=Arguments选项卡中增加配置VM arguments参数:
- -noverify
- -Drebel.struts2-plugin=true
- -Drebel.spring_plugin=true
- -Xms256m -Xmx256m -XX:MaxNewSize=256m -XX:MaxPermSize=256m
前面的参数是打开JRebel对struts和spring的支持,后面的参数可以防止系统发生OutOfMemery异常。
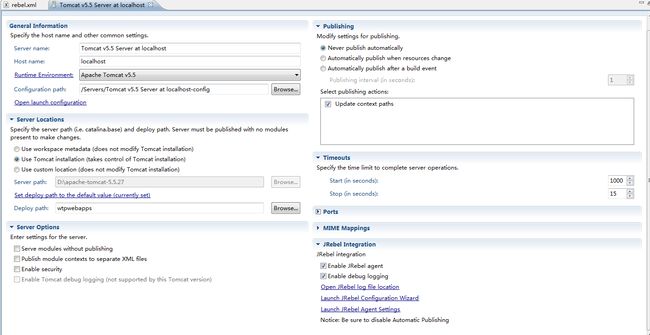
5. 配置其他参数 看图附件 其他配置信息.png
土豆注:如果你要log4j和hibernate等配置。需要配置相应的插件。具体见官网。
如:hibernate_plugin,ibatis_plugin等。
a、Server Locations选择User Tomcat installation
b、Publishing中选择Never publish automatically
c、Timeouts中Start设置成1000或更大
d、JRebel Integration中两个复选框都选中
6.设置项目路径,点击Server选项卡最下面的Modules,点击Add External Web Module,Document base选择到你编译的webapp,Path输入/xxxxx 这里就是你的访问路径了。
比如我的
Document base:D:\Workspaces\eclipse for sems2\cn.ac.iscas.gz.sems.web\target\sems
Path:/sems
至此,jrebel的配置算完成了,配置可能有点繁琐,要细心,要根据自己项目的实际情况配置,结构相同,但内容不可完全照搬。
对于代码中的测试,就根据自己的项目去做测试吧。
别忘了,jrebel监控的是classes文件夹下的文件!
以上大部分来源于:感谢!
http://royal2xiaose.iteye.com/blog/1447586
土豆注:
不过由于我的项目是公司的项目,不能随意添加配置文件,所以我全部是在JVM arguments里面设置的。
修改完后如下所示:
-Drebel.spring_plugin=false
-Drebel.aspectj_plugin=false
-Drebel.struts2_plugin=false
-Drebel.hibernate_plugin=false
-javaagent:D:\java\jrebel.jar
-noverify
-server -Xmn128m -Xms1000m -Xmx1000m
-XX:PermSize=128m -XX:MaxPermSize=256m
这样整个项目算是配置完毕了。在这里做个笔记日后会再用到的!


