Android想尽一切办法进行优化,不断更新--布局优化
1.使用布局相关的工具,SDK提供了2个工具:一个是hierarchyviewer.bat 另一个是lint.bat(SDK16之前叫layoutopt.bat)
使用hierarchyviewer.bat查看布局
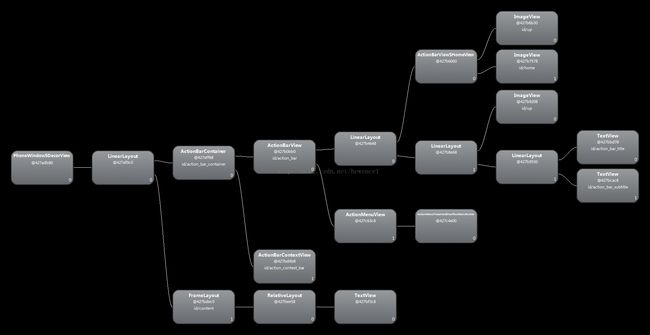
使用hierarchyviewer 查看helloworld的全部布局
简单的hellowolrd的全部布局是这样的:
使用方法是直接打开sdk下面的tools下面的文件夹点击hierarchyviewe.bat:
具体使用方法可以百度一下,自己实战才可以正确使用,使用得熟练。
2.lint.bat(layoutopt.bat)的使用
参考文章:http://blog.csdn.net/u012252502/article/details/24971151
现在自己实战:
我找了一个自己以前写的layout文件:
<RelativeLayout xmlns:android="http://schemas.android.com/apk/res/android"
    android:layout_width="match_parent"
    android:layout_height="match_parent" >

    <ImageView
        android:id="@+id/photo_thumb"
        android:layout_width="match_parent"
        android:layout_height="wrap_content"
        android:scaleType="fitXY"
        android:src="@drawable/empty_photo"
       />
    <TextView
        android:id="@+id/photo_name"
        android:layout_width="wrap_content"
        android:layout_height="wrap_content"
        android:textSize="25sp"
        android:textColor="#ffffffff"
        android:text="25"
        android:layout_centerHorizontal="true"
        android:layout_below="@id/photo_thumb"/>

</RelativeLayout>
发现2个警告,第2个警告,应该应用@string
第一个警告是ADT16以后引入的新特性,
在一些没有文本显示的控件里,如imageView和imageButton等,ADT会提示你定义一个android:contentDescription属性,用来描述这个控件的作用
详细可以参考:http://stackoverflow.com/questions/8500544/android-lint-contentdescription-warning
所有原xml可以改成
<RelativeLayout xmlns:android="http://schemas.android.com/apk/res/android"
    android:layout_width="match_parent"
    android:layout_height="match_parent" >

    <ImageView
        android:id="@+id/photo_thumb"
        android:layout_width="match_parent"
        android:layout_height="wrap_content"
        android:scaleType="fitXY"
        android:src="@drawable/empty_photo"
        android:contentDescription="@string/imagedescroption"
       />
    <TextView
        android:id="@+id/photo_name"
        android:layout_width="wrap_content"
        android:layout_height="wrap_content"
        android:textSize="25sp"
        android:textColor="#ffffffff"
        android:text="@string/height"
        android:layout_centerHorizontal="true"
        android:layout_below="@id/photo_thumb"/>

</RelativeLayout>
还有常见警告:
Should use "sp" instead of "dp" for text sizes
就是text的大少时应该使用sp而不是dp , 应为Sp可以根据用户的字体大小编号来缩放
android:textSize="25sp"
在把我以前写的xml加载进来,发现大部分都有以上3个警告,哎以前都没有注意
还发现这样的警告:
<img src="http://img.blog.csdn.net/20140904104940275?watermark/2/text/aHR0cDovL2Jsb2cuY3Nkbi5uZXQvaGV3ZW5jZTE=/font/5a6L5L2T/fontsize/400/fill/I0JBQkFCMA==/dissolve/70/gravity/Center" alt="" />
从意思上看是布局多余了:
打开这个xml进来分析一下:
<pre name="code" class="html"><?xml version="1.0" encoding="utf-8"?>
<LinearLayout xmlns:android="http://schemas.android.com/apk/res/android"
    android:layout_width="wrap_content"
    android:layout_height="wrap_content"
    android:gravity="center"
    android:orientation="vertical" >

    <FrameLayout
        android:id="@+id/item_focus"
        android:layout_width="wrap_content"
        android:layout_height="wrap_content"
        android:layout_marginTop="10dp"
        android:gravity="center" >

        <LinearLayout
            android:id="@+id/app_item"
            android:layout_width="wrap_content"
            android:layout_height="wrap_content"
            android:layout_gravity="center"
            android:gravity="center"
            android:orientation="vertical" >

            <FrameLayout
                android:layout_width="wrap_content"
                android:layout_height="wrap_content"
                android:gravity="center" >

                <ImageView
                    android:id="@+id/app_icon_focus"
                    android:layout_width="wrap_content"
                    android:layout_height="wrap_content"
                    android:layout_gravity="center"
                    android:src="@drawable/menu_icon_bg" />

                <ImageView
                    android:id="@+id/app_icon"
                    android:layout_width="80dp"
                    android:layout_height="80dp"
                    android:layout_gravity="center"
                    android:layout_marginBottom="2dp" />
            </FrameLayout>

            <TextView
                android:id="@+id/app_name"
                style="@style/select_app_name_style" />
        </LinearLayout>
    </FrameLayout>

</LinearLayout>
简单分析一下,
第八行的FrameLayout,里面马上就套用了一个Linearlayout,而且只有一个子控件,确实是多余的,删之
我一直加载几十个xml,发现了这四类警告,解决办法卸载上面了!
还有从其他地方收集来的:
如: <p style="color: rgb(51, 51, 51); font-size: 14px; margin-top: 10px; margin-bottom: 10px; padding-top: 0px; padding-bottom: 0px; text-indent: 28px; font-family: 宋体; line-height: 28px; background-color: rgb(248, 248, 248);"><span style="text-align: center;">(1)太多的视图</span></p><p style="color: rgb(51, 51, 51); font-size: 14px; margin-top: 10px; margin-bottom: 10px; padding-top: 0px; padding-bottom: 0px; text-indent: 28px; font-family: 宋体; line-height: 28px; background-color: rgb(248, 248, 248);">每个视图都会消耗内存,在一个布局中布置太多的视图,布局会占用过多的内存,假设一个布局包含超过80个视图,layoutopt可能会给出下面这样的建议:<br style="clear: both; width: 0px; height: 0px;" /> </p><pre style="white-space: pre-wrap; word-wrap: break-word; color: rgb(51, 51, 51); font-size: 14px; margin-top: 0px; margin-bottom: 1em; padding: 0px; font-family: 'Courier New', monospace; width: 591.015625px; overflow: auto; line-height: 28px; background-color: rgb(230, 230, 230);"><ol class="dp-xml" style="margin-left: 55px; padding: 5px 0px; color: rgb(92, 92, 92); list-style-position: initial; word-wrap: break-word; word-break: normal; border: none; margin-top: 0px !important; margin-right: 0px !important; margin-bottom: 1px !important; background-color: rgb(247, 247, 247);"><li class="alt" style="color: inherit; list-style: decimal outside none; word-wrap: break-word; word-break: normal; border: none; line-height: 18px; margin: 0px !important; padding: 0px 3px 0px 10px !important; background-color: transparent;"><span style="margin: 0px; padding: 0px; border: none; color: black; background-color: inherit;"><span style="margin: 0px; padding: 0px; border: none; background-color: inherit;">-1:-1 This layout has too many views: 83 views, it should have </span><span class="tag" style="color: rgb(0, 102, 153); font-weight: bold; margin: 0px 0px 10px; padding: 7px 0px 4px; border: none; width: 635px; background-color: inherit;"><</span><span style="margin: 0px; padding: 0px; border: none; background-color: inherit;">= 80! </span></span></li><li style="list-style: decimal outside none; word-wrap: break-word; word-break: normal; border: none; line-height: 18px; margin: 0px !important; padding: 0px 3px 0px 10px !important; background-color: transparent;"><span style="margin: 0px; padding: 0px; border: none; color: black; background-color: inherit;">-1:-1 This layout has too many views: 82 views, it should have </span><span class="tag" style="color: rgb(0, 102, 153); font-weight: bold; margin: 0px 0px 10px; padding: 7px 0px 4px; border: none; width: 635px; background-color: inherit;"><</span><span style="margin: 0px; padding: 0px; border: none; color: black; background-color: inherit;">= 80! </span></li><li class="alt" style="color: inherit; list-style: decimal outside none; word-wrap: break-word; word-break: normal; border: none; line-height: 18px; margin: 0px !important; padding: 0px 3px 0px 10px !important; background-color: transparent;"><span style="margin: 0px; padding: 0px; border: none; color: black; background-color: inherit;">-1:-1 This layout has too many views: 81 views, it should have </span><span class="tag" style="color: rgb(0, 102, 153); font-weight: bold; margin: 0px 0px 10px; padding: 7px 0px 4px; border: none; width: 635px; background-color: inherit;"><</span><span style="margin: 0px; padding: 0px; border: none; color: black; background-color: inherit;">= 80! </span></li></ol>
上面给出的建议是视图数量不能超过80,当然最新的设备有可能能够支持这么多视图,但如果真的出现性能不佳的情况,最好采纳这个建议。
(2)
嵌套太多
布局不应该有太多的嵌套,layoutopt(和Android团队)建议布局保持在10级以内,即使是最大的平板电脑屏幕,布局也不应该超过10级,RelativeLayout可能是一个解决办法,但它的用法更复杂,好在Eclipse中的Graphical Layout资源工具更新后,使得这一切变得更简单。
下面是布局嵌套太多时,layoutopt的输出内容:
- -1:-1 This layout has too many nested layouts: 12 levels, it should have <= 10!
- 305:318 This LinearLayout layout or its RelativeLayout parent is possibly useless
- 307:314 This LinearLayout layout or its FrameLayout parent is possibly useless
- 310:312 This LinearLayout layout or its LinearLayout parent is possibly useless
3.使用多线程解决复杂计算,耗时长的操作
占用CPU较多的数据操作尽可能放在一个单独的线程中进行,通过handler等方式把执行的结果交于UI线程显示。特别是针对的网络访问,数据库查询,和复杂的算法。目前Android提供了AsyncTask,Hanlder、Message和Thread的组合。对于多线程的处理,如果并发的线程很多,同时有频繁的创建和释放,线程池解决线程创建的效率瓶颈。另外值得注意的是,应用开发中自定义View的时候,交互部分,千万不要写成线程不断刷新界面显示,而是根据TouchListener事件主动触发界面的更新!线程跟UI通过handler来更新
4.布局用Java完成比XML快
一般情况下对于Android程序布局往往使用XML文件来编写,这样可以提高开发效率,但是考虑到代码的安全性以及执行效率,可以通过Java代码执行创建,虽然Android编译过的XML是二进制的,但是加载XML解析器的效率对于资源占用还是比较大的,Java处理效率比XML快得多,但是对于一个复杂界面的编写,可能需要一些套嵌考虑,如果你思维灵活的话,使用Java代码来布局你的Android应用程序是一个更好的方法。
5.对图片进行适当的缩放
图片读取是OOM(Out of Memory)的常客,当在Android手机上直接读取4M的图片时,死神一般都会降临,所以导致往往自己手机拍摄的照片都不能直接读取。对大型图片进行缩放处理图片时我们经常会用到BitmapFactory类,android系统中读取位图Bitmap时分给虚拟机中图片的堆栈大小只有8M。用BitmapFactory解码一张图片时,有时也会遇到该错误。这往往是由于图片过大造成的。这时我们需要分配更少的内存空间来存储。BitmapFactory.Options.inSampleSize设置恰当的inSampleSize可以使BitmapFactory分配更少的空间以消除该错误。Android提供了一种动态计算的,如下:
读取图片之前先查看其大小:
BitmapFactory.Options opts = new BitmapFactory.Options();
opts.inJustDecodeBounds = true;
Bitmap bitmap = BitmapFactory.decodeFile(imageFile, opts);
使用得到的图片原始宽高计算适合自己的smaplesize
BitmapFactory.Options opts = new BitmapFactory.Options();
 opts.inSampleSize = 4 ;// 4就代表容量变为以前容量的1/4
 Bitmap bitmap = BitmapFactory.decodeFile(imageFile, opts);
对于过时的Bitmap对象一定要及时recycle,并且把此对象赋值为null。
 if (!bit.isRecycled()){
            bit.recycle();
            bit = null;
     }
6 .合理使用ViewStub
ViewStub 是一个隐藏的,不占用内存空间的视图对象,它可以在运行时延迟加载布局资源文件。当ViewStub可见,或者调用 inflate()函数时,才会加载这个布局资源文件。 该ViewStub在加载视图时在父容器中替换它本身。因此,ViewStub会一直存在于视图中,直到调用setVisibility(int) 或者inflate()为止。ViewStub的布局参数会随着加载的视图数一同被添加到ViewStub父容器。同样,你也可以通过使用 inflatedId属性来定义或重命名要加载的视图对象的Id值。所以我们可以使用ViewStub延迟加载某些比较复杂的layout,动态加载 View,采用ViewStub 避免一些不经常的视图长期握住引用。
详细请参考http://developer.android.com/reference/android/view/ViewStub.html
使用ViewStub的实例:
布局如下:
<RelativeLayout xmlns:android="http://schemas.android.com/apk/res/android" xmlns:tools="http://schemas.android.com/tools" android:layout_width="match_parent" android:layout_height="match_parent" android:paddingBottom="@dimen/activity_vertical_margin" android:paddingLeft="@dimen/activity_horizontal_margin" android:paddingRight="@dimen/activity_horizontal_margin" android:paddingTop="@dimen/activity_vertical_margin" tools:context=".MainActivity" > <Button android:id="@+id/button" android:layout_width="wrap_content" android:layout_height="wrap_content" android:text="@string/show" android:textSize="20sp" /> <ViewStub android:id="@+id/view_stub" android:layout_width="wrap_content" android:layout_height="wrap_content" android:layout="@layout/sub_view" /> <!-- <include layout="@layout/sub_view" android:id="@+id/view_stub" android:visibility="gone"/> --> </RelativeLayout>在button点击以后才把布局加载进来,被加载进来的布局<?xml version="1.0" encoding="utf-8"?> <RelativeLayout xmlns:android="http://schemas.android.com/apk/res/android" android:layout_width="match_parent" android:layout_height="match_parent" > <ImageView android:id="@+id/imageview" android:layout_width="wrap_content" android:layout_height="wrap_content" android:layout_marginLeft="10dp" android:layout_marginTop="50dp" android:src="@drawable/photo17" android:contentDescription="@string/image_description"/> <TextView android:id="@+id/textview" android:layout_width="wrap_content" android:layout_height="wrap_content" android:layout_marginLeft="10dp" android:layout_marginTop="50dp" android:textSize="18sp"/> </RelativeLayout>为力效果明显。我这么使用了一张比较大的图片来显示:mButton = (Button)findViewById(R.id.button); mButton.setOnClickListener(this); @Override public void onClick(View v) { if (isShow){ if (null != subView){ subView.setVisibility(View.GONE); } }else{ // 只可以findview一次,第二次findviewById 时 view为null if (null == subView){ ViewStub view = (ViewStub)findViewById(R.id.view_stub); Log.w(TAG , "view = " + view); subView = view.inflate(); }else{ subView.setVisibility(View.VISIBLE); TextView text = (TextView)findViewById(R.id.textview); ImageView image = (ImageView)findViewById(R.id.imageview); text.setText(image.getContentDescription()); } } isShow = !isShow; }功能是点击button来显示跟隐藏view
现在来跟踪一下内存的使用情况:点击button之前(stub没有没inflate)结果见截图:
点击以后:
然后不管点击多少下都内存的使用都不会有大的变化了 :
要注意的地方是
ViewStub view = (ViewStub)findViewById(R.id.view_stub); Log.w(TAG , "view = " + view); subView = view.inflate();只能被执行一次,第二次调用<pre name="code" class="java" style="font-size: 14px; line-height: 21px;">ViewStub view = (ViewStub)findViewById(R.id.view_stub);时,返回值为null。如果不是ViewStub时那么一开始运行时占用内存有多大呢?按道理来说应该是跟调用<pre name="code" class="java" style="font-size: 14px; line-height: 21px;">subView = view.inflate();以后的内存差不多大!实验一下,布局修改为
<RelativeLayout xmlns:android="http://schemas.android.com/apk/res/android"
    xmlns:tools="http://schemas.android.com/tools"
    android:layout_width="match_parent"
    android:layout_height="match_parent"
    android:paddingBottom="@dimen/activity_vertical_margin"
    android:paddingLeft="@dimen/activity_horizontal_margin"
    android:paddingRight="@dimen/activity_horizontal_margin"
    android:paddingTop="@dimen/activity_vertical_margin"
    tools:context=".MainActivity" >

    <Button
        android:id="@+id/button"
        android:layout_width="wrap_content"
        android:layout_height="wrap_content"
        android:text="@string/show"
        android:textSize="20sp" />
  <!--   <ViewStub
        android:id="@+id/view_stub"
        android:layout_width="wrap_content"
        android:layout_height="wrap_content"
        android:layout="@layout/sub_view" />   -->

  <include layout="@layout/sub_view"
       android:id="@+id/view_stub"
       android:visibility="gone"/>

</RelativeLayout>
运行结果:

总结一下:个人觉得可以使用在第一次不需要显示出来的可以使用ViewStub,
需要条件触发才显示出来的如:常见的点击,检测到网络,硬盘,收到某些广播等。。。
如果工程中有多余的图片(需求修改后,对应的图片没有被删除),那么最终生成的APK的大少肯定会大一些,
那么占用的内存会因此增加吗?
实验一下:
系统生成的helloworld的程序,记录下它的使用内存大少跟bin下面的APk大少:
现在copy大量的图片(图片总大少6.28 MB (6,594,853 字节))到drawable-mdpi下面结果如下:
可见APk的大少变大了,但是使用的内存是没有变化的,以前怀疑过图片会不会影响占用内存,现在实验都知道结果了!
既然会影响APK大少,当然多余的还是要删掉掉,但是跟内存没有一毛钱关系,所有删掉多余的图片/资源文件跟内存的优化没有一点帮助。
8.其他的注意点:i. 分辨率适配
-ldpi,-mdpi, -hdpi配置不同精度资源,系统会根据设备自适应,包括drawable, layout,style等不同资源。
ii. 尽量使用dp(density independent pixel)开发,不用px(pixel)。
iii. 多用wrap_content, fill_parent(跟match_parent 是一样的效果)
iv. 抛弃AbsoluteLayout
v. 使用9patch(通过~/tools/draw9patch.bat启动应用程序),png格式
vi. 采用<merge> 优化布局层数;采用<include >来共享布局。
vii. 将Acitivity中的Window的背景图设置为空。getWindow().setBackgroundDrawable(null);android的默认背景是不是为空。
viii. View中设置缓存属性.setDrawingCache为true。
使用include跟merge共同使用:
上一个例子中布局文件:
<RelativeLayout xmlns:android="http://schemas.android.com/apk/res/android" xmlns:tools="http://schemas.android.com/tools" android:layout_width="match_parent" android:layout_height="match_parent" android:paddingBottom="@dimen/activity_vertical_margin" android:paddingLeft="@dimen/activity_horizontal_margin" android:paddingRight="@dimen/activity_horizontal_margin" android:paddingTop="@dimen/activity_vertical_margin" tools:context=".MainActivity" > <Button android:id="@+id/button" android:layout_width="wrap_content" android:layout_height="wrap_content" android:text="@string/show" android:textSize="20sp" /> <!-- <ViewStub android:id="@+id/view_stub" android:layout_width="wrap_content" android:layout_height="wrap_content" android:layout="@layout/sub_view" /> --> <include layout="@layout/sub_view" android:id="@+id/view_stub" android:visibility="visible"/> </RelativeLayout>那么sub_view.xml的root节点就可以改成merge,这样哭减少嵌套层次从而优化布局:<pre name="code" class="html"><?xml version="1.0" encoding="utf-8"?> <merge xmlns:android="http://schemas.android.com/apk/res/android" android:layout_width="match_parent" android:layout_height="match_parent" > <ImageView android:id="@+id/imageview" android:layout_width="wrap_content" android:layout_height="wrap_content" android:layout_marginLeft="10dp" android:layout_marginTop="50dp" android:src="@drawable/photo17" android:contentDescription="@string/image_description"/> <TextView android:id="@+id/textview" android:layout_width="wrap_content" android:layout_height="wrap_content" android:layout_marginLeft="10dp" android:layout_marginTop="50dp" android:textSize="18sp"/> </merge>


