AppWidget启动流程部分 Launcher分析
基于源代码: Android2.2. Launcher.java.
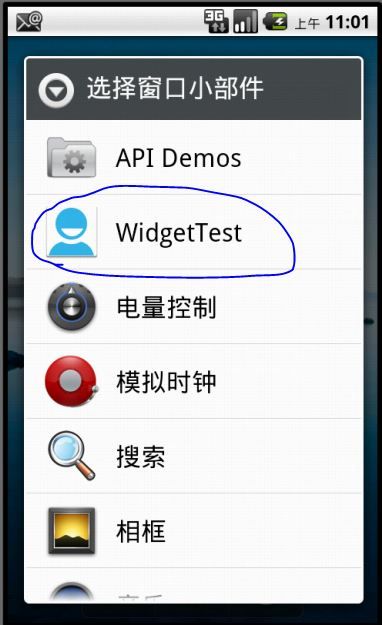
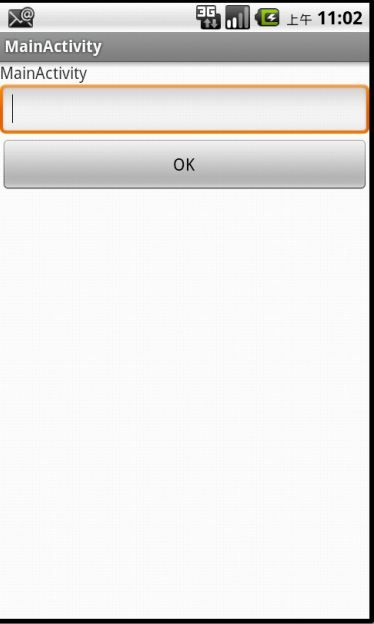
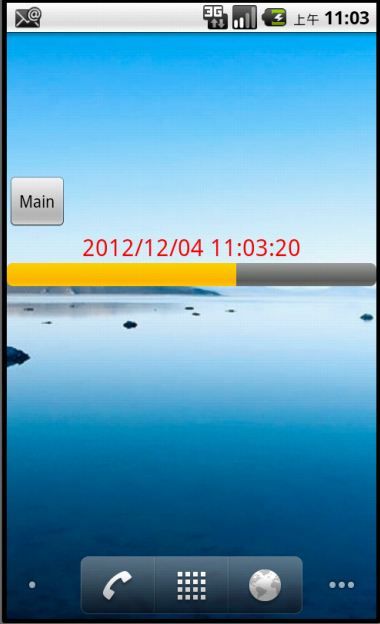
操作流程:在Launcher界面长按,选择“窗口小部件”,弹出小部件选择框,选择自己的小部件,出现Configure Activity,点击OK,显示Widget.
启动流程:Laucher界面
-------->Launcher.onLongClick() { .... showAddDialog(cellInfo) .......}
Launcher.showAddDialog(){ ......... showDialog(DIALOG_CREATE_SHORTCUT); .........}
----->Activity.showDialog(,){ ............. createDialog() ; onPrepareDialog() ........................}
------->Launcher.onCreateDialog(){ ..................... new CreateShortcut().createDialog(); .........................} //显示 "添加到主屏幕" ;
Launcher.onPrepareDialog(){ .... .............}
-------> Laucher.CreateShortcut.onClick() { ..........
case AddAdapter.ITEM_APPWIDGET: {
int appWidgetId = Launcher.this.mAppWidgetHost.allocateAppWidgetId(); //分配WIdgetId,不能自己设置
Intent pickIntent = new Intent(AppWidgetManager.ACTION_APPWIDGET_PICK);
pickIntent.putExtra(AppWidgetManager.EXTRA_APPWIDGET_ID, appWidgetId);
// start the pick activity
startActivityForResult(pickIntent, REQUEST_PICK_APPWIDGET);//加载"选择窗口小部件"activity
break; }
......}
---------> "选择窗口小部件"activity,选择了某一个AppWidget, onClick(),AppWidgetManager.bindAppWidgetId(),AppWidgetService.bindAppWidgetId()
appWidgetService.bindAppWidgetId(){ ...........
//发送Enable BroadCast,then AppWidgetProvider get broadcast ,执行onEnale();
//发送Update BroadCast,then AppWidgetProvider get broadcast ,执行onUpdate();
............
}
---------->Launcher.onActivityResult(){ .............
case REQUEST_PICK_APPWIDGET:
addAppWidget(data);
break;
.................. }
-------->Launcher.addAppWidget(){ ....................
//当需要Configure时,打开ConfigureActivity,同时将AppWidgetId传入
if (appWidget.configure != null) {
// Launch over to configure widget, if needed
Intent intent = new Intent(AppWidgetManager.ACTION_APPWIDGET_CONFIGURE);
intent.setComponent(appWidget.configure);
intent.putExtra(AppWidgetManager.EXTRA_APPWIDGET_ID, appWidgetId);
startActivityForResultSafely(intent, REQUEST_CREATE_APPWIDGET); //
}else{
// Otherwise just add it
onActivityResult(REQUEST_CREATE_APPWIDGET, Activity.RESULT_OK, data);
}
.....................}
主要流程:
1.Createshortcut Dialog [添加到主屏幕]
2.AppWidgetPickActivity [ 选择小部件 ]
3.发送Broadcast
A> AppWidgetManager.sService 发送widgetID的ACTION_APPWIDGET_ENABLED【Sent when an instance of an AppWidget is added to a host for the first time】,widgetID的OnEnabled被called;
B>AppWidgetManager.sService 发送widgetID的ACTION_APPWIDGET_UPDATE,widgetID的OnUpdated被called;
C>返回Launcher, 发送ACTION_APPWIDGET_CONFIGURE,configureActivity将收到此广播,并打开自己的activity,对widget的参数进行配置【配置的参数采用SharedPreferences方式,widget跟host可以共享访问
4.添加Widget
另外:
D>删除插件时,即在插件上长按,在拖动到垃圾桶里,会调用ACTION_APPWIDGET_DELETED【Sent when an instance of an AppWidget is deleted from its host】,这里可以做一些清除工作,比如清除配置信息,停止alarm等操作;
E>如果app只绑定了一个插件的话,则appwidgetmanager.sService会发送ACTION_APPWIDGET_DISABLED【Sent when an instance of an AppWidget is removed from the last host】,同样可以做一些清理的工作。
(2)下一次手机开机
由于插件已经绑定过了,并且configure过了,此时启动后,appwidgetmanager会执行A> B>,不会执行C>,所以第一次安装过程中,最好是对参数做一个合理的配置。不过一般来讲,widget上还有配置的选项,在运行后可以再次设置
源代码:
1.Launcher.OnLongClick
  public boolean onLongClick(View v) {
        switch (v.getId()) {
            case R.id.previous_screen:
                if (!isAllAppsVisible()) {
                    mWorkspace.performHapticFeedback(HapticFeedbackConstants.LONG_PRESS,
                            HapticFeedbackConstants.FLAG_IGNORE_VIEW_SETTING);
                    showPreviews(v);
                }
                return true;
            case R.id.next_screen:
                if (!isAllAppsVisible()) {
                    mWorkspace.performHapticFeedback(HapticFeedbackConstants.LONG_PRESS,
                            HapticFeedbackConstants.FLAG_IGNORE_VIEW_SETTING);
                    showPreviews(v);
                }
                return true;
            case R.id.all_apps_button:
                if (!isAllAppsVisible()) {
                    mWorkspace.performHapticFeedback(HapticFeedbackConstants.LONG_PRESS,
                            HapticFeedbackConstants.FLAG_IGNORE_VIEW_SETTING);
                    showPreviews(v);
                }
                return true;
        }

        if (isWorkspaceLocked()) {
            return false;
        }

        if (!(v instanceof CellLayout)) {
            v = (View) v.getParent();
        }

        CellLayout.CellInfo cellInfo = (CellLayout.CellInfo) v.getTag();

        // This happens when long clicking an item with the dpad/trackball
        if (cellInfo == null) {
            return true;
        }

        if (mWorkspace.allowLongPress()) {
            if (cellInfo.cell == null) {
                if (cellInfo.valid) {
                    // User long pressed on empty space
                    mWorkspace.setAllowLongPress(false);
                    mWorkspace.performHapticFeedback(HapticFeedbackConstants.LONG_PRESS,
                            HapticFeedbackConstants.FLAG_IGNORE_VIEW_SETTING);
                    showAddDialog(cellInfo);
                }
            } else {
                if (!(cellInfo.cell instanceof Folder)) {
                    // User long pressed on an item
                    mWorkspace.performHapticFeedback(HapticFeedbackConstants.LONG_PRESS,
                            HapticFeedbackConstants.FLAG_IGNORE_VIEW_SETTING);
                    mWorkspace.startDrag(cellInfo);
                }
            }
        }
        return true;
    }
2. Activity.showDialog();
    /**
     * Simple version of {@link #showDialog(int, Bundle)} that does not
     * take any arguments.  Simply calls {@link #showDialog(int, Bundle)}
     * with null arguments.
     */
    public final void showDialog(int id) {
        showDialog(id, null);
    }

    /**
     * Show a dialog managed by this activity.  A call to {@link #onCreateDialog(int, Bundle)}
     * will be made with the same id the first time this is called for a given
     * id.  From thereafter, the dialog will be automatically saved and restored.
     *
     * <p>Each time a dialog is shown, {@link #onPrepareDialog(int, Dialog, Bundle)} will
     * be made to provide an opportunity to do any timely preparation.
     *
     * @param id The id of the managed dialog.
     * @param args Arguments to pass through to the dialog.  These will be saved
     * and restored for you.  Note that if the dialog is already created,
     * {@link #onCreateDialog(int, Bundle)} will not be called with the new
     * arguments but {@link #onPrepareDialog(int, Dialog, Bundle)} will be.
     * If you need to rebuild the dialog, call {@link #removeDialog(int)} first.
     * @return Returns true if the Dialog was created; false is returned if
     * it is not created because {@link #onCreateDialog(int, Bundle)} returns false.
     *
     * @see Dialog
     * @see #onCreateDialog(int, Bundle)
     * @see #onPrepareDialog(int, Dialog, Bundle)
     * @see #dismissDialog(int)
     * @see #removeDialog(int)
     */
    public final boolean showDialog(int id, Bundle args) {
        if (mManagedDialogs == null) {
            mManagedDialogs = new SparseArray<ManagedDialog>();
        }
        ManagedDialog md = mManagedDialogs.get(id);
        if (md == null) {
            md = new ManagedDialog();
            md.mDialog = createDialog(id, null, args);
            if (md.mDialog == null) {
                return false;
            }
            mManagedDialogs.put(id, md);
        }

        md.mArgs = args;
        onPrepareDialog(id, md.mDialog, args);
        md.mDialog.show();
        return true;
    }
 private class CreateShortcut implements DialogInterface.OnClickListener,
            DialogInterface.OnCancelListener, DialogInterface.OnDismissListener,
            DialogInterface.OnShowListener {

        private AddAdapter mAdapter;

        Dialog createDialog() {
            mAdapter = new AddAdapter(Launcher.this);

            final AlertDialog.Builder builder = new AlertDialog.Builder(Launcher.this);
            builder.setTitle(getString(R.string.menu_item_add_item));
            builder.setAdapter(mAdapter, this);

            builder.setInverseBackgroundForced(true);

            AlertDialog dialog = builder.create();
            dialog.setOnCancelListener(this);
            dialog.setOnDismissListener(this);
            dialog.setOnShowListener(this);

            return dialog;
        }

        public void onCancel(DialogInterface dialog) {
            mWaitingForResult = false;
            cleanup();
        }

        public void onDismiss(DialogInterface dialog) {
        }

        private void cleanup() {
            try {
                dismissDialog(DIALOG_CREATE_SHORTCUT);
            } catch (Exception e) {
                // An exception is thrown if the dialog is not visible, which is fine
            }
        }

        /**
         * Handle the action clicked in the "Add to home" dialog.
         */
        public void onClick(DialogInterface dialog, int which) {
            Resources res = getResources();
            cleanup();

            switch (which) {
                case AddAdapter.ITEM_SHORTCUT: {
                    // Insert extra item to handle picking application
                    pickShortcut();
                    break;
                }

                case AddAdapter.ITEM_APPWIDGET: {
                    int appWidgetId = Launcher.this.mAppWidgetHost.allocateAppWidgetId();

                    Intent pickIntent = new Intent(AppWidgetManager.ACTION_APPWIDGET_PICK);
                    pickIntent.putExtra(AppWidgetManager.EXTRA_APPWIDGET_ID, appWidgetId);
                    // start the pick activity
                    startActivityForResult(pickIntent, REQUEST_PICK_APPWIDGET);
                    break;
                }

                case AddAdapter.ITEM_LIVE_FOLDER: {
                    // Insert extra item to handle inserting folder
                    Bundle bundle = new Bundle();

                    ArrayList<String> shortcutNames = new ArrayList<String>();
                    shortcutNames.add(res.getString(R.string.group_folder));
                    bundle.putStringArrayList(Intent.EXTRA_SHORTCUT_NAME, shortcutNames);

                    ArrayList<ShortcutIconResource> shortcutIcons =
                            new ArrayList<ShortcutIconResource>();
                    shortcutIcons.add(ShortcutIconResource.fromContext(Launcher.this,
                            R.drawable.ic_launcher_folder));
                    bundle.putParcelableArrayList(Intent.EXTRA_SHORTCUT_ICON_RESOURCE, shortcutIcons);

                    Intent pickIntent = new Intent(Intent.ACTION_PICK_ACTIVITY);
                    pickIntent.putExtra(Intent.EXTRA_INTENT,
                            new Intent(LiveFolders.ACTION_CREATE_LIVE_FOLDER));
                    pickIntent.putExtra(Intent.EXTRA_TITLE,
                            getText(R.string.title_select_live_folder));
                    pickIntent.putExtras(bundle);

                    startActivityForResult(pickIntent, REQUEST_PICK_LIVE_FOLDER);
                    break;
                }

                case AddAdapter.ITEM_WALLPAPER: {
                    startWallpaper();
                    break;
                }
            }
        }

        public void onShow(DialogInterface dialog) {
            mWaitingForResult = true;
        }
    }
4.在AppWidgetPickerActivity中,内容为List<PickAdapter.Item> items,存放的是所有的widget。点击onClick,intent.getExtras() == null的,执行
mAppWidgetManager.bindAppWidgetId(mAppWidgetId, intent.getComponent());
启动AppWidgetService,并sService.bindAppWidgetId(){. .. ..},并发送Enable broadcast, Update broadcast;
AppWidgetProvider onReceive() Broadcast,执行 onEnable(),onUpdate()
 public void onClick(DialogInterface dialog, int which) {
        Intent intent = getIntentForPosition(which);

        int result;
        if (intent.getExtras() != null) {
            // If there are any extras, it's because this entry is custom.
            // Don't try to bind it, just pass it back to the app.
            setResultData(RESULT_OK, intent);
        } else {
            try {
                mAppWidgetManager.bindAppWidgetId(mAppWidgetId, intent.getComponent());
                result = RESULT_OK;
            } catch (IllegalArgumentException e) {
                // This is thrown if they're already bound, or otherwise somehow
                // bogus.  Set the result to canceled, and exit.  The app *should*
                // clean up at this point.  We could pass the error along, but
                // it's not clear that that's useful -- the widget will simply not
                // appear.
                result = RESULT_CANCELED;
            }
            setResultData(result, null);
        }
        finish();
    }
AppWidgetService.bindAppWidgetId
 public void bindAppWidgetId(int appWidgetId, ComponentName provider) {
        mContext.enforceCallingPermission(android.Manifest.permission.BIND_APPWIDGET,
                "bindGagetId appWidgetId=" + appWidgetId + " provider=" + provider);
        synchronized (mAppWidgetIds) {
            AppWidgetId id = lookupAppWidgetIdLocked(appWidgetId);
            if (id == null) {
                throw new IllegalArgumentException("bad appWidgetId");
            }
            if (id.provider != null) {
                throw new IllegalArgumentException("appWidgetId " + appWidgetId + " already bound to "
                        + id.provider.info.provider);
            }
            Provider p = lookupProviderLocked(provider);
            if (p == null) {
                throw new IllegalArgumentException("not a appwidget provider: " + provider);
            }
            if (p.zombie) {
                throw new IllegalArgumentException("can't bind to a 3rd party provider in"
                        + " safe mode: " + provider);
            }

            id.provider = p;
            p.instances.add(id);
            int instancesSize = p.instances.size();
            if (instancesSize == 1) {
                // tell the provider that it's ready
                sendEnableIntentLocked(p);
            }

            // send an update now -- We need this update now, and just for this appWidgetId.
            // It's less critical when the next one happens, so when we schdule the next one,
            // we add updatePeriodMillis to its start time.  That time will have some slop,
            // but that's okay.
            sendUpdateIntentLocked(p, new int[] { appWidgetId });

            // schedule the future updates
            registerForBroadcastsLocked(p, getAppWidgetIds(p));
            saveStateLocked();
        }
    }
5. 从"选择窗口小部件"Activity中返回选择的小部件REQUEST_PICK_APPWIDGET
  @Override
    protected void onActivityResult(int requestCode, int resultCode, Intent data) {
        mWaitingForResult = false;

        // The pattern used here is that a user PICKs a specific application,
        // which, depending on the target, might need to CREATE the actual target.

        // For example, the user would PICK_SHORTCUT for "Music playlist", and we
        // launch over to the Music app to actually CREATE_SHORTCUT.

        if (resultCode == RESULT_OK && mAddItemCellInfo != null) {
            switch (requestCode) {
                case REQUEST_PICK_APPLICATION:
                    completeAddApplication(this, data, mAddItemCellInfo);
                    break;
                case REQUEST_PICK_SHORTCUT:
                    processShortcut(data);
                    break;
                case REQUEST_CREATE_SHORTCUT:
                    completeAddShortcut(data, mAddItemCellInfo);
                    break;
                case REQUEST_PICK_LIVE_FOLDER:
                    addLiveFolder(data);
                    break;
                case REQUEST_CREATE_LIVE_FOLDER:
                    completeAddLiveFolder(data, mAddItemCellInfo);
                    break;
                case REQUEST_PICK_APPWIDGET:
                    addAppWidget(data);
                    break;
                case REQUEST_CREATE_APPWIDGET:
                    completeAddAppWidget(data, mAddItemCellInfo);
                    break;
                case REQUEST_PICK_WALLPAPER:
                    // We just wanted the activity result here so we can clear mWaitingForResult
                    break;
            }
        } else if ((requestCode == REQUEST_PICK_APPWIDGET ||
                requestCode == REQUEST_CREATE_APPWIDGET) && resultCode == RESULT_CANCELED &&
                data != null) {
            // Clean up the appWidgetId if we canceled
            int appWidgetId = data.getIntExtra(AppWidgetManager.EXTRA_APPWIDGET_ID, -1);
            if (appWidgetId != -1) {
                mAppWidgetHost.deleteAppWidgetId(appWidgetId);
            }
        }
    }
 void addAppWidget(Intent data) {
        // TODO: catch bad widget exception when sent
        int appWidgetId = data.getIntExtra(AppWidgetManager.EXTRA_APPWIDGET_ID, -1);
        AppWidgetProviderInfo appWidget = mAppWidgetManager.getAppWidgetInfo(appWidgetId);

        if (appWidget.configure != null) {
            // Launch over to configure widget, if needed
            Intent intent = new Intent(AppWidgetManager.ACTION_APPWIDGET_CONFIGURE);
            intent.setComponent(appWidget.configure);
            intent.putExtra(AppWidgetManager.EXTRA_APPWIDGET_ID, appWidgetId);

            startActivityForResultSafely(intent, REQUEST_CREATE_APPWIDGET);
        } else {
            // Otherwise just add it
            onActivityResult(REQUEST_CREATE_APPWIDGET, Activity.RESULT_OK, data);
        }
    }
7.当发送REQUEST_CREATE_APPWIDGET时,completeAddAppWidget()
  /**
     * Add a widget to the workspace.
     *
     * @param data The intent describing the appWidgetId.
     * @param cellInfo The position on screen where to create the widget.
     */
    private void completeAddAppWidget(Intent data, CellLayout.CellInfo cellInfo) {
        Bundle extras = data.getExtras();
        int appWidgetId = extras.getInt(AppWidgetManager.EXTRA_APPWIDGET_ID, -1);

        if (LOGD) Log.d(TAG, "dumping extras content=" + extras.toString());

        AppWidgetProviderInfo appWidgetInfo = mAppWidgetManager.getAppWidgetInfo(appWidgetId);

        // Calculate the grid spans needed to fit this widget
        CellLayout layout = (CellLayout) mWorkspace.getChildAt(cellInfo.screen);
        int[] spans = layout.rectToCell(appWidgetInfo.minWidth, appWidgetInfo.minHeight);

        // Try finding open space on Launcher screen
        final int[] xy = mCellCoordinates;
        if (!findSlot(cellInfo, xy, spans[0], spans[1])) {
            if (appWidgetId != -1) mAppWidgetHost.deleteAppWidgetId(appWidgetId);
            return;
        }

        // Build Launcher-specific widget info and save to database
        LauncherAppWidgetInfo launcherInfo = new LauncherAppWidgetInfo(appWidgetId);
        launcherInfo.spanX = spans[0];
        launcherInfo.spanY = spans[1];

        LauncherModel.addItemToDatabase(this, launcherInfo,
                LauncherSettings.Favorites.CONTAINER_DESKTOP,
                mWorkspace.getCurrentScreen(), xy[0], xy[1], false);

        if (!mRestoring) {
            mDesktopItems.add(launcherInfo);

            // Perform actual inflation because we're live
            launcherInfo.hostView = mAppWidgetHost.createView(this, appWidgetId, appWidgetInfo);

            launcherInfo.hostView.setAppWidget(appWidgetId, appWidgetInfo);
            launcherInfo.hostView.setTag(launcherInfo);

            mWorkspace.addInCurrentScreen(launcherInfo.hostView, xy[0], xy[1],
                    launcherInfo.spanX, launcherInfo.spanY, isWorkspaceLocked());
        }
    }


