CodeIgniter and Netbeans 7.3 autocomplete
CodeIgniter and Netbeans don’t work together out of the box. And as this lengthy bug-report suggests, there won’t be any support soon.
But we can get some of the code autocomplete working. This post will tell you how.
What we need is Netbeans 7.3 en CodeIgniter Version 2.1.3
Installing CodeIgniter
After you downloaded CodeIgniter, install it following these instructions. I followed these to the letter, doing what “For the best security, both the system and any application folders should be placed above web root” said. This proved to make matters complicated. I will try to point some pitfalls out.
Tutorial
You might want to follow the tutorial section to find out how CodeIgniter works.
Code Auto Complete
Early into the tutorial you will notice that auto completion doesn’t work. $this->… will throw “No Suggestions” at you. The problem is that Netbeans needs some extra configuration to get it up and running. Here is how:
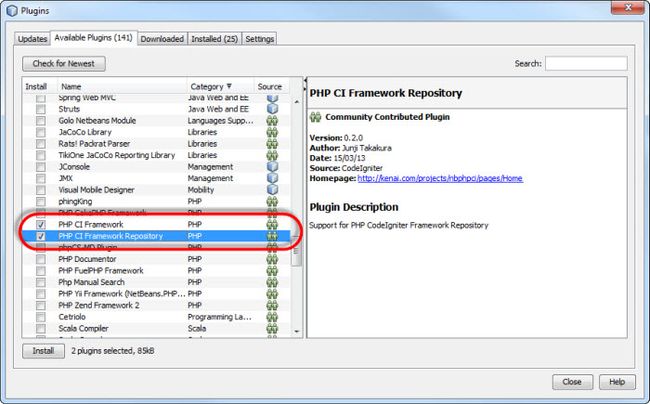
We need to install the CodeIgniter plugin ( by Junji Takakura ) into Netbeans (optional more info:https://kenai.com/projects/nbphpci/pages/NBInstall)
1. Go to Tools – Plugins and select Settings tab. Then click “Add” to add the plugin. No files are needed, the plugin will be downloaded automatically.

2.Put “CodeIgniter” (or something you recognize) in the name field and put the following URL in the URL text field:
https://kenai.com/downloads/nbphpci/Latest_NetBeans730/updates.xml
Click “OK”
3.Switch to the “available plugins” tab and search for PHP CI Framework and PHP CI Framework Repository. Check the checkbox in front of them and click “install”.

4. Follow the instructions, click on continue when at the ‘validation warning’ (the following plugins are not signed:)…
So far so good. My folder structure is as follows. Note that I moved application and system out of the webroot, which in my case is “public_html”:
Source-Files
–>public_html
–>application
–>system
To get auto complete working, we need a (autogenerated) auto complete file. It is included in all your files, but not compiled. It’s only used by Netbeans internally so it can find the properties and methods to offer for autocompletion. In previous versions, we needed to put these in the (global) include folder. This version of the plugin does that for us, but we need to tell it where to find our application and system folders.
1. Right click your project and choose properties
2. Go to Frameworks -> CodeIgniter and check the checkbox to enable it. The click the “Add Folder” button to add the application and settings folders you have. (Note that in the screenshot I renamed them, but in your case they will be called application and system.)
3. Click “OK”. If you did everything right, Netbeans automagically created a directory “autocomplete” and added it the the include path. In that directory is a file containing all the scenery code to make auto complete working, more or less like we want it.
New Project
A bit off topic, but if you want to start a new CodeIgniter project, Netbeans can automatically get the files needed for the framework. To do that, we need to put the files somewhere, on a fixed place, and tell Netbeans where to find them. Here is how.
1. Download the CodeIgniter zipfile (downloads).
2. Save is some place where it can be used for all projects.
3. Tell Netbeans where it is: Go to Tools -> Options -> Choose the PHP icon on top -> Go to the CodeIgniter tab. Click “Add Zip” and browse to the zipfile containing the CodeIgniter framework.
Some fine tuning
When going through the tutorial, you might find that the Auto Complete is not always working as expected.
For example:
When you are here ( http://ellislab.com/codeigniter/user-guide/tutorial/create_news_items.html ) to “create a newsitem” and you want to have “input” autocomplete in this line in the model:
$slug = url_title($this->input->post(‘title’), ‘dash’, TRUE);
you will find that is looks like this:
This can be fixed by fiddling in the “__ci_auto_complete__.php” file. In that file you’ll note that every class, like CI_Controller, is preceded by @property statements for methods in them. You’ll notice that the list is for longer for CI_Controller than for CI_Model. The latter is missing the input method. So if you copy ” * @property CI_Input $input ” from the list on top and paste it into the list above CI_model, it will work. I’m still experimenting with this file, so I can’t tell you more.
If you have more tips, please add them to the comments section.