ASoc driver结构流程分析
在网上看到一位大神写的关于ALSA声卡驱动的一系列文章,感觉很膜拜。附上地址:http://blog.csdn.net/droidphone/article/details/6271122
下面是我自己的心得体会
一、platform_device and platform_driver
1、第一次platform_device与platform_driver匹配
在arch/arm/mach-s3c2440/mach-mini2440.c文件中
#include <sound/s3c24xx_uda134x.h>
static struct s3c24xx_uda134x_platform_data s3c24xx_uda134x_data = { (struct s3c24xx_uda134x_platform_data是第一次匹配时的platform_data)
.l3_clk = S3C2410_GPB(4),
.l3_data = S3C2410_GPB(3),
.l3_mode = S3C2410_GPB(2),
.model = UDA134X_UDA1341,
};
static struct platform_device s3c24xx_uda134x = {
.name = "s3c24xx_uda134x",
.dev = {
.platform_data = &s3c24xx_uda134x_data,
}
};
在sound/soc/s3c24xx/s3c24xx_uda134x.c文件中
static struct platform_driver s3c24xx_uda134x_driver = {
.probe = s3c24xx_uda134x_probe,
.remove = s3c24xx_uda134x_remove,
.driver = {
.name = "s3c24xx_uda134x",
.owner = THIS_MODULE,
},
};
2、struct platform_device s3c24xx_uda134x与struct platform_driver s3c24xx_uda134x_driver两者一匹配,进入s3c24xx_uda134x_probe函数,之后开始第二次platform_device与platform_driver匹配。
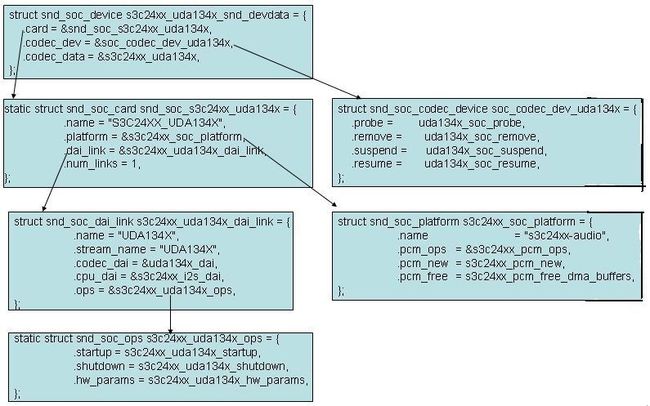
static struct snd_soc_device s3c24xx_uda134x_snd_devdata = { (struct snd_soc_device是第二次匹配时的platform_data)
.card = &snd_soc_s3c24xx_uda134x,
.codec_dev = &soc_codec_dev_uda134x,
.codec_data = &s3c24xx_uda134x,
};
struct platform_device s3c24xx_uda134x_snd_device = platform_device_alloc("soc-audio", -1);
platform_set_drvdata(s3c24xx_uda134x_snd_device, &s3c24xx_uda134x_snd_devdata);
platform_device_add(s3c24xx_uda134x_snd_device);
由于在sound/soc/soc-core.c文件中
static struct platform_driver soc_driver = {
.driver = {
.name = "soc-audio",
.owner = THIS_MODULE,
.pm = &soc_pm_ops,
},
.probe = soc_probe,
.remove = soc_remove,
};
struct platform_device s3c24xx_uda134x_snd_device与struct platform_driver soc_driver一匹配,接下来进入soc_probe函数
二、声卡的创建与注册
1、soc_probe函数
soc_probe
snd_soc_register_card
snd_soc_instantiate_cards(这个函数能被四个函数调用snd_soc_register_card,snd_soc_register_dai,snd_soc_register_platform,snd_soc_register_codec)
snd_soc_instantiate_card
2、snd_soc_instantiate_card函数
真正去调用的是cpu_dai->probe和codec_dev->probe函数,其他都没有实现。
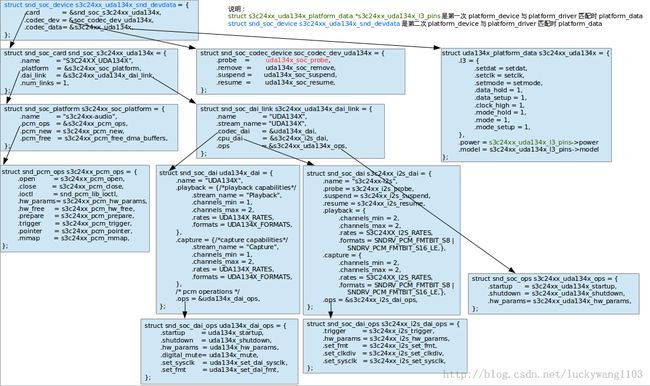
先来理清card,cpu_dai,codec_dev,platform几个结构体之间的关系

a. card->probe没有实现
struct snd_soc_card *card是struct snd_soc_device s3c24xx_uda134x_snd_devdata中的变量,而s3c24xx_uda134x_snd_devdata是在soc_probe中取出来platform_drvdata
b. cpu_dai->probe的实现在sound/soc/s3c24xx/s3c24xx-i2s.c中
struct snd_soc_dai *cpu_dai是struct snd_soc_device --> struct snd_soc_card --> struct snd_soc_dai_link --> struct snd_soc_dai
struct snd_soc_dai s3c24xx_i2s_dai = {
.name = "s3c24xx-i2s",
.id = 0,
.probe = s3c24xx_i2s_probe,
.suspend = s3c24xx_i2s_suspend,
.resume = s3c24xx_i2s_resume,
.playback = {
.channels_min = 2,
.channels_max = 2,
.rates = S3C24XX_I2S_RATES,
.formats = SNDRV_PCM_FMTBIT_S8 | SNDRV_PCM_FMTBIT_S16_LE,},
.capture = {
.channels_min = 2,
.channels_max = 2,
.rates = S3C24XX_I2S_RATES,
.formats = SNDRV_PCM_FMTBIT_S8 | SNDRV_PCM_FMTBIT_S16_LE,},
.ops = &s3c24xx_i2s_dai_ops,
};
c. codec_dev->probe的实现在sound/soc/codec/uda134x.c
struct snd_soc_codec_device soc_codec_dev_uda134x = {
.probe = uda134x_soc_probe,
.remove = uda134x_soc_remove,
.suspend = uda134x_soc_suspend,
.resume = uda134x_soc_resume,
};
d. platform->probe并没有实现
struct snd_soc_device --> struct snd_soc_card --> snd_soc_platform的定义在sound/soc/s3c24xx/s3c24xx-pcm.c文件中
struct snd_soc_platform s3c24xx_soc_platform = {
.name = "s3c24xx-audio",
.pcm_ops = &s3c24xx_pcm_ops,
.pcm_new = s3c24xx_pcm_new,
.pcm_free = s3c24xx_pcm_free_dma_buffers,
};
3、cpu_dai->probe即s3c24xx_i2s_probe
初始化i2s时钟,管脚等寄存器
4、codec_dev->probe即uda134x_soc_probe
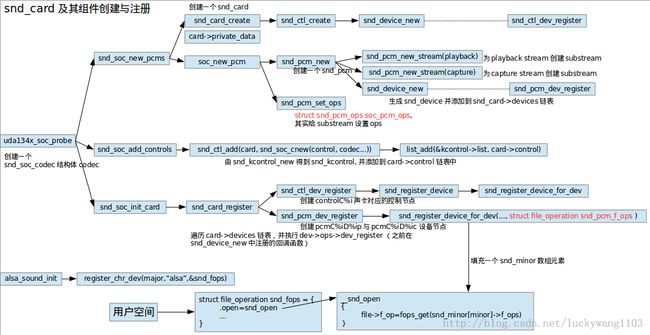
主要是声卡(snd_card)及其组件(snd_pcm)的创建与注册
其中snd_device_new作用是往snd_card->devices链表中添加snd_device,添加的结果如下:
5、很关键的两个结构体
snd_pcm_set_ops(..., struct snd_pcm_ops soc_pcm_ops) 和 snd_register_device_for_dev(...,struct file_operation snd_pcm_f_ops)
应用层访问驱动层的接口通过struct file_operation snd_pcm_f_ops,而file_operation的具体实现又要依赖于struct snd_pcm_ops soc_pcm_ops
const struct file_operations snd_pcm_f_ops[2] = {
	{
		.owner =		THIS_MODULE,
		.write =		snd_pcm_write,
		.aio_write =		snd_pcm_aio_write,
		.open =			snd_pcm_playback_open,
		.release =		snd_pcm_release,
		.poll =			snd_pcm_playback_poll,
		.unlocked_ioctl =	snd_pcm_playback_ioctl,
		.compat_ioctl = 	snd_pcm_ioctl_compat,
		.mmap =			snd_pcm_mmap,
		.fasync =		snd_pcm_fasync,
		.get_unmapped_area =	dummy_get_unmapped_area,
	},
	{
		.owner =		THIS_MODULE,
		.read =			snd_pcm_read,
		.aio_read =		snd_pcm_aio_read,
		.open =			snd_pcm_capture_open,
		.release =		snd_pcm_release,
		.poll =			snd_pcm_capture_poll,
		.unlocked_ioctl =	snd_pcm_capture_ioctl,
		.compat_ioctl = 	snd_pcm_ioctl_compat,
		.mmap =			snd_pcm_mmap,
		.fasync =		snd_pcm_fasync,
		.get_unmapped_area =	dummy_get_unmapped_area,
	}
};
static struct snd_pcm_ops soc_pcm_ops = {
    .open       = soc_pcm_open,
    .close      = soc_codec_close,
    .hw_params  = soc_pcm_hw_params,
    .hw_free    = soc_pcm_hw_free,
    .prepare    = soc_pcm_prepare,
    .trigger    = soc_pcm_trigger,
};

soc_pcm_ops.mmap    = platform->pcm_ops->mmap;
soc_pcm_ops.pointer = platform->pcm_ops->pointer;
soc_pcm_ops.ioctl   = platform->pcm_ops->ioctl;
soc_pcm_ops.copy    = platform->pcm_ops->copy;
soc_pcm_ops.silence = platform->pcm_ops->silence;
soc_pcm_ops.ack     = platform->pcm_ops->ack;
soc_pcm_ops.page    = platform->pcm_ops->page;
1)看看struct file_operation是如何一层层调用到struct snd_pcm_ops的
2)对于struct snd_pcm_ops soc_pcm_ops结构体中的函数,具体又会去依次调用(如果有的话)cpu_dai->ops, platform->ops, codec_dai->ops, machine->ops中的函数。
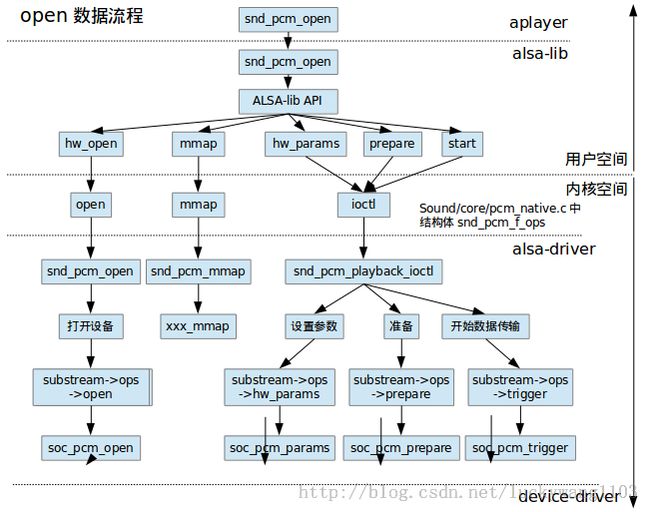
三、open流程
打开设别,映射,设置硬件参数,准备工作,触发数据流。
四、写数据流程
五、其他


