Cobbler自动化批量安装系统服务搭建详解
前述(配置环境):
本次配置环境基于CentOS 7,主机的IP为172.16.49.101
一、Cobbler概述
1.cobbler简介
cobbler是基于python语言开发的pxe二次封装的网络安装服务;可以多系统选择自动化安装配置。可以通过Web图形化界面配置,其安装包为cobbler,在epel源上。配置过程中某些过程可能需要依赖互联网环境。
主配置文件:/etc/cobbler/settings
相关概念:
distro |
表示一个发行版,标记一个发行版的最关键资源是kernel和ramdisk; |
profile |
kickstart配置文件 |
system |
借助于为主机指明IP、mask安装系统 |
2.cobbler管理命令
cobbler程序提供了cobbler系列的管控命令管理distro和prifile
[root@localhost ~]#cobbler
usage
=====
cobbler<distro|profile|system|repo|image|mgmtclass|package|file> ...
[add|edit|copy|getks*|list|remove|rename|report] [options|--help]
cobbler<aclsetup|buildiso|import|list|replicate|report|reposync|sync|validateks|version|signature|get-loaders|hardlink>[options|--help]
管理distro |
cobbler distro {list|add|remove|edit|rename} |
管理pofile |
cobbler profile {list|add|remove|edit|rename} |
(1)管理distro
使cobbler变得可用的第一步为定义distro,可通过为其指定外部的安装引导内核及ramdisk文件方式实现。若已经有完整的系统安装镜像,则推荐使用import直接导入的方式进行。
(2)管理prifile
cobbler使用profile来为特定的需求类别提供所需要安装配置,即在distro的基础上通过提供kickstart文件来生成一个特定的系统安装配置。distro的profile可以出现在PXE的引导菜单中作为安装的选择之一。可使用“cobblerprofile list”查看已经创建的profile
实例:
为前面创建的centos-6.5-x86_64这个distro提供一个可引导安装条目,其用到的kickstart文件为/tmp/centos-6.5-x86_64.cfg(只提供了最基本的程序包),则可通过如下命令实现。
# cobbler profile add --name=centos-6.5-x86_64-basic--distro=centos-6.5-x86_64 --kickstart=/tmp/centos-6.5-x86_64.cfg
二、安装启动cobbler程序
1.安装启动程序
[root@localhost ~]# yum install cobbler
[root@localhost~]# systemctl start cobblerd.service
2.检测配置环境
[root@localhost ~]# yum install httpd
[root@localhost ~]# systemctl start httpd.service # cobbler会依赖web服务
[root@localhost ~]# cobbler check # 检测cobbler环境,每个问题解决之后就能运行
cobbler check环境错误:
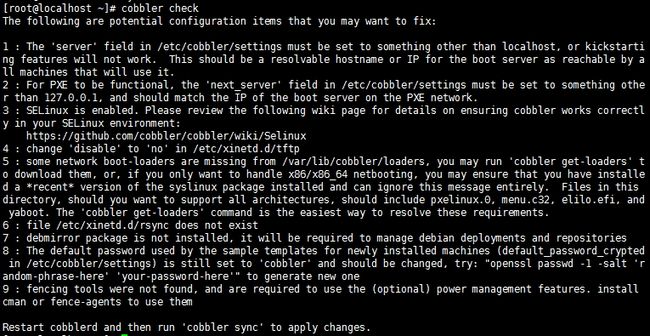
[root@localhost~]# cobbler check
Thefollowing are potential configuration items that you may want to fix:
1: The 'server' field in /etc/cobbler/settings must be set to something otherthan localhost, or kickstarting features will not work. This should be a resolvable hostname or IPfor the boot server as reachable by all machines that will use it.
2: For PXE to be functional, the 'next_server' field in /etc/cobbler/settingsmust be set to something other than 127.0.0.1, and should match the IP of theboot server on the PXE network.
3: SELinux is enabled. Please review the following wiki page for details onensuring cobbler works correctly in your SELinux environment:
https://github.com/cobbler/cobbler/wiki/Selinux
4: change 'disable' to 'no' in /etc/xinetd.d/tftp
5: some network boot-loaders are missing from /var/lib/cobbler/loaders, you mayrun 'cobbler get-loaders' to download them, or, if you only want to handlex86/x86_64 netbooting, you may ensure that you have installed a *recent*version of the syslinux package installed and can ignore this messageentirely. Files in this directory,should you want to support all architectures, should include pxelinux.0,menu.c32, elilo.efi, and yaboot. The 'cobbler get-loaders' command is theeasiest way to resolve these requirements.
6: file /etc/xinetd.d/rsync does not exist
7: debmirror package is not installed, it will be required to manage debiandeployments and repositories
8: The default password used by the sample templates for newly installedmachines (default_password_crypted in /etc/cobbler/settings) is still set to'cobbler' and should be changed, try: "openssl passwd -1 -salt'random-phrase-here' 'your-password-here'" to generate new one
9: fencing tools were not found, and are required to use the (optional) powermanagement features. install cman or fence-agents to use them
Restartcobblerd and then run 'cobbler sync' to apply changes.
解决方法:
1) 修改/etc/cobbler/settings文件中的server参数的值为提供cobbler服务的主机相应的IP地址或主机名,如172.16.49.101
2) 修改/etc/cobbler/settings文件中的next_server参数的值为提供PXE服务的主机相应的IP地址,如172.16.49.101
3) 需要关闭SELinux
4) 执行 "chkconfigtftp on" 命令启动tftp服务,CentOS7:systemctl start tftp.socket
5) 缺少bootloader引导文件。如果当前节点可以访问互联网,执行“cobblerget-loaders”命令即可;否则,需要安装syslinux程序包,而后复制/usr/share/syslinux/{pxelinux.0,menu.c32}等至/var/lib/cobbler/loaders/目录中;
6) 执行 "chkconfig rsyncon" 命令启动rsync(远程同步)服务,CentOS7:确保服务启动安装systemctlstart rsyncd.socket
7) CentOS 7,关于deb可忽略,无相关包组
8) 密码过于简单;执行“openssl passwd -1 -salt $(openssl rand -hex4)”生成密码,并用其替换/etc/cobbler/settings文件中default_password_crypted参数的值;或者创建用户/etc/shadow中的密码段复制
9) 执行“yum installcman fence-agents”命令安装相应的程序包即可;
三、配置启动cobbler所依赖服务
说明:
1) 依赖程序包
cobbler程序运行依赖于务dhcp、tftp、rsync及dns服务。其中dhcp可由dhcpd(isc)提供,也可由dnsmasq提供;tftp可由tftp-server程序包提供,也可由cobbler自带的tftp功能提供;rsync由rsync程序包提供;dns可由bind提供,也可由dnsmasq提供。
2) 服务管控
cobbler程序可以管控dhcp、tftp、rsync及dns服务中的部分或者全部。
需要在配置/etc/cobbler/settings文件中定义:"manage_dhcp""manage_tftpd""manage_rsync"和"manage_dns"手动或托管使用。由于每种服务都有着不同的实现方式,如若需要进行自定义,需要通过修改/etc/cobbler/modules.conf配置文件中各服务的模块参数的值来实现。
注意:本文采用了部分独立手动管理的方式,即不通过cobbler来管理这些服务。
1.配置cobbler服务管控
[root@localhost~]# vim /etc/cobbler/settings
"manage_tftpd"设置为1,cobbler自动管控
"manage_dhcp""manage_rsync"和"manage_dns"设置为0,手动管控
2.安装配置dhcp服务
(1)安装dhcp程序包
[root@localhost~]# yuminstall dhcp
(2)复制修改配置模板
[root@localhost~]# cp /usr/share/doc/dhcp-4.2.5/dhcpd.conf.example /etc/dhcp/dhcpd.conf
配置文件定义所需的“subnet”及其它参数或选项:
option domain-name "xuding.com";
option domain-name-servers 192.168.10.254,172.16.0.1;
default-lease-time 43200;
max-lease-time 86400;
log-facility local7;
subnet 172.16.0.0 netmask 255.255.0.0 {
range 172.16.100.121 172.16.100.200;
option routers 172.16.49.101;
}
next-server 172.16.49.101;
filename="pxelinux.0";
(3)启动dhcp服务
[root@localhost~]# systemctl start cobblerd.service
3.启动tftp-server服务
该服务在依赖yum源安装cobbler服务时候会作为依赖包自动安装,[root@localhost ~]# systemctl start tftp.socket
三、光盘镜像创建disrtro和profile
1.imort生成distro
通过对于已经挂载至/media/cdrom目录的CentOS-7-x86_64的安装镜像,导入镜像。
[root@localhost ~]# mount/dev/cdrom /media/cdrom
[root@localhost ~]# cobbler import --name=centos-7-x86_64 --path=/media/cdrom
[root@localhost ~]# cobblersync # 同步更新
说明:
1) import光盘镜像构建distro会造成大量的磁盘IO,更具镜像的大小完成的时间不同
2) 要去报磁盘上有足够的空间完成构建distro操作
3) import操作会根据cobbler配置文件复制镜像在web服务DocumentRoot目录/var/www/cobbler/ks_mirror/NAME
4) "cobblerdistro list" 列出所有的distro
注意:
import会自动为导入的distro生成一个profile,该profile所提供的ks文件为最小化安装CentOS7的文件。此时可以通过cobbler profile命令进行更改,但时比较复杂。
实例:改名cobbler profile rename --name=### --newname=###
2.自定义profile文件
(1) 复制自定义ks文件至/var/lib/cobbler/kickstarts/
(2 )创建基于profile
# cobblerprofile add --name=自定义配置文件 --distro=基于的镜像名称 --kickstarts=/var/lib/cobbler/kickstarts/###
注意:
1) 基于同一个发行版镜像(distro),而不同的kickstarts所创建出来的profile文件,当自动化安装选择的时候会安装不同环境系统
2) 每次修改完成需要cobbler sync同步,会同步写入到/var/lib/tftpboot/pxelinux.cfg/default信息
四、使用cobbler_web网页图形化界面管理
cobbler_web是一种基于网页图形化界面管理cobblerde软件。支持多种认证方式,如authn_configfile、authn_ldap或authn_pam等,默认为authn_denyall,即拒绝所有用户登录。下面说明两种能认证用户登录cobbler_web的方式。
安装:[root@localhost~]# yum install -y cobbler-web
1.使用authn_pam模块认证cobbler_web用户
(1)修改cobbler配置文件/etc/cobbler/modules.conf
[root@localhost~]# vim /etc/cobbler/modules.conf
将该配置文件中[authentication]段的module参数的值为authn_pam
(2)添加系统用户
[root@localhost~]# useradd cblradmin
[root@localhost~]# echo 'cblrpass' | passwd --stdin cblradmin
(3)将cblradmin用户添加至cobbler_web的admin组中
修改/etc/cobbler/users.conf文件,将cblradmin用户名添加为admin参数的值即可,如下所示。
[admins]
admin= "cblradmin"
(3)重启服务
[root@localhost~]# systemctl restart cobblerd.service
(4)网页访问
http://172.16.49.101/cobbler_web
2.使用authn_configfile模块认证cobbler_web用户
(1)修改cobbler配置文件/etc/cobbler/modules.conf
[root@localhost~]# vim /etc/cobbler/modules.conf
将该配置文件中[authentication]段的module参数的值为authn_configfile。
(2)创建认证文件并添加用户
[root@localhost~]# htdigest -c /etc/cobbler/users.digest Cobbler cblradmin
注意:
1)添加第一个用户时,需要为htdigest命令使用“-c”选项,后续添加其他用户时不能再使用;
2)cobbler_web的realm只能为Cobbler。如下所示。
(3)重启服务
[root@localhost~]# systemctl restart cobblerd.service
(4)网页访问
https://172.16.49.101/cobbler_web
本文出自 “许鼎的博客” 博客,转载请与作者联系!


