ASP.NET Identity Authentication
ASP.NET 认证与授权机制从基本的Form认证到后来的Membership认证,为ASP.NET应用构建了一个关于认证与授权的解决方案,开发者可以方便快捷地使用这个框架去解决应用认证与授权的问题.Memership解决的是应用的角色,用户及角色与用户的关联的问题,随着ASP.NET的深入发展,OWN产生了。OWIN的基本思想是提供一种标准化的WEB通信的接口,将ASP.NET的一些基本组件(比如认证与授权)与其他组件隔离开,每一个组件都是一个基于Http消息的中间件,降低系统的耦合度,这个思想与目前流行的为服务架构思想是非常契合的,也是未来应用架构发展的方向。
今天根据官网的范例,写了一个ASP.NET Identity 应用,主要步骤如下:
1.新建解决方案
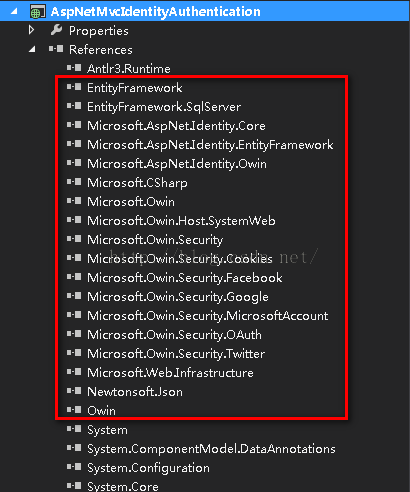
新建ASP.NET MVC解决方案,使用NuGet导入如下包.(主要关注红色框选的包)
2.代码架构
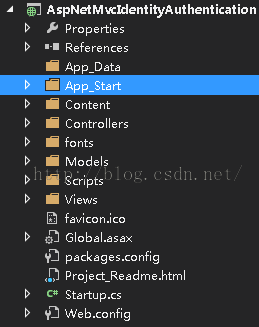
整个解决方案层次与ASP.NET MVC工程基本相同.
在App_start目录下多了两个文件:IdentityConfig.cs和Startup.Auth.cs,下面主要分下下这两个文件里面的内容.
IdentityConfig.cs里面包含EmailService,SmsService,ApplicationUserManager,ApplicationRoleManager,ApplicationSignInManager,ApplicationDbInitializer几个类,ApplicationDbInitializer是做数据初始化用的,和Identity关系不大,EmailService是Identity做邮件认证的时候使用的,即Identity提供了相应的接口,只需要实现这个EmailService里面相应的发送邮件的方法即可实现邮箱认证.SmsService是做短信认证的,原理和EmailService相同,ApplicationUserManager是管理Identity用户的,只实现了新增用户的方法,ApplicationRoleManager的作用类似.EmailService和SmsService如下:
public class EmailService : IIdentityMessageService
{
	public Task SendAsync(IdentityMessage message)
        {
            // Plug in your email service here to send an email.
            return Task.FromResult(0);
        }
}

public class SmsService : IIdentityMessageService
{
        public Task SendAsync(IdentityMessage message)
        {
            // Plug in your SMS service here to send a text message.
            return Task.FromResult(0);
        }
}
ApplicationRoleManager和ApplicationUserManager如下:
public class ApplicationUserManager : UserManager<ApplicationUser>
{
	public ApplicationUserManager(IUserStore<ApplicationUser> store)
          : base(store)
   	{
        }

        public static ApplicationUserManager Create(IdentityFactoryOptions<ApplicationUserManager> options, IOwinContext context)
        {
            var manager = new ApplicationUserManager(new UserStore<ApplicationUser>(context.Get<ApplicationDbContext>()));
            // Configure validation logic for usernames
            manager.UserValidator = new UserValidator<ApplicationUser>(manager)
            {
                AllowOnlyAlphanumericUserNames = false,
                RequireUniqueEmail = true
            };

            // Configure validation logic for passwords
            manager.PasswordValidator = new PasswordValidator
            {
                RequiredLength = 6,
                RequireNonLetterOrDigit = true,
                RequireDigit = true,
                RequireLowercase = true,
                RequireUppercase = true,
            };

            // Configure user lockout defaults
            manager.UserLockoutEnabledByDefault = true;
            manager.DefaultAccountLockoutTimeSpan = TimeSpan.FromMinutes(5);
            manager.MaxFailedAccessAttemptsBeforeLockout = 5;

            // Register two factor authentication providers.
            //This application uses Phone and Emails as a step of receiving a code for verifying the user
            // You can write your own provider and plug it in here.
            manager.RegisterTwoFactorProvider("Phone Code", new PhoneNumberTokenProvider<ApplicationUser>
            {
                MessageFormat = "Your security code is {0}"
            });
            manager.RegisterTwoFactorProvider("Email Code", new EmailTokenProvider<ApplicationUser>
            {
                Subject = "Security Code",
                BodyFormat = "Your security code is {0}"
            });
            manager.EmailService = new EmailService();
            manager.SmsService = new SmsService();
            var dataProtectionProvider = options.DataProtectionProvider;
            if (dataProtectionProvider != null)
            {
                manager.UserTokenProvider =
                    new DataProtectorTokenProvider<ApplicationUser>(dataProtectionProvider.Create("ASP.NET Identity"));
            }
            return manager;
        }
}

 //配置此应用程序中使用的应用程序角色管理器。RoleManager 在 ASP.NET Identity 中定义,并由此应用程序使用。
 public class ApplicationRoleManager : RoleManager<IdentityRole>
 {
        public ApplicationRoleManager(IRoleStore<IdentityRole, string> roleStore)
            : base(roleStore)
        {
        }

        public static ApplicationRoleManager Create(IdentityFactoryOptions<ApplicationRoleManager> options, IOwinContext context)
        {
            return new ApplicationRoleManager(new RoleStore<IdentityRole>(context.Get<ApplicationDbContext>()));
        }

        public static IdentityRole AddIdentityRole(IdentityRole role)
        {
            ApplicationDbContext instance = ApplicationDbContext.Create();
            if (instance.Roles.AsEnumerable().Contains(role))
            {
                return null;
            }
            instance.Roles.Add(new IdentityRole(role.Name));
            instance.SaveChanges();
            return role;
        }
}
在Controller目录下面会有一个ManagementController,这个类持有ApplicationUserManager的引用.我们可以自己参照这个扩展出ApplicationRoleManager.
public ApplicationUserManager UserManager
 {
            get
            {
                return _userManager ?? HttpContext.GetOwinContext().GetUserManager<ApplicationUserManager>();
            }
            private set
            {
                _userManager = value;
            }
}
由此可见,ASP.NET OWIN已经封装了通过ApplicationUserManager多ApplicationUser的CRUD操作,当然底层还是使用的EF作为ORM框架,因为我们在使用NuGet添加OWIN的包的时候,自动会添加EF,可能我们没有注意到.
在Models中有一个ApplicationUser的类,该类继承自IdentityUser,一个GenerateUserIdentityAsync方法将ApplicationUser转化为ClaimsIdentity.ClaimsIdentity是基于生命的认证形式,是ASP.NET Identity所采用的model形式.主要代码如下:
namespace AspNetMvcIdentityAuthentication.Models
{
    // You can add profile data for the user by adding more properties to your ApplicationUser class, please visit http://go.microsoft.com/fwlink/?LinkID=317594 to learn more.
    public class ApplicationUser : IdentityUser
    {
        public async Task<ClaimsIdentity> GenerateUserIdentityAsync(UserManager<ApplicationUser> manager)
        {
            // Note the authenticationType must match the one defined in CookieAuthenticationOptions.AuthenticationType
            var userIdentity = await manager.CreateIdentityAsync(this, DefaultAuthenticationTypes.ApplicationCookie);
            // Add custom user claims here
            return userIdentity;
        }
    }

    public class ApplicationDbContext : IdentityDbContext<ApplicationUser>
    {
        public ApplicationDbContext()
            : base("DefaultConnection", throwIfV1Schema: false)
        {
            // 在第一次启动网站时初始化数据库添加管理员用户凭据和admin 角色到数据库
            //Database.SetInitializer<ApplicationDbContext>(new ApplicationDbInitializer());
            //ApplicationDbInitializer.InitializeIdentityForEF(null);
        }

        public static ApplicationDbContext Create()
        {
            return new ApplicationDbContext();
        }
    }
}
下面我们看看如何使用ASP.NET Identity完成注册.
public ActionResult Register()
{
            //ApplicationDbContext instance = ApplicationDbContext.Create();
            //List<IdentityRole> roles = instance.Roles.ToList();
            //IEnumerable<SelectListItem> items =
            //    roles.Select(role => new SelectListItem() {Text = role.Name, Value = role.Name});
            //ViewData["roles"] = items;
            return View();
 }

 //
 // POST: /Account/Register
 [HttpPost]
 [AllowAnonymous]
 [ValidateAntiForgeryToken]
 public async Task<ActionResult> Register(RegisterViewModel model)
 {
            if (ModelState.IsValid)
            {
                var newUser = new ApplicationUser { UserName = model.Email, Email = model.Email };
                var result = await UserManager.CreateAsync(newUser, model.Password);

                ApplicationDbContext instance = ApplicationDbContext.Create();
                ApplicationUser user = instance.Users.FirstOrDefault(x => x.Email == model.Email);
                if (instance.Roles.Single(x => x.Name == model.Role) == null)
                {
                    IdentityRole role = ApplicationRoleManager.AddIdentityRole(new IdentityRole(model.Role));
                }
                else
                {
                    if (user != null)
                    {
                        var status = await UserManager.AddToRoleAsync(user.Id, model.Role);
                        if (result.Succeeded && status.Succeeded)
                        {
                            await SignInManager.SignInAsync(newUser, isPersistent: false, rememberBrowser: false);

                            // For more information on how to enable account confirmation and password reset please visit http://go.microsoft.com/fwlink/?LinkID=320771
                            // Send an email with this link
                            // string code = await UserManager.GenerateEmailConfirmationTokenAsync(user.Id);
                            // var callbackUrl = Url.Action("ConfirmEmail", "Account", new { userId = user.Id, code = code }, protocol: Request.Url.Scheme);
                            // await UserManager.SendEmailAsync(user.Id, "Confirm your account", "Please confirm your account by clicking <a href=\"" + callbackUrl + "\">here</a>");

                            return RedirectToAction("Index", "Home");
                        }
                    }
                }
                AddErrors(result);
            }

     // If we got this far, something failed, redisplay form
     return View(model);
}
这里注释的代码里面可以实现给注册的用户发送邮件,Identity还是考虑得比较全面的.使用起来也是比较方便的.

