iOS SDK: Working with URL Schemes
Communication between apps provides your application with an opportunity to take advantage of other application’s functionality, send and receive data between apps, and provide a rich user experience that “just works”.
In this tutorial we are going to create two apps, one app that sends data, and another app that receives that data. Together, these apps will demonstrate URL schemes, a method for sending and receiving data between applications. This is a fairly advanced tutorial with regard to understanding Xcode, and I would highly recommend that before you begin this tutorial you feel comfortable using Xcode and Interface Builder.
Please note: A physical device is required for testing this app.
Step 1: Creating a Sender Project
Let’s go ahead and create a new Xcode project, select “View Based Application.” Hit next. Name the project “Sender” and enter your Company Identifier. This project will house the app that sends information to the “Receiver” app which we will create shortly.
Step 2: Setup the XIB and Interface Builder Connections
Before we setup our XIB, we’ll create a few declarations ahead of time.
In the left Navigator Pane, open up SenderViewController.h and set it up like this:
|
1
2
3
4
5
6
7
8
9
|
#import <UIKit/UIKit.h>
@interface
SenderViewController : UIViewController {
IBOutlet
UITextField *textBox;
}
-(
IBAction
) openMaps:(
id
)sender;
-(
IBAction
) openYoutube:(
id
)sender;
-(
IBAction
) openReceiverApp:(
id
)sender;
@property
(
nonatomic
, retain)
IBOutlet
UITextField *textBox;
@end
|
By doing this, we are declaring a few methods which will be called by UIButtons in the future and a variable that references a UITextField. These UI Elements will be added next.
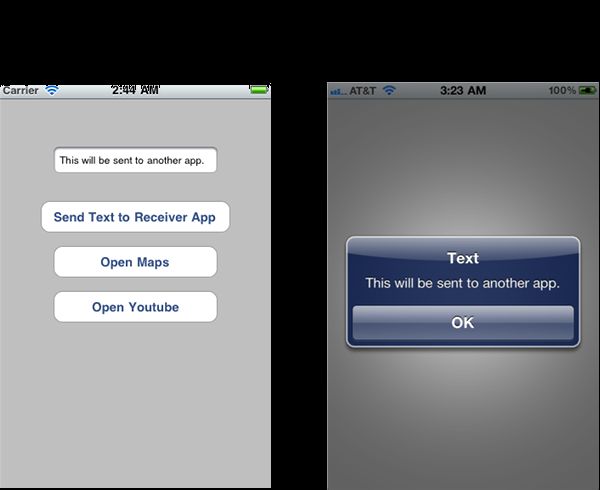
Now, in the left Navigator Pane, open up SenderViewController.xib and drag out one UITextField and three UIButtons from the right-hand side Utilities Pane. Stack them vertically on the view and rename the first button to “Send Text to Receiver App “, the second button to “Open Maps”, and the third button to “Open YouTube”. Your view should resemble something similar the image below.
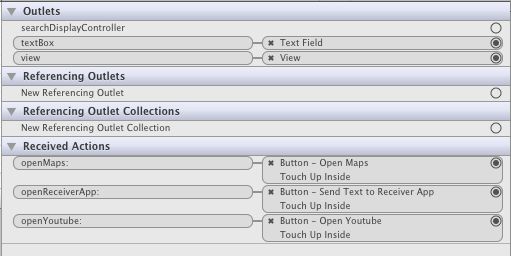
Now, our last step is to finalize our IBConnections. Select File’s Owner (the orange wireframe box) on the left and then, in the Utilities Pane on the right, choose the Connections Inspector (the arrow) tab. ConnecttextBox to the UITextField. Next, connect openMaps:, openYoutube:, and openReceiverApp: to their respective button’s “Touch Up Inside” event by a connection line from the circle on the right to the buttons. The connections should resemble what is shown below.
Step 3: Opening URLs for Communication
To begin, open the file SenderViewController.m from the Navigator Pane. Under @implementation add the following line to synthesize our property:
|
1
|
@synthesize
textBox;
|
Let’s also make sure we follow correct memory management rules and cleanup the retain we had in our property, above [super dealloc]; add:
|
1
|
[textBox release];
|
Lastly, in our viewDidUnload method below “[super viewDidUnload];” add:
|
1
|
self
.textBox =
nil
;
|
A brief rundown of URL schemes is that URL schemes allow apps to register their own protocol to allow the transfer of data. Some common examples of protocols you may use on a regular basis are, “http://”, “https://”, and “ftp://”. For example a bookmarking app may want to register “bookmark://”, so other apps could bookmark links using the URL scheme, “bookmark://www.envato.com”. Apps cannot register to the “http://” protocol, although some Apple apps break this rule and are registered “http://” to open up apps like Maps, iTunes, and YouTube. Our Receiver app will register for “readtext://texthere”. We can open these URL’s by calling UIApplication’s method openURL:. When we use openURL: it will launch the specified app and hand it the data you provided.
Add the following methods to your SenderViewController.m file:
|
1
2
3
4
5
6
7
8
9
10
11
12
13
14
15
16
17
18
19
20
21
22
23
24
25
26
27
28
29
30
|
-(
IBAction
) openMaps:(
id
)sender {
// Opens a map containing Envato's Headquarters
UIApplication *ourApplication = [UIApplication sharedApplication];
NSString
*ourPath =
@"http://maps.google.com/maps?ll=-37.812022,144.969277"
;
NSURL
*ourURL = [
NSURL
URLWithString:ourPath];
[ourApplication openURL:ourURL];
}
-(
IBAction
) openYoutube:(
id
)sender {
// Opens a video of an iPad 2 Commercial
UIApplication *ourApplication = [UIApplication sharedApplication];
NSString
*ourPath =
@"http://www.youtube.com/watch?v=TFFkK2SmPg4"
;
NSURL
*ourURL = [
NSURL
URLWithString:ourPath];
[ourApplication openURL:ourURL];
}
-(
IBAction
) openReceiverApp:(
id
)sender {
// Opens the Receiver app if installed, otherwise displays an error
UIApplication *ourApplication = [UIApplication sharedApplication];
NSString
*URLEncodedText = [
self
.textBox.text stringByAddingPercentEscapesUsingEncoding:
NSUTF8StringEncoding
];
NSString
*ourPath = [
@"readtext://"
stringByAppendingString:URLEncodedText];
NSURL
*ourURL = [
NSURL
URLWithString:ourPath];
if
([ourApplication canOpenURL:ourURL]) {
[ourApplication openURL:ourURL];
}
else
{
//Display error
UIAlertView *alertView = [[UIAlertView alloc] initWithTitle:
@"Receiver Not Found"
message:
@"The Receiver App is not installed. It must be installed to send text."
delegate:
nil
cancelButtonTitle:
@"OK"
otherButtonTitles:
nil
];
[alertView show];
[alertView release];
}
}
|
These methods are using the openURL method of the UIApplication to send data to other apps. Apple has registered the Maps application and YouTube application with “http://” essentially, so we simply callopenURL on those URLs. To create our URL, we also used thestringByAddingPercentEscapesUsingEncoding: method to ensure the string is a valid URL by URL encoding the string (we will decode it in our Receiver app). For our custom URL “readtext://” we first check if the link can be opened with canOpenURL. This essentially checks whether the app that is registered to that particular URL scheme is installed, and if it is, we are able to open the URL with our text. If the app is not installed, we display an error message. Remember that when you release your app to the public, the URL scheme your app is dependent on might not work because the other app isn’t installed. You should always perform the canOpenURL when opening non-http:// URL schemes.
Go ahead and build and run the application. Notice the Maps and YouTube buttons open up their respective apps. Also, the “Sent Text” button returns an error message since we have yet to create our “Receiver” app.
Step 4: Creating a Receiver App
Create a new XCode project, and select “View Based Application.” Hit next. Name the project “Receiver” and enter your Company Identifier. This project will house the app that reads information sent by the “Sender” app.
Step 5: Register the Custom URL Scheme
In the Project Navigator, expand the Supporting Files group and open the Receiver-Info.plist file.
You can add a new row by going to the menu and clicking Editor > Add Item. Set up a URL Types item by adding a new item. Expand the URL Types key, expand Item 0, and add a new item, “URL schemes”. Fill in “readtext” for Item 0 of “URL schemes” and your company identifier for the “URL Identifier”. Your file should resemble the image below when done.
Step 6 : Handle the URL
Open ReceiverAppDelegate.m and replace theapplication:applicationDidFinishLaunchingWithOptions: method with the following code:
|
1
2
3
4
5
6
7
8
9
10
11
12
13
14
|
- (
BOOL
)application:(UIApplication *)application didFinishLaunchingWithOptions:(
NSDictionary
*)launchOptions
{
// Override point for customization after application launch.
self
.window.rootViewController =
self
.viewController;
[
self
.window makeKeyAndVisible];
//Display error is there is no URL
if
(![launchOptions objectForKey:UIApplicationLaunchOptionsURLKey]) {
UIAlertView *alertView;
alertView = [[UIAlertView alloc] initWithTitle:
@"Error"
message:
@"This app was launched without any text. Open this app using the Sender app to send text."
delegate:
nil
cancelButtonTitle:
@"OK"
otherButtonTitles:
nil
];
[alertView show];
[alertView release];
}
return
YES
;
}
|
This alerts an error if the application is opened without a URL. Generally, if this occurs you would load your app normally but for the sake of experimenting we will display an error.
Add the following code beneath the application:applicationDidFinishLaunchingWithOptions:method.
|
1
2
3
4
5
6
7
8
9
|
- (
BOOL
)application:(UIApplication *)application handleOpenURL:(
NSURL
*)url {
// Display text
UIAlertView *alertView;
NSString
*text = [[url host] stringByReplacingPercentEscapesUsingEncoding:
NSUTF8StringEncoding
];
alertView = [[UIAlertView alloc] initWithTitle:
@"Text"
message:text delegate:
nil
cancelButtonTitle:
@"OK"
otherButtonTitles:
nil
];
[alertView show];
[alertView release];
return
YES
;
}
|
This code alerts the user with the text that was sent by the Sender app when the application is opened with a URL. Generally, you should use this data to follow up with an appropriate action within your app. Notice that we used the hostname of the URL to get our text. We did this because the URL scheme we registered functions like any other URL “scheme://hostname/path/file.php?variable=x#section” (Recall that our URL was “readtext://text”). We also URL decoded the text using thestringByReplacingPercentEscapesUsingEncoding: method as previously we had URL encoded it.
Step 7: Testing the Application
The time has finally come to test these two applications. They must both be built and installed to a physical iOS device. Make sure you have disconnected the device from the computer when testing and you have closed the Receiver app after disconnecting to prevent any problems. Open up the Sender app, write up some text, and hit send. The receiver app should open prompting you with the text you typed.
Conclusion
If successful, you should now be able to easily implement inter-app communications using URL schemes. If you have any questions or comments, feel free to leave them in the comments section below. Thanks for reading!
Additional Information and Resources
Pros:
- Does not force the user to be connected to a network, or require additional resources for web server handling.
- A simple, fast, and easy method of implementing communication.
- Provide a public communication interface that ANY app can take advantage of.
- Open your application from your website using an anchor tag. Ex:
<a href="readtext://">Open Our iPhone Application</a>
Cons:
- Unlike other platforms such as Android, iPhone does not create a stack of actions (back stacking on Android). What this means is that if you do decide to launch another application, your application will not resume when the user exits from the application you opened.
When not to use URL Schemes:
- Sending user-sensitive data such as username and password combinations. You should never do this; instead refer to the Keychain API.
- Avoid using URL Schemes when you can implement the other applications functionality internally and directly, to avoid having your application close. For example, should you use a URL scheme to launch the Maps application when you could implement Maps in-app? Depending on the situation, you may have to but in many cases opening Maps in-app is sufficient.
- No authentication that the data you have sent will reach the correct application or whether it has reached at all, namely why sensitive data should not be sent.
Resources:
- Apple Developer Reference (provides information on URL Schemes, and how to launch Apple apps using them)

