Java操作系统注册表
转载自:http://www.javaeye.com/topic/82291
由于java程序是“write once, run everywhere”,用java读写注册表,那程序的跨平台性就差了。java对注册表的操作,在jdk1.4以前的版本中,那是不可能的,只能用JNI来实现
;然而jdk1.4之后提供的prefs包可以操作windows注册表,不过定死了root只在SOFTWARE/JavaSoft/prefs下,估计也是出于这种两难吧,又要保证所谓平台无关,还要照顾大家对
windows的依赖。
下面将从两方面来介绍对注册表的操作。
一、 使用JDK提供的Preferences类
首先得到Preferences的一个对象,这个对象就规定了你要在注册表的哪个位置写入信息,即节点.然后再用put(String key,String value)或者putInt(),tDouble()...等来给有关
项赋值。下面是Demo程序。
import java.util.prefs.*; public class Registery { String[] keys = {"version", "initial", "creator"}; String[] values = {"1.3", "ini.mp3", "[email protected]"}; //把相应的值储存到变量中去 public void writeValue() { // HKEY_LOCAL_MACHINE/Software/JavaSoft/prefs下写入注册表值. Preferences pre = Preferences.systemRoot().node("/javaplayer"); for (int i = 0; i < keys.length; i++) { pre.put(keys[i], values[i]); } } public static void main(String[] args) { Registery reg = new Registery(); reg.writeValue(); } }
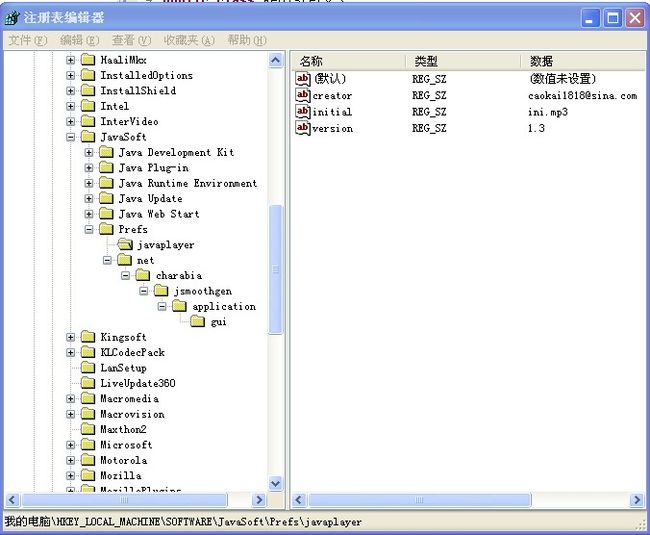
执行后效果:
执行上面的代码则在注册表的HKEY_LOCAL_MACHINE/Software/JavaSoft/prefs/javaplayer项下写入了有关值.
最后再说明几点:
1:你的节点的首字母不要大写,不然在注册表中的项前就加了一个“/”;
2:注册表中的值也可以导入到一个XML文件中,具体方法见有关文档.
3:如果把代码中的Preferences pre = Preferences.systemRoot().node("/javaplayer"); 换成Preferences pre = Preferences.userRoot().node("/javaplayer");则相应的
HKEY_LOCAL_MACHINE就成为HKEY_LOCAL_USER。
二、 用jRegistry 来操作注册表
jRegistry它是用JNI来封装WINDOWS注册表API,方便了java开发者访问windows注册表。首先介绍一下jRegistryKey.jar和jRegistryKey.dll,这两个文件是使用jRegistry来操作
注册表所必需的文件:一个是jar包,是一个包括了java类的文件;一个是动态链接库文件,提供了访问注册表所需的本地代码(即C/C++)。
下面详细介绍一下使用流程:
1、 在JBuilder的菜单Project->Project Properties->Required Libraries中添加jRegistryKey.jar或在环境变量classpath中添加该jar文件;
2、 将jRegistryKey.dll放在工程的当前目录下;
3、 在访问注册表类中import该语句:import ca.beq.util.win32.registry.*; 该包中有两个类:RegistryKey和RegistryValue。其中RegistryKey是注册表键的java表示
,它提供了creat()和delete()方法创建和删除key,枚举子键和值,set和get键的值等;RegistryValue is the Java? representation of a registry value (defined as a
name, a type, and data).
4、 创建一个新key:
RegistryKey r = new RegistryKey(RootKey.HKEY_CURRENT_USER, "Software//BEQ Technologies"); r.create();
5、创建一个子键:
RegistryKey r = new RegistryKey(RootKey.HKEY_CURRENT_USER, "Software"); r.createSubkey("BEQ Technologies");
6、删除一个已存在的键值:
try { RegistryKey r = new RegistryKey(RootKey.HKEY_CURRENT_USER, "Software//BEQ Technologies"); r.delete(); } // try catch(RegistryException re) { re.printStackTrace(); } // catch
7、枚举子键:
RegistryKey r = new RegistryKey(RootKey.HKEY_CURRENT_USER, "Software"); if(r.hasSubkeys()) { Iterator i = r.subkeys(); while(i.hasNext()) { RegistryKey x = (RegistryKey)i.next(); System.out.println(x.toString()); } // while } // if
8、读注册表中键的值:
RegistryKey r = new RegistryKey(RootKey.HKEY_CURRENT_USER, "Software//BEQ Technologies"); if(r.hasValue("myValue")) { RegistryValue v = r.getValue("myValue"); System.out.println(v.toString());// } // if
注:v.toString()仅是键myValue对应的键值,若要得到myValue键对应的值数据,则需要String str = v.getDate().toSting();
9、设置注册表中键的值:
RegistryKey r = new RegistryKey(RootKey.HKEY_CURRENT_USER, "Software//BEQ Technologies"); RegistryValue v = new RegistryValue("myVal", ValueType.REG_SZ, "data"); r.setValue(v);
10、枚举某键的所有值:
RegistryKey r = new RegistryKey(RootKey.HKEY_CURRENT_USER, "Software"); if(r.hasValues()) { Iterator i = r.values(); while(i.hasNext()) { RegistryValue v = (RegistryValue)i.next(); System.out.println(v.toString()); } // while } // if
下面是一个demo程序,仅供参考。
// create a new key, "Test", under HKLM RegistryKey r = new RegistryKey(RootKey.HKEY_LOCAL_MACHINE, "Test"); if(!r.exists()) { r.create(); } // if // create value entries RegistryValue v = new RegistryValue("aString", ValueType.REG_SZ, "test"); r.setValue(v); v.setName("aDword"); v.setType(ValueType.REG_DWORD); v.setData(new Integer(0x1001001)); r.setValue(v); // read value entries Iterator i = r.values(); while(i.hasNext()) { v = (RegistryValue)i.next(); System.out.println(v.toString()); } // while // delete registry key r.delete();
