5.4 Spring AOP
5.4.1 从代理机制初探AOP
来看一个简单的例子,当需要在执行某些方法时留下日志信息,可能会这样写:
import java.util.logging.*;
public class HelloSpeaker{
pirvate Logger logger=Logger.getLogger(this.getClass().getName());
    public void hello(String name){
        logger.log(Level.INFO, "hello method starts…");// 方法开始执行时留下日志
        Sytem.out.println("hello, "+name); // 程序的主要功能
        Logger.log(Level.INFO, "hello method ends…");// 方法执行完毕时留下日志
    }
}
在HelloSpeaker类中,当执行hello()方法时,程序员希望该方法执行开始与执行完毕时都留下日志。最简单的做法是用上面的程序设计,在方法执行的前后加上日志动作。
可以使用代理(Proxy)机制来解决这个问题,有两种代理方式:静态代理(static proxy)和动态代理(dynamic proxy)。
在静态代理的实现中,代理类与被代理的类必须实现同一个接口。在代理类中可以实现记录等相关服务,并在需要的时候再呼叫被代理类。这样被代理类就可以仅仅保留业务相关的职责了。
举个简单的例子,首先定义一个IHello接口,IHello.java代码如下:
public interface IHello{
    public void hello(String name);
}
然后让实现业务逻辑的HelloSpeaker类实现IHello接口,HelloSpeaker.java代码如下:
public class HelloSpeaker implements IHello{
    public void hello(String name){
      System.out.println("hello,"+name);
    }
}
可以看到,在HelloSpeaker类中没有任何日志的代码插入其中,日志服务的实现将被放到代理类中,代理类同样要实现IHello接口。
HelloProxy.java代码如下:
public class HelloProxy implements IHello{
    private Logger logger=Logger.getLogger(this.getClass().getName());
    private IHello helloObject;
    public HelloProxy(IHello helloObject){
        this.helloObject=helloObject;
    }
    public void hello(String name){
        log("hello method starts…");// 日志服务
       helloObject.hello(name);// 执行业务逻辑
        log("hello method ends…");// 日志服务
    }
    private void log(String msg){
        logger.log(Level.INFO,msg);
    }
}
在HelloProxy类的hello()方法中,真正实现业务逻辑前后安排记录服务,可以实际撰写一个测试程序来看看如何使用代理类。
public class ProxyDemo{
    public static void main(String[] args){
        IHello proxy=new HelloProxy(new HelloSpeaker());
        proxy.hello("Justin");
    }
}
程序运行结果:
hello,Justin
5.4.2 动态代理
要实现动态代理,同样需要定义所要代理的接口。
IHello.java代码如下:
public interface IHello{
    public void hello(String name);
}
然后让实现业务逻辑的HelloSpeaker类实现IHello接口。
HelloSpeaker.java代码如下:
public class HelloSpeaker implements IHello{
    public void hello(String name){
        System.out.println("Hello,"+name);
    }
}
与上例不同的是,这里要实现不同的代理类:
import java.lang.reflect.InvocationHandler;
import java.lang.reflect.Method;
public class LogHandler implements InvocationHandler{
    private Object sub;
    public LogHandler() {
    }
    public LogHandler(Object obj){
        sub = obj;
    }
    public Object invoke(Object proxy, Method method, Object[] args)
            throws Throwable{
        System.out.println("before you do thing");
        method.invoke(sub, args);
        System.out.println("after you do thing");
        return null;
    }
}
写一个测试程序,使用LogHandler来绑定被代理类。
ProxyDemo.java代码如下:
import java.lang.reflect.Proxy;
public class ProxyDemo {
    public static void main(String[] args) {
        HelloSpeaker helloSpeaker=new HelloSpeaker();
        LogHandler logHandler=new LogHandler(helloSpeaker);
        Class cls=helloSpeaker.getClass();
        IHello iHello=
        (IHello)Proxy.newProxyInstance(cls.getClassLoader(),cls.getInterfaces(),logHandler);
        iHello.hello("Justin");
    }
}
程序运行结果:
before you do thing
Hello, Justin
after you do thing
5.4.3 AOP术语与概念
1.cross-cutting concerns
在DynamicProxyDemo例子中,记录的动作原先被横切(Cross-cutting)到HelloSpeaker本身所负责的业务流程中。类似于日志这类的动作,如安全检查、事务等服务,在一个应用程序中常被安排到各个类的处理流程之中。这些动作在AOP的术语中称为cross-cutting concerns。如图5.7所示,原来的业务流程是很单纯的。
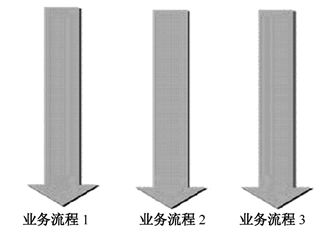
图5.7 原来的业务流程
为了加入日志与安全检查等服务,类的程序代码中被硬生生地写入了相关的Logging、Security程序片段,如图5.8所示。
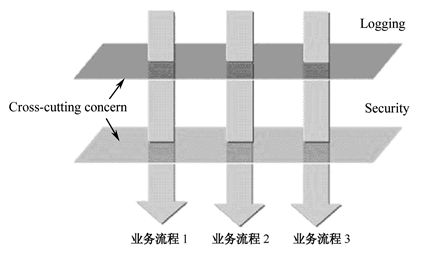
图5.8 加入各种服务的业务流程
2.Aspect
将散落在各个业务类中的cross-cutting concerns收集起来,设计各个独立可重用的类,这种类称为Aspect。例如,在动态代理中将日志的动作设计为LogHandler类,LogHandler类在AOP术语中就是Aspect的一个具体实例。在需要该服务的时候,缝合到应用程序中;不需要服务的时候,也可以马上从应用程序中脱离。应用程序中的可重用组件不用做任何的修改。例如,在动态代理中的HelloSpeaker所代表的角色就是应用程序中可重用的组件,在它需要日志服务时并不用修改本身的程序代码。
5.4.4 通知Advice
Spring提供了5种通知(Advice)类型:Interception Around、Before、After Returning、Throw 和Introduction。它们分别在以下情况被调用:
Interception Around Advice:在目标对象的方法执行前后被调用。
Before Advice:在目标对象的方法执行前被调用。
After Returning Advice:在目标对象的方法执行后被调用。
Throw Advice:在目标对象的方法抛出异常时被调用。
Introduction Advice:一种特殊类型的拦截通知,只有在目标对象的方法调用完毕后执行。
创建一个Before Advice的Web项目,步骤如下。
① 创建一个Web项目,命名为“Spring_Advices”。
② 编写Java类。
Before Advice会在目标对象的方法执行之前被呼叫。这个接口提供了获取目标方法、参数及目标对象。
MethodBeforeAdvice接口的代码如下:
import java.lang.ref.*;
import java.lang.reflect.Method;
public interface MethodBeforeAdvice{
    void before(Method method, Object[] args, Object target) throws Exception;
}
用实例来示范如何使用Before Advice。首先要定义目标对象必须实现的接口IHello。
IHello.java代码如下:
public interface IHello{
    public void hello(String name);
}
接着定义一个HelloSpeaker,实现IHello接口。
HelloSpeaker.java代码如下:
public class HelloSpeaker implements IHello{
    public void hello(String name){
            System.out.println("Hello,"+name);
    }
}
在对HelloSpeader不进行任何修改的情况下,想要在hello()方法执行之前可以记录一些信息。有一个组件,但没有源代码,可对它增加一些日志的服务。
LogBeforeAdvice.java代码如下:
import java.lang.reflect.*;
import java.util.logging.Level;
import java.util.logging.Logger;
import org.springframework.aop.MethodBeforeAdvice;
public class LogBeforeAdvice implements MethodBeforeAdvice{
    private Logger logger=Logger.getLogger(this.getClass().getName());
    public void before(Method method,Object[] args,Object target) throws Exception{
       logger.log(Level.INFO, "method starts…"+method);
    }
}
③ 添加Spring开发能力。
applicationContext.xml的代码如下:
<?xml version="1.0" encoding="UTF-8"?>
<beans xmlns="http://www.springframework.org/schema/beans"
xmlns:xsi="http://www.w3.org/2001/XMLSchema-instance"
xsi:schemaLocation="http://www.springframework.org/schema/beans
http://www.springframework.org/schema/beans/spring-beans-2.0.xsd">
    <bean id="logBeforeAdvice" class="LogBeforeAdvice" />
    <bean id="helloSpeaker" class="HelloSpeaker" />
    <bean id="helloProxy"
            class="org.springframework.aop.framework.ProxyFactoryBean">
        <property name="proxyInterfaces">
            <value>IHello</value>
        </property>
        <property name="target">
            <ref bean="helloSpeaker" />
        </property>
        <property name="interceptorNames">
            <list>
                <value>logBeforeAdvice</value>
            </list>
        </property>
    </bean>
</beans>
④ 运行程序,测试结果。
写一个程序测试一下Before Advice的运作。
SpringAOPDemo.java代码如下:
import org.springframework.context.ApplicationContext;
import org.springframework.context.support.FileSystemXmlApplicationContext;
public class SpringAOPDemo{
    public static void main(String[] args){
        ApplicationContext context=new FileSystemXmlApplicationContext("
            /WebRoot/WEB-INF/classes/applicationContext.xml");
        IHello helloProxy=(IHello)context.getBean("helloProxy");
        helloProxy.hello("Justin");
    }
}
程序运行结果:
Hello,Justin
HelloSpeaker与LogBeforeAdvice是两个独立的类。对于HelloSpeaker来说,它不用知道LogBeforeAdvice的存在;而LogBeforeAdvice也可以运行到其他类之上。HelloSpeaker与LogBeforeAdvice都可以重复使用。
5.4.5 切入点Pointcut
创建一个切入点Pointcut项目,步骤如下。
① 创建一个Web项目,命名为“Spring_Pointcut”。
② 编写Java类。
IHello.java代码如下:
public interface IHello{
    public void helloNewbie(String name);
    public void helloMaster(String name);
}
HelloSpeaker类实现IHello接口。HelloSpeaker.java代码如下:
public class HelloSpeaker implements IHello{
    public void helloNewbie(String name){
        System.out.println("Hello, "+name+"newbie! ");
    }
    public void helloMaster(String name){
        System.out.println("Hello, "+name+"master! ");
    }
}
③ 添加Spring开发能力。
applicationContext.xml的代码。
<?xml version="1.0" encoding="UTF-8"?>
<beans xmlns="http://www.springframework.org/schema/beans"
xmlns:xsi="http://www.w3.org/2001/XMLSchema-instance"
xsi:schemaLocation="http://www.springframework.org/schema/beans
http://www.springframework.org/schema/beans/spring-beans-2.0.xsd">
    <bean id="logBeforeAdvice" class="LogBeforeAdvice" />
    <bean id="helloAdvisor"
            class="org.springframework.aop.support.NameMatchMethodPointcutAdvisor">
        <property name="mappedName">
            <value>hello*</value>
        </property>
        <property name="advice">
            <ref bean="logBeforeAdvice" />
        </property>
    </bean>
    <bean id="helloSpeaker" class="HelloSpeaker" />
    <bean id="helloProxy"
                class="org.springframework.aop.framework.ProxyFactoryBean">
        <property name="proxyInterfaces">
            <value>IHello</value>
        </property>
        <property name="target">
            <ref bean="helloSpeaker" />
        </property>
        <property name="interceptorNames">
            <list>
                <value>helloAdvisor</value>
            </list>
        </property>
    </bean>
</beans>
④ 运行程序,测试结果。
SpringAOPDemo.java代码如下:
import org.springframework.context.ApplicationContext;
import org.springframework.context.support.FileSystemXmlApplicationContext;
public class SpringAOPDemo {
    public static void main(String[] args) {
        ApplicationContext context = new FileSystemXmlApplicationContext(
            "/WebRoot/WEB-INF/classes/applicationContext.xml");
        IHello helloProxy = (IHello) context.getBean("helloProxy");
        helloProxy.helloNewbie("Justin");
        helloProxy.helloMaster("Tom");
    }
}
程序运行结果:
Hello, Justinnewbie!
Hello, Tommaster!
附:目录《JavaEE基础实用教程》笔记说明