基于Spring4.X和Hibernate4.x开发Restful风格WebService
我的开发IDE为eclipse而且我web项目采用集成maven,所以如果你对maven不是太了解可以先查询一下资料了解一下maven。
1.环境搭建
这是我的POM文件,包括所依赖的jar包和一些常用的插件
<project xmlns="http://maven.apache.org/POM/4.0.0" xmlns:xsi="http://www.w3.org/2001/XMLSchema-instance"
    xsi:schemaLocation="http://maven.apache.org/POM/4.0.0 http://maven.apache.org/maven-v4_0_0.xsd">
    <modelVersion>4.0.0</modelVersion>
    <groupId>SafetyMonitorService</groupId>
    <artifactId>SafetyMonitorService</artifactId>
    <packaging>war</packaging>
    <version>0.0.1-SNAPSHOT</version>
    <name>SafetyMonitorService Maven Webapp</name>
    <url>http://maven.apache.org</url>

    <properties>
        <spring.version>4.2.5.RELEASE</spring.version>
        <hibernate.version>4.3.6.Final</hibernate.version>
        <project.build.sourceEncoding>UTF-8</project.build.sourceEncoding>
        <project.deploy>AppVersionManagement</project.deploy>
        <project.tomcat.version>8.0.28</project.tomcat.version>
    </properties>

    <dependencies>
        <!-- junit -->
        <dependency>
            <groupId>junit</groupId>
            <artifactId>junit</artifactId>
            <version>3.8.1</version>
            <scope>test</scope>
        </dependency>
        <!-- Servlet -->
        <dependency>
            <groupId>javax.servlet</groupId>
            <artifactId>javax.servlet-api</artifactId>
            <version>3.0.1</version>
            <scope>provided</scope>
        </dependency>
        <!-- javax.ws.rs -->
        <dependency>
            <groupId>javax.ws.rs</groupId>
            <artifactId>javax.ws.rs-api</artifactId>
            <version>2.0.1</version>
        </dependency>
        <!-- Spring -->
        <dependency>
            <groupId>org.springframework</groupId>
            <artifactId>spring-webmvc</artifactId>
            <version>${spring.version}</version>
        </dependency>
        <dependency>
            <groupId>org.springframework</groupId>
            <artifactId>spring-web</artifactId>
            <version>${spring.version}</version>
        </dependency>
        <dependency>
            <groupId>org.springframework</groupId>
            <artifactId>spring-context-support</artifactId>
            <version>${spring.version}</version>
        </dependency>
        <dependency>
            <groupId>org.springframework</groupId>
            <artifactId>spring-tx</artifactId>
            <version>${spring.version}</version>
        </dependency>
        <dependency>
            <groupId>org.springframework</groupId>
            <artifactId>spring-orm</artifactId>
            <version>${spring.version}</version>
        </dependency>
        <dependency>
            <groupId>org.springframework</groupId>
            <artifactId>spring-aspects</artifactId>
            <version>${spring.version}</version>
        </dependency>
        <!-- log4j -->
        <dependency>
            <groupId>log4j</groupId>
            <artifactId>log4j</artifactId>
            <version>1.2.14</version>
        </dependency>
        <!-- hibernate -->
        <dependency>
            <groupId>org.hibernate</groupId>
            <artifactId>hibernate-core</artifactId>
            <version>${hibernate.version}</version>
        </dependency>
        <!-- transaction-jta -->
        <dependency>
            <groupId>javax.transaction</groupId>
            <artifactId>jta</artifactId>
            <version>1.1</version>
        </dependency>
        <!-- fastjson -->
        <dependency>
            <groupId>com.alibaba</groupId>
            <artifactId>fastjson</artifactId>
            <version>1.2.8</version>
        </dependency>
        <!-- druid -->
        <dependency>
            <groupId>com.alibaba</groupId>
            <artifactId>druid</artifactId>
            <version>1.0.17</version>
        </dependency>
        <!-- SQLServer-jtds -->
        <dependency>
            <groupId>net.sourceforge.jtds</groupId>
            <artifactId>jtds</artifactId>
            <version>1.2</version>
        </dependency>
        <!-- hibernate -->
        <dependency>
            <groupId>org.hibernate</groupId>
            <artifactId>hibernate-core</artifactId>
            <version>${hibernate.version}</version>
        </dependency>
        <!-- memcached -->
        <dependency>
            <groupId>com.danga</groupId>
            <artifactId>java-memcached</artifactId>
            <version>2.6.2</version>
        </dependency>
        <dependency>
            <groupId>net.spy</groupId>
            <artifactId>spymemcached</artifactId>
            <version>2.12.0</version>
        </dependency>
        <dependency>
            <groupId>fakepath</groupId>
            <artifactId>hibernate-memcached</artifactId>
            <version>1.5</version>
        </dependency>
        <!-- Jackson JSON -->
        <dependency>
            <groupId>com.fasterxml.jackson.core</groupId>
            <artifactId>jackson-databind</artifactId>
            <version>2.6.4</version>
        </dependency>
        <dependency>
            <groupId>com.fasterxml.jackson.core</groupId>
            <artifactId>jackson-annotations</artifactId>
            <version>2.6.4</version>
        </dependency>
        <dependency>
            <groupId>com.fasterxml.jackson.core</groupId>
            <artifactId>jackson-core</artifactId>
            <version>2.6.4</version>
        </dependency>
    </dependencies>
    <build>
        <finalName>SafetyMonitorService</finalName>
        <plugins>
            <!-- Apache官方TomcatPlugin 远程部署 -->
            <plugin>
                <groupId>org.apache.tomcat.maven</groupId>
                <artifactId>tomcat7-maven-plugin</artifactId>
                <version>2.2</version>
                <configuration>
                    <url>http://111.175.187.206:5007/manager/text</url>
                    <username>admin</username>
                    <password>admin</password>
                    <path>/${project.deploy}</path>
                </configuration>
            </plugin>
            <!-- Apache官方TomcatPlugin 本地部署 -->
            <plugin>
                <groupId>org.apache.tomcat.maven</groupId>
                <artifactId>tomcat7-maven-plugin</artifactId>
                <version>2.2</version>
                <configuration>
                    <port>5008</port>
                    <path>/${project.deploy}</path>
                    <uriEncoding>${project.build.sourceEncoding}</uriEncoding>
                    <finalName>${project.deploy}</finalName>
                    <server>tomcat7</server>
                </configuration>
            </plugin>
            <!-- Compile Plugin -->
            <plugin>
                <groupId>org.apache.maven.plugins</groupId>
                <artifactId>maven-compiler-plugin</artifactId>
                <version>3.3</version>
                <configuration>
                    <source>1.8</source>
                    <target>1.8</target>
                    <encoding>${project.build.sourceEncoding}</encoding>
                </configuration>
            </plugin>
            <!-- Jetty Plugin -->
            <plugin>
                <groupId>org.mortbay.jetty</groupId>
                <artifactId>maven-jetty-plugin</artifactId>
                <version>6.1.26</version>
                <configuration>
                    <webAppSourceDirectory>${basedir}/src/main/webapp</webAppSourceDirectory>
                </configuration>
            </plugin>
        </plugins>
    </build>
</project>
2.从POJO开始说
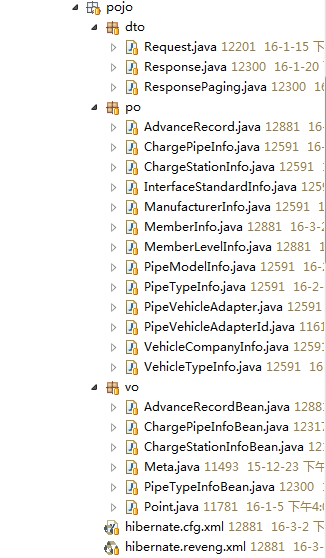
我的pojo结构如下
很明显我的pojo包下面分为了3个子包分别为dto、po和vo,那有人可能就会问了,他们都是什么意思并且分别都代表什么功能?那我就来给你们分享我的认知经验。首先dto是传输对象,构造这个对象主要是最终传递给调用者的对象。po毋庸置疑是属于数据库映射出来的对象,这里面可以看到只有单单的类文件,没有.hbm映射文件。原因是我的po实体类上面都加有JPA注解,其实效果和.hbm文件达到的效果是一样的,这个通过hibernate的反向工程可以得到。不太会生成po这些类的话,百度一下帮你解决。然后是vo包下面类存在的原因,这个是我用来传输的对象。主要是解决dao层查询出来的存在one to many 或者 many to one 关联导致Json序列化出现死循环的问题,可在Service将查询出来的po对象赋值给vo对象从而传递给调用者。dto包下的request为传入对象,response为返回的对象,ResponsePaging则为分页的返回对象。
3.Dao和Service
和很多web项目一样,我的Dao结构和Service结构类似,都包含公共接口和公共抽象类以及具体的对象接口以及对应的实现类。这里只列举Dao的结构,Service与之类似。
公共接口:基本包含了所有的操作方法
package com.evt.charge.rpc.dao;

import java.io.Serializable;
import java.util.List;

import com.evt.charge.rpc.pojo.dto.Request;

public interface ICommonDao<T extends Serializable> {
    T findOne(final long id);

    T findOne(final int id);

    T findOne(final String id);

    List<T> findAll(Request resquest);

    List<T> findAll();

    void save(final T entity);

    void saveOrUpdate(final T entity);

    void batchSave(final List<T> entities);

    T update(final T entity);

    void delete(final T entity);

    void deleteById(final int entityId);

    void deleteById(final long entityId);

    void deleteById(final String entityId);
}
公共抽象类:实现了公共接口的所有的方法并且有sessionFactory注入以及Class对象的设置。值得注意的是我获取session通过sessionFactory.getCurrentSession()方法获得,没有调用openSession()方法。这样的好处是将session的管理交给spring容器,这样不再需要每次获取session都需要重新重连接池那一条连接导致服务器连接池滥用,也不再需要手动关闭session,连接关闭之前自动提交事务关闭session。
package com.evt.charge.rpc.dao;

import java.io.Serializable;
import java.util.List;

import javax.annotation.Resource;

import org.hibernate.Query;
import org.hibernate.Session;
import org.hibernate.SessionFactory;

import com.evt.charge.rpc.exception.DaoException;
import com.evt.charge.rpc.exception.ExceptionCode;
import com.evt.charge.rpc.pojo.dto.Request;

@SuppressWarnings("unchecked")
public abstract class AbstractBaseDao<T extends Serializable> implements
        ICommonDao<T> {

    private Class<T> clazz;

    @Resource(name = "sessionFactory")
    private SessionFactory sessionFactory;

    protected final void setClazz(final Class<T> clazzToSet) {
        if (null == clazzToSet)
        this.clazz = clazzToSet;
    }

    protected final Session getSession() {
        return sessionFactory.getCurrentSession();
    }

    @Override
    public final T findOne(final long id) {
        return (T) getSession().get(clazz, id);
    }

    @Override
    public final T findOne(final int id) {
        return (T) getSession().get(clazz, id);
    }

    @Override
    public final T findOne(final String id) {
        return (T) getSession().get(clazz, id);
    }

    @Override
    public final List<T> findAll(Request resquest) {
        int pageIndex = resquest.getPageIndex();
        int pageSize = resquest.getPageSize();
        String orderParam = resquest.getOrderbyParam();
        StringBuffer hql = new StringBuffer("from " + clazz.getName());
        if (resquest.getOrder() == 0 && orderParam != null) {
            hql.append(" order by " + orderParam + " asc");
        } else if (resquest.getOrder() == 1 && orderParam != null) {
            hql.append(" order by " + orderParam + " desc");
        }
        Query query = getSession().createQuery(hql.toString());
        query.setFirstResult((pageIndex - 1) * pageSize);
        query.setMaxResults(pageSize);
        query.setCacheable(true);
        return query.list();
    }

    @Override
    public final List<T> findAll() {
        Query query = getSession().createQuery("from " + clazz.getName());
        query.setCacheable(true);
        return query.list();
    }

    @Override
    public final void save(final T entity) {
        if (null == entity)
        Session session = getSession();
        session.save(entity);
    }

    @Override
    public final void saveOrUpdate(final T entity) {
        if (null == entity)
        Session session = getSession();
        session.saveOrUpdate(entity);
    }

    @Override
    public final void batchSave(final List<T> entities) {
    }

    @Override
    public final T update(final T entity) {
        if (null == entity)
        Session session = getSession();
        session.update(entity);
        return entity;
    }

    @Override
    public final void delete(final T entity) {
        if (null == entity)
        Session session = getSession();
        session.delete(entity);
    }

    @Override
    public final void deleteById(final long entityId) {
        final T entity = findOne(entityId);
        if (null == entity)
        delete(entity);
    }

    @Override
    public final void deleteById(final int entityId) {
        final T entity = findOne(entityId);
        if (null == entity)
        delete(entity);
    }

    @Override
    public final void deleteById(final String entityId) {
        final T entity = findOne(entityId);
        if (null == entity)
        delete(entity);
    }

    protected void closure(Session session) {
        if (session != null) {
            session.flush();
            session.clear();
            session.close();
        }
    }
}
4.控制器
同样是基于注解的配置,@RestController是Spring4.0的新注解,是由@Controller和@ResponseBody(实现返回对象序列化)组成@RequestMapping里面的请求方法只能选择一种,value是请求的地址。@RequestBody是Http请求的请求体,我采用的是通过传入json字符串来传参。
package com.evt.app.rest.controller;

import java.util.Map;

import org.apache.log4j.Logger;
import org.springframework.beans.factory.annotation.Autowired;
import org.springframework.web.bind.annotation.RequestBody;
import org.springframework.web.bind.annotation.RequestMapping;
import org.springframework.web.bind.annotation.RequestMethod;
import org.springframework.web.bind.annotation.RestController;

import com.alibaba.fastjson.JSON;
import com.evt.app.rest.pojo.Response;
import com.evt.app.rest.service.IAppVersionRecordService;

@RestController
public class AppVersionController {

    @Autowired
    private IAppVersionRecordService appVersionRecordService;

    /**
     * 获取所有版本信息
     *
     * @return
     */
    @RequestMapping(value = "/getAppVersion", method = RequestMethod.GET)
    public Response getAppVersion() {
        return appVersionRecordService.getAppVersion();
    }

    /**
     * 增加或修改版本信息
     *
     * @param param
     */
    @RequestMapping(value = "/saveOrUpdateAppVersion", method = RequestMethod.POST)
    public void saveOrUpdateAppVersion(@RequestBody String param) {
        appVersionRecordService.saveOrUpdateAppVersion(param);
    }

    /**
     * 删除版本信息
     *
     * @param param
     */
    @SuppressWarnings("unchecked")
    @RequestMapping(value = "/deleteAppVersion", method = RequestMethod.POST)
    public void deleteAppVersion(@RequestBody String param) {
        Map<String, String> map = JSON.parseObject(param, Map.class);
        int id = Integer.valueOf(map.get("id"));
        appVersionRecordService.deleteById(id);
    }

    /**
     * findById版本信息
     *
     * @param param
     * @return
     */
    @RequestMapping(value = "/findAppVersionOne/{param}", method = RequestMethod.GET)
    public Response findAppVersionOne( @PathParam("param") @RequestBody String param) {
        return appVersionRecordService.findAppVersionOne(param);
    }
}
5.其他细节
异常处理:
在 Spring MVC 中,我们可以使用 AOP 技术,编写一个全局的异常处理切面类,用它来统一处理所有的异常行为,在 Spring 3.2 中才开始提供。使用法很简单,只需定义一个类,并通过 @ControllerAdvice 注解将其标注即可,同时需要使用 @ResponseBody 注解表示返回值可序列化为 JSON 字符串。代码如下:
@ControllerAdvice@ResponseBodypublic class ExceptionAdvice {    /**
     * 400 - Bad Request
     */
    @ResponseStatus(HttpStatus.BAD_REQUEST)    @ExceptionHandler(HttpMessageNotReadableException.class)    public Response handleHttpMessageNotReadableException(HttpMessageNotReadableException e) {
        logger.error("参数解析失败", e);        return new Response().failure("could_not_read_json");
    }    /**
     * 405 - Method Not Allowed
     */
    @ResponseStatus(HttpStatus.METHOD_NOT_ALLOWED)    @ExceptionHandler(HttpRequestMethodNotSupportedException.class)    public Response handleHttpRequestMethodNotSupportedException(HttpRequestMethodNotSupportedException e) {
        logger.error("不支持当前请求方法", e);        return new Response().failure("request_method_not_supported");
    }    /**
     * 415 - Unsupported Media Type
     */
    @ResponseStatus(HttpStatus.UNSUPPORTED_MEDIA_TYPE)    @ExceptionHandler(HttpMediaTypeNotSupportedException.class)    public Response handleHttpMediaTypeNotSupportedException(Exception e) {
        logger.error("不支持当前媒体类型", e);        return new Response().failure("content_type_not_supported");
    }    /**
     * 500 - Internal Server Error
     */
    @ResponseStatus(HttpStatus.INTERNAL_SERVER_ERROR)    @ExceptionHandler(Exception.class)    public Response handleException(Exception e) {
        logger.error("服务运行异常", e);        return new Response().failure(e.getMessage());
    }
}
可见,在 ExceptionAdvice 类中包含一系列的异常处理方法,每个方法都通过 @ResponseStatus 注解定义了响应状态码,此外还通过 @ExceptionHandler 注解指定了具体需要拦截的异常类。以上过程只是包含了一部分的异常情况,若需处理其它异常,可添加方法具体的方法。需要注意的是,在运行时从上往下依次调 用每个异常处理方法,匹配当前异常类型是否与 @ExceptionHandler 注解所定义的异常相匹配,若匹配,则执行该方法,同时忽略后续所有的异常处理方法,最终会返回经 JSON 序列化后的 Response 对象。
解决跨域问题
比如,前端应用为静态站点且部署在 http://web.xxx.com 域下,后端应用发布 REST API 并部署在 http://api.xxx.com 域下,如何使前端应用通过 AJAX 跨域访问后端应用呢?这需要使用到 CORS 技术来实现,这也是目前最好的解决方案了。
CORS 全称为 Cross Origin Resource Sharing(跨域资源共享),服务端只需添加相关响应头信息,即可实现客户端发出 AJAX 跨域请求。
CORS 技术非常简单,易于实现,目前绝大多数浏览器均已支持该技术(IE8 浏览器也支持了),服务端可通过任何编程语言来实现,只要能将 CORS 响应头写入 response 对象中即可。
下面我们继续扩展 REST 框架,通过 CORS 技术实现 AJAX 跨域访问。
首先,我们需要编写一个 Filter,用于过滤所有的 HTTP 请求,并将 CORS 响应头写入 response 对象中,代码如下:
public class CorsFilter implements Filter {    private String allowOrigin;    private String allowMethods;    private String allowCredentials;    private String allowHeaders;    private String exposeHeaders;    @Override
    public void init(FilterConfig filterConfig) throws ServletException {
        allowOrigin = filterConfig.getInitParameter("allowOrigin");
        allowMethods = filterConfig.getInitParameter("allowMethods");
        allowCredentials = filterConfig.getInitParameter("allowCredentials");
        allowHeaders = filterConfig.getInitParameter("allowHeaders");
        exposeHeaders = filterConfig.getInitParameter("exposeHeaders");
    }    @Override
    public void doFilter(ServletRequest req, ServletResponse res, FilterChain chain) throws IOException, ServletException {
        HttpServletRequest request = (HttpServletRequest) req;
        HttpServletResponse response = (HttpServletResponse) res;        if (StringUtil.isNotEmpty(allowOrigin)) {
            List<String> allowOriginList = Arrays.asList(allowOrigin.split(","));            if (CollectionUtil.isNotEmpty(allowOriginList)) {
                String currentOrigin = request.getHeader("Origin");                if (allowOriginList.contains(currentOrigin)) {
                    response.setHeader("Access-Control-Allow-Origin", currentOrigin);
                }
            }
        }        if (StringUtil.isNotEmpty(allowMethods)) {
            response.setHeader("Access-Control-Allow-Methods", allowMethods);
        }        if (StringUtil.isNotEmpty(allowCredentials)) {
            response.setHeader("Access-Control-Allow-Credentials", allowCredentials);
        }        if (StringUtil.isNotEmpty(allowHeaders)) {
            response.setHeader("Access-Control-Allow-Headers", allowHeaders);
        }        if (StringUtil.isNotEmpty(exposeHeaders)) {
            response.setHeader("Access-Control-Expose-Headers", exposeHeaders);
        }
        chain.doFilter(req, res);
    }    @Override
    public void destroy() {
    }
}
以上 CorsFilter 将从 web.xml 中读取相关 Filter 初始化参数,并将在处理 HTTP 请求时将这些参数写入对应的 CORS 响应头中,下面大致描述一下这些 CORS 响应头的意义:
Access-Control-Allow-Origin:允许访问的客户端域名,例如:http://web.xxx.com,若为 *,则表示从任意域都能访问,即不做任何限制。Access-Control-Allow-Methods:允许访问的方法名,多个方法名用逗号分割,例如:GET,POST,PUT,DELETE,OPTIONS。Access-Control-Allow-Credentials:是否允许请求带有验证信息,若要获取客户端域下的 cookie 时,需要将其设置为 true。Access-Control-Allow-Headers:允许服务端访问的客户端请求头,多个请求头用逗号分割,例如:Content-Type。Access-Control-Expose-Headers:允许客户端访问的服务端响应头,多个响应头用逗号分割。
需要注意的是,CORS 规范中定义 Access-Control-Allow-Origin 只允许两种取值,要么为 *,要么为具体的域名,也就是说,不支持同时配置多个域名。为了解决跨多个域的问题,需要在代码中做一些处理,这里将 Filter 初始化参数作为一个域名的集合(用逗号分隔),只需从当前请求中获取 Origin 请求头,就知道是从哪个域中发出的请求,若该请求在以上允许的域名集合中,则将其放入 Access-Control-Allow-Origin 响应头,这样跨多个域的问题就轻松解决了。
以下是 web.xml 中配置 CorsFilter 的方法:
<filter>
    <filter-name>corsFilter</filter-name>
    <filter-class>com.xxx.api.cors.CorsFilter</filter-class>
    <init-param>
        <param-name>allowOrigin</param-name>
        <param-value>http://web.xxx.com</param-value>
    </init-param>
    <init-param>
        <param-name>allowMethods</param-name>
        <param-value>GET,POST,PUT,DELETE,OPTIONS</param-value>
    </init-param>
    <init-param>
        <param-name>allowCredentials</param-name>
        <param-value>true</param-value>
    </init-param>
    <init-param>
        <param-name>allowHeaders</param-name>
        <param-value>Content-Type</param-value>
    </init-param></filter><filter-mapping>
    <filter-name>corsFilter</filter-name>
    <url-pattern>/*</url-pattern></filter-mapping>
完成以上过程即可实现 AJAX 跨域功能了,但似乎还存在另外一个问题,由于 REST 是无状态的,后端应用发布的 REST API 可在用户未登录的情况下被任意调用,这显然是不安全的,如何解决这个问题呢?我们需要为 REST 请求提供安全机制。
配置缓存服务器
为了更加高效的通过查询获取我的WebService接口服务,我在我的WebService中加入的Memcached缓存的支持,在Habernate中加入如下配置:
        <!-- 开启二级缓存 -->
        <property name="hibernate.cache.use_second_level_cache">true</property>
        <!-- 开启查询缓存 -->
        <property name="hibernate.cache.use_query_cache">true</property>
        <!-- 结构化查询 -->
        <property name="hibernate.cache.use_structured_entries">true</property>
        <!-- 缓存提供商 -->
        <property name="hibernate.cache.region.factory_class">com.googlecode.hibernate.memcached.MemcachedRegionFactory</property>
        <!-- memcached 服务地址,多个用空格分隔格式host:port -->
        <property name="hibernate.memcached.servers">192.168.1.194:11211,192.168.1.223:11211</property>
        <!-- 区域前缀 -->
        <property name="hibernate.cache.region_prefix">quality.cache.memcached</property>
        <!-- 设置连接工厂 -->
        <property name="hibernate.memcached.connectionFactory">KetamaConnectionFactory</property>
        <!-- 缓存失效时间,单位秒 -->
        <property name="hibernate.memcached.cacheTimeSeconds">300</property>
        <!-- 缓存Key生成存储HashCode算法 -->
        <property name="hibernate.memcached.keyStrategy">HashCodeKeyStrategy</property>
        <!-- 属性配置 -->
        <property name="hibernate.memcached.readBufferSize">16384</property>
        <property name="hibernate.memcached.operationQueueLength">16384</property>
        <property name="hibernate.memcached.operationTimeout">2500</property>
        <property name="hibernate.memcached.hashAlgorithm">NATIVE_HASH</property>
        <property name=" hibernate.memcached.clearSupported">false</property>
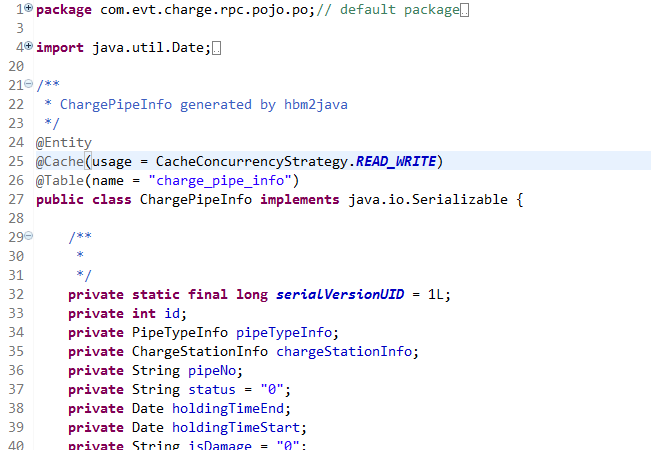
在vo实体类上加上@Cache(usage = CacheConcurrencyStrategy.READ_WRITE),配置如下:
6.总结
通过本次基于Spring和Hibernate对于Restful风格的WebService的开发,发现基于此实现的WebService比较轻量级而且实现起来非常的简单。支持前端页面的ajax调用,对于面向服务的比较复杂的SAOP式的WebService来说在很多时候都是非常轻便而高效的。

