Spring MVC + Hibernate + Maven: Crud操作示例
本文转载自: ImportNew - wudy 转载请注明出处
点击打开链接
Spring MVC + Hibernate + Maven: Crud操作示例
关于作者(Alexey Zvolinskiy)
Alexey是一个在使用Java,TestNG 和Selenium的自动化WEB应用程序中有丰富经验的测试开发者。他如此的喜欢QA以至于在下班后他为初级QA工程师提供培训课程。
在这篇文章中我想介绍一个Spring MVC + Hibernate + Maven例子。这组技术主要涉及一些基础知识,我想在每一个必要的地方详细解释它。本篇话题范围以外的更多资源,我会提供链接方便你阅读。在文章的最后,我将发布一个GitHub的链接。
目标
示例web应用程序是基于Spring MVC, Hibernate, Maven的,界面是基于HTML的。这个应用程序将提供所有的CRUD操作:增删改查。和往常一样,我将使用Mysql作为我的数据库。这个应用程序将把足球俱乐部相关的实体来作为示例,所以这个教程将会涉及运动领域。
准备
我需要在数据库中创建一个表,下面就是创建它的代码:
CREATE TABLE `teams` (
`id` int(6) NOT NULL AUTO_INCREMENT,
`name` varchar(40) NOT NULL,
`rating` int(6) NOT NULL,
PRIMARY KEY (`id`)
) ENGINE=InnoDB AUTO_INCREMENT=6 DEFAULT CHARSET=utf8;
这个表将在应用程序中用下面的类来表示:
@Entity
@Table(name="teams")
public class Team {

    @Id
    @GeneratedValue
    private Integer id;

    private String name;

    private Integer rating;

    public Integer getId() {
        return id;
    }
    public void setId(Integer id) {
        this.id = id;
    }
    public String getName() {
        return name;
    }
    public void setName(String name) {
        this.name = name;
    }
    public Integer getRating() {
        return rating;
    }
    public void setRating(Integer rating) {
        this.rating = rating;
    }

}
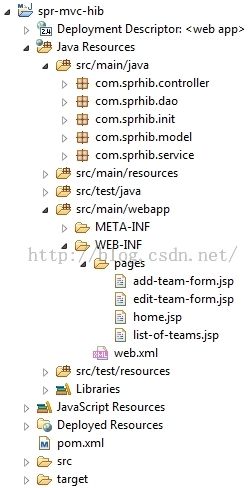
然后我需要在IDE(我使用Eclipse)里面创建一个Maven项目。我将略过创建的详细过程,你可以查看它在我的关于Maven项目的创建的文章里,这是pom.xml文件的链接。首先最重要的一点就是WebAppConfig.java 文件,所以我开始吧:
@Configuration
@ComponentScan("com.sprhib")
@EnableWebMvc
@EnableTransactionManagement
@PropertySource("classpath:application.properties")
public class WebAppConfig {

    private static final String PROPERTY_NAME_DATABASE_DRIVER = "db.driver";
    private static final String PROPERTY_NAME_DATABASE_PASSWORD = "db.password";
    private static final String PROPERTY_NAME_DATABASE_URL = "db.url";
    private static final String PROPERTY_NAME_DATABASE_USERNAME = "db.username";

    private static final String PROPERTY_NAME_HIBERNATE_DIALECT = "hibernate.dialect";
    private static final String PROPERTY_NAME_HIBERNATE_SHOW_SQL = "hibernate.show_sql";
    private static final String PROPERTY_NAME_ENTITYMANAGER_PACKAGES_TO_SCAN = "entitymanager.packages.to.scan";

    @Resource
    private Environment env;

    @Bean
    public DataSource dataSource() {
        DriverManagerDataSource dataSource = new DriverManagerDataSource();

        dataSource.setDriverClassName(env.getRequiredProperty(PROPERTY_NAME_DATABASE_DRIVER));
        dataSource.setUrl(env.getRequiredProperty(PROPERTY_NAME_DATABASE_URL));
        dataSource.setUsername(env.getRequiredProperty(PROPERTY_NAME_DATABASE_USERNAME));
        dataSource.setPassword(env.getRequiredProperty(PROPERTY_NAME_DATABASE_PASSWORD));

        return dataSource;
    }

    @Bean
    public LocalSessionFactoryBean sessionFactory() {
        LocalSessionFactoryBean sessionFactoryBean = new LocalSessionFactoryBean();
        sessionFactoryBean.setDataSource(dataSource());
        sessionFactoryBean.setPackagesToScan(env.getRequiredProperty(
PROPERTY_NAME_ENTITYMANAGER_PACKAGES_TO_SCAN));
        sessionFactoryBean.setHibernateProperties(hibProperties());
        return sessionFactoryBean;
    }

    private Properties hibProperties() {
        Properties properties = new Properties();
        properties.put(PROPERTY_NAME_HIBERNATE_DIALECT, env.getRequiredProperty(PROPERTY_NAME_HIBERNATE_DIALECT));
        properties.put(PROPERTY_NAME_HIBERNATE_SHOW_SQL, env.getRequiredProperty(PROPERTY_NAME_HIBERNATE_SHOW_SQL));
        return properties;
    }

    @Bean
    public HibernateTransactionManager transactionManager() {
        HibernateTransactionManager transactionManager = new HibernateTransactionManager();
        transactionManager.setSessionFactory(sessionFactory().getObject());
        return transactionManager;
    }

    @Bean
    public UrlBasedViewResolver setupViewResolver() {
        UrlBasedViewResolver resolver = new UrlBasedViewResolver();
        resolver.setPrefix("/WEB-INF/pages/");
        resolver.setSuffix(".jsp");
        resolver.setViewClass(JstlView.class);
        return resolver;
    }

}
在这个文件开头,你看见了注解@EnableTransactionManagement,它可以使Spring的注解驱动事务管理器生效工作。注解@PropertySource(“classpath:application.properties”)定位属性文件所在的资源文件夹。注意着三个beans:transactionManager, sessionFactory, dataSource,这些beans提供了事务管理。更多信息可以阅读我的关于Hibernate功能的文章。
#DB properties:
db.driver=com.mysql.jdbc.Driver
db.url=jdbc:mysql://localhost:3306/hibnatedb
db.username=hibuser
db.password=root

#Hibernate Configuration:
hibernate.dialect=org.hibernate.dialect.MySQL5InnoDBDialect
hibernate.show_sql=true
entitymanager.packages.to.scan=com.sprhib.model
以上是我和项目有关的所有准备,接下来我将向你展示DAO层和Service层。
DAO层和Service层
下面是DAOs和Services接口和实现:
public interface TeamDAO {

    public void addTeam(Team team);
    public void updateTeam(Team team);
    public Team getTeam(int id);
    public void deleteTeam(int id);
    public List

          getTeams();

}

@Repository
public class TeamDAOImpl implements TeamDAO {

    @Autowired
    private SessionFactory sessionFactory;

    private Session getCurrentSession() {
        return sessionFactory.getCurrentSession();
    }

    public void addTeam(Team team) {
        getCurrentSession().save(team);
    }

    public void updateTeam(Team team) {
        Team teamToUpdate = getTeam(team.getId());
        teamToUpdate.setName(team.getName());
        teamToUpdate.setRating(team.getRating());
        getCurrentSession().update(teamToUpdate);

    }

    public Team getTeam(int id) {
        Team team = (Team) getCurrentSession().get(Team.class, id);
        return team;
    }

    public void deleteTeam(int id) {
        Team team = getTeam(id);
        if (team != null)
            getCurrentSession().delete(team);
    }

    @SuppressWarnings("unchecked")
    public List

          getTeams() {
        return getCurrentSession().createQuery("from Team").list();
    }

}
注解 @Repository 表明被注解的类是一个DAO
public interface TeamService {

    public void addTeam(Team team);
    public void updateTeam(Team team);
    public Team getTeam(int id);
    public void deleteTeam(int id);
    public List

          getTeams();

}

@Service
@Transactional
public class TeamServiceImpl implements TeamService {

    @Autowired
    private TeamDAO teamDAO;

    public void addTeam(Team team) {
        teamDAO.addTeam(team);
    }

    public void updateTeam(Team team) {
        teamDAO.updateTeam(team);
    }

    public Team getTeam(int id) {
        return teamDAO.getTeam(id);
    }

    public void deleteTeam(int id) {
        teamDAO.deleteTeam(id);
    }

    public List

          getTeams() {
        return teamDAO.getTeams();
    }

}
注解@Service表明备注解的类是一个“Service”。注解@Transactional在一个方法或者是类上声明一个事务。
控制器和JSPs
现在我就要涵盖所有的 CRUD操作,这一章会有点长。我将从最基础的控制器开始,它负责主页:
@Controller
public class LinkController {

    @RequestMapping(value="/")
    public ModelAndView mainPage() {
        return new ModelAndView("home");
    }

    @RequestMapping(value="/index")
    public ModelAndView indexPage() {
        return new ModelAndView("home");
    }

}
它挺简单的,这是JSP文件:
...
<h1>Home page</h1>
<p>
${message}
<a href="${pageContext.request.contextPath}/team/add.html">Add new team</a>
<a href="${pageContext.request.contextPath}/team/list.html">Team list</a>
</p>
...
下面是这里是核心控制器,主要应用程序的控制器:
@Controller
public class TeamController {

    @Autowired
    private TeamService teamService;

    @RequestMapping(value="/team/add")
    public ModelAndView addTeamPage() {
        ModelAndView modelAndView = new ModelAndView("add-team-form");
        modelAndView.addObject("team", new Team());
        return modelAndView;
    }

    @RequestMapping(value="/team/add/process")
    public ModelAndView addingTeam(@ModelAttribute Team team) {

        ModelAndView modelAndView = new ModelAndView("home");
        teamService.addTeam(team);

        String message = "Team was successfully added.";
        modelAndView.addObject("message", message);

        return modelAndView;
    }

    @RequestMapping(value="/team/list")
    public ModelAndView listOfTeams() {
        ModelAndView modelAndView = new ModelAndView("list-of-teams");

        List

          teams = teamService.getTeams();
        modelAndView.addObject("teams", teams);

        return modelAndView;
    }

    @RequestMapping(value="/team/edit/{id}", method=RequestMethod.GET)
    public ModelAndView editTeamPage(@PathVariable Integer id) {
        ModelAndView modelAndView = new ModelAndView("edit-team-form");
        Team team = teamService.getTeam(id);
        modelAndView.addObject("team",team);
        return modelAndView;
    }

    @RequestMapping(value="/team/edit/{id}", method=RequestMethod.POST)
    public ModelAndView edditingTeam(@ModelAttribute Team team, @PathVariable Integer id) {

        ModelAndView modelAndView = new ModelAndView("home");

        teamService.updateTeam(team);

        String message = "Team was successfully edited.";
        modelAndView.addObject("message", message);

        return modelAndView;
    }

    @RequestMapping(value="/team/delete/{id}", method=RequestMethod.GET)
    public ModelAndView deleteTeam(@PathVariable Integer id) {
        ModelAndView modelAndView = new ModelAndView("home");
        teamService.deleteTeam(id);
        String message = "Team was successfully deleted.";
        modelAndView.addObject("message", message);
        return modelAndView;
    }

}
基本上所有的方法和请求映射都是很清晰的。请注意editTeamPage() 和edditingTeam() 方法的@RequestMapping,对于不同的method属性包含不同的值。
现在我们来看看JSP页面:
“Add new team” 页面
...
<h1>Add team page</h1>
<p>Here you can add a new team.</p>
<form:form method="POST" commandname="team" action="${pageContext.request.contextPath}/team/add/process.html">
<table>
<tbody>
    <tr>
        <td>Name:</td>
        <td><form:input path="name"></form:input></td>
    </tr>
    <tr>
        <td>Rating:</td>
        <td><form:input path="rating"></form:input></td>
    </tr>
    <tr>
        <td><input value="Add" type="submit"></td>
        <td></td>
    </tr>
</tbody>
</table>
</form:form>

<p><a href="${pageContext.request.contextPath}/index.html">Home page</a></p>
...
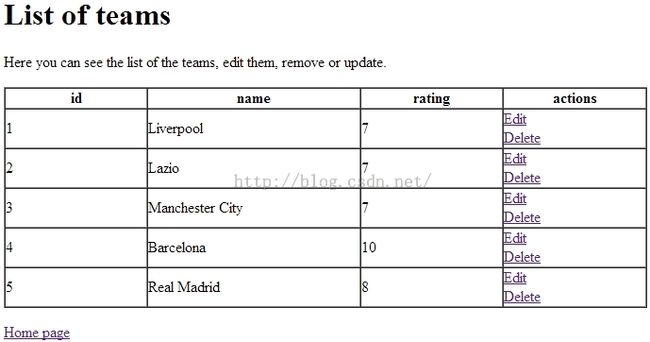
“List of teams” 页面:
<h1>List of teams</h1>
<p>Here you can see the list of the teams, edit them, remove or update.</p>
<c:foreach var="team" items="${teams}">
</c:foreach><table border="1px" cellpadding="0" cellspacing="0">
<thead>
<tr>
<th width="10%">id</th><th width="15%">name</th><th width="10%">rating</th><th width="10%">actions</th>
</tr>
</thead>
<tbody>
<tr>
    <td>${team.id}</td>
    <td>${team.name}</td>
    <td>${team.rating}</td>
    <td>
    <a href="${pageContext.request.contextPath}/team/edit/${team.id}.html">Edit</a>
    <a href="${pageContext.request.contextPath}/team/delete/${team.id}.html">Delete</a>
    </td>
</tr>

</tbody>
</table>

<p><a href="${pageContext.request.contextPath}/index.html">Home page</a></p>
...
“Edit team” 页面:
...
<h1>Edit team page</h1>
<p>Here you can edit the existing team.</p>
<p>${message}</p>
<form:form method="POST" commandname="team" action="${pageContext.request.contextPath}/team/edit/${team.id}.html">
<table>
<tbody>
    <tr>
        <td>Name:</td>
        <td><form:input path="name"></form:input></td>
    </tr>
    <tr>
        <td>Rating:</td>
        <td><form:input path="rating"></form:input></td>
    </tr>
    <tr>
        <td><input value="Edit" type="submit"></td>
        <td></td>
    </tr>
</tbody>
</table>
</form:form>

<p><a href="${pageContext.request.contextPath}/index.html">Home page</a></p>
...
总结
几个技术的整合通常不是一件简单的事情,所有如果要想成功就需要有耐心。在这篇文章中没有囊括所有的资源,你可以访问GitHub去查看哪些你感兴趣的类。
原文链接: javacodegeeks 翻译: ImportNew.com - wudy译文链接: http://www.importnew.com/11121.html
[ 转载请保留原文出处、译者和译文链接。 ]

