osgi学习笔记3之集成Spring-DM的cxf-DOSGI HelloWorld
需要的jar包 自己上网查询 我在这里不再累赘 首先 新建两个buddle 分别是 HelloWorldInferface 和 HelloWorldImpl
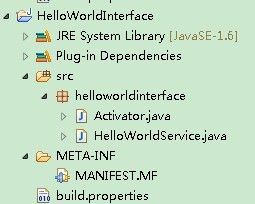
打开 HelloWorldInferface 这个buddle ,如下图
新建HelloWorldService.java 具体内容如下:
package helloworldinterface;
public interface HelloWorldService {
public String hello();
}
然后 打开 META-INF 下的MANIFEST.Mf文件 把此budle发布出去 操作 如下图
这样 此服务接口就发布出去 才能被 helloworldImpl 这个budle 依赖引用。 好啦 这个budle 已经完成了 简单吧 嘻嘻嘻
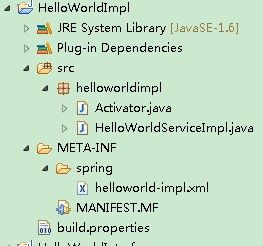
接下来 我们 来编写 helloworldImpl 这个budle 首先看一下次budle的结构
看完结构之后 读者已经看到了HelloWorldServiceImpl.java这个类 它实现了上一个budle 里的HelloWorldService.java这个接口 ,我想在不配置前 肯定会报找到不到这个类
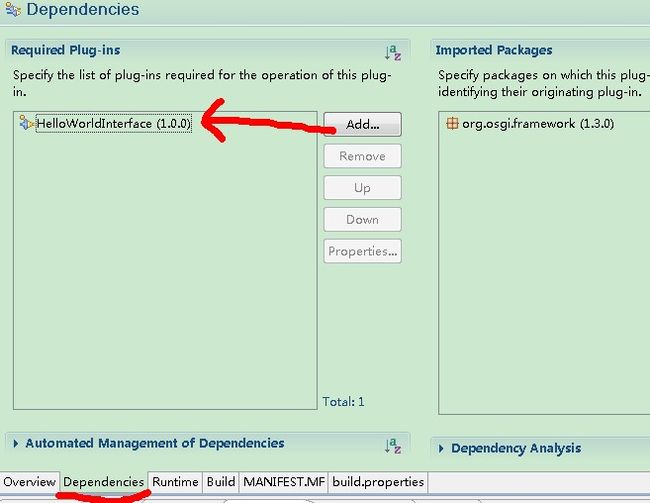
所以 接下来 要导入依赖的 HelloWorldInferface 这个budle 具体操作如下图 打开 META-INF 下的MANIFEST.Mf文件:
这样 我们就能 实现 上一个budle 里的服务接口 helloworldService.java 啦, 实现类 代码如下:
package helloworldimpl;
import helloworldinterface.HelloWorldService;
public class HelloWorldServiceImpl implements HelloWorldService{
@Override
public String hello() {
// TODO Auto-generated method stub
return "你好";
}
}
然后 就剩下配置啦
在helloworldImpl 这个budle 的 MATA-INF 下 新建spring 文件夹 文件夹名字 一定要叫 spring,不然 工程启动时候 它找不到你需要加载的xml配置文件的
在新建一个helloworld-impl.xml 配置文件 配置文件的代码如下:
<?xml version="1.0" encoding="UTF-8"?>
<beans xmlns="http://www.springframework.org/schema/beans"
xmlns:xsi="http://www.w3.org/2001/XMLSchema-instance"
xmlns:osgi="http://www.springframework.org/schema/osgi"
xsi:schemaLocation="http://www.springframework.org/schema/beans
http://www.springframework.org/schema/beans/spring-beans.xsd
http://www.springframework.org/schema/osgi
http://www.springframework.org/schema/osgi/spring-osgi.xsd">
<osgi:service interface="helloworldinterface.HelloWorldService">
<osgi:service-properties>
<!-- http://cxf.apache.org/distributed-osgi-reference.html -->
<entry key="osgi.remote.interfaces" value="*"/>
</osgi:service-properties>
<bean class="helloworldimpl.HelloWorldServiceImpl">
</bean>
</osgi:service>
</beans>
==========================结束 两个budle 都已经实现 并配置好了 现在就是启功
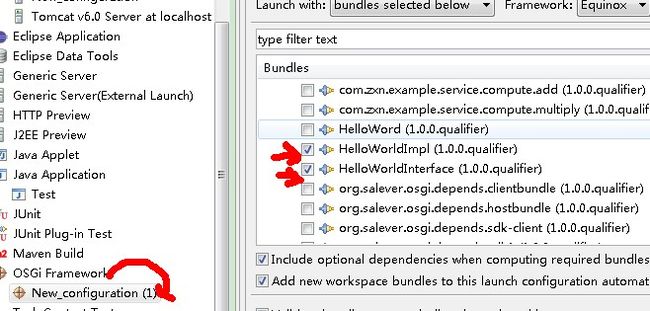
点击eclipse 环境的 run-runConfiguractions 会出现如下如图:
点击右下角的run 启动成功之后 在浏览器里 输入http://localhost:9000/helloworldinterface/HelloWorldService?wsdl
osgi 默认端口号9000 输入浏览器 效果图 如下:
web 客户端 如何调用咱们下次 有时间了 在写


