在ubuntu上安装zeppelin
1, 安装java
sudo apt-get install default-jre
修改java的home路径,这个在安装mysql jdbc的时候也会用到
CLASSPATH=$CLASSPATH:/usr/share/java/mysql.jar
export CLASSPATH
2, 安装
可以参考这篇文章
https://zeppelin.incubator.apache.org/docs/0.5.6-incubating/install/install.html
现在下载zeppelin的binary包,可以从这里下载
http://ftp.meisei-u.ac.jp/mirror/apache/dist/incubator/zeppelin/0.5.6-incubating/zeppelin-0.5.6-incubating-bin-all.tgz
然后解压缩,
tar -xzvf zeppelin-0.5.6-incubating-bin-all.tgz
cd zeppelin-0.5.6-incubating-bin-all启动zeppelin,可以通过下面的命令
启动 Zeppelin
bin/zeppelin-daemon.sh start
然后就可以通过 http://localhost:8080 访问zeppelin.
停止 Zeppelin
bin/zeppelin-daemon.sh stop3,(可选)在zeppelin里面添加mysql interpreter
首先安装mysql,和jdbc
sudo apt-get install mysql-server
sudo apt-get install mysql-client
sudo apt-get install libmysql-java
然后不要忘记修改CLASSPATH变量
CLASSPATH=$CLASSPATH:/usr/share/java/mysql.jar
export CLASSPATH
然后在zeppelin里添加mysql的interpreter
具体可参考如下文章
http://thedataist.com/tutorial-using-apache-zeppelin-with-mysql/
自己在使用下面的步骤的时候,出现%sql的地方,都换成%psql就可以成功了。
Step 2: Add an Interpreter in Zeppelin
Now that your JDBC connection is working, the next step is to create and configure a Zeppelin interpreter for MySQL. Once you’ve opened up Zeppelin, click on the Interpreter link at the top of the screen. Click on create and populate the form as shown below.
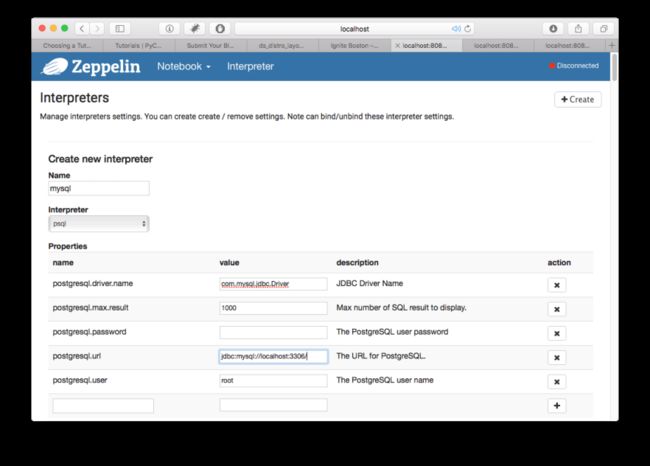
The fields you’ll need to fill in are:
- Interpreter: psql
- postgresql.driver.name: com.mysql.jdbc.Driver
- postgresql.url: jdbc:mysql://localhost:3306/ or jdbc:mysql://<your host>:3306/
Of course, you’ll have to fill out the username/password fields. There is an optional database name which you can put as follows: jdbc:mysql://<your host>:3306/<database>.
Step 3: Activate the MySQL Interpreter
The next step is to bind the MySQL interpreter to your notebook. Click on the gear icon in the upper right corner and make sure that the MySQL interpreter is on. You might want to drag it to the top of your interpreter list.
Step 4: Run Your Query
The final step is to execute a query. If you didn’t already specify which database you are using, enter the following into the first Zeppelin text window:
%sql
USE <database name>;
Once you’ve specified the database, you can simply query the database in Zeppelin and it should work.
