UICollectionView 使用 介绍

目录[-]

  • 1.1.1 Collection View 元素
  • 1.1.2 数据模型与交互
  • 数据模型(数据提供者UICollectionViewDataSource)
  • 交互(UICollectionViewDelegate)
  • 1.1.3 内容的显示
  • UICollectionViewCell Styles
  • 使用自己的layout(UICollectionViewLayout)
  • 1.2 Flow Layout
  • 1.2.2 自定义 Flow Layout
  • Item size(每个item的大小)
  • Line spacing(每行的间距)
  • Inter cell spacing(每行内部cell item的间距)
  • Scrolling direction(滚动方向)
  • Header and footer size(页眉和页脚大小)
  • Section Inset
  • 1.1. Collection View

    全家福:

    UICollectionView, UITableView, NSCollectionView

    n   不直接等效于NSCollectionView

    n   也不替代UITableView----亲兄弟


    为什么要使用Collection Views呢?

    n  可以高度定制内容的展现

    n  管理数据最佳的做法

    n  即使是处理大量数据,也非常的高效


    我们先来感性的认识一下Collection Views,下面这幅图就是用Collection Views实现的一个照片墙显示。


    1.1.1 Collection View 元素


     UICollectionView 使用 介绍_第1张图片


    从上图中,我们可以看出Collection View的整体构成元素,共有三个要素,分别如下

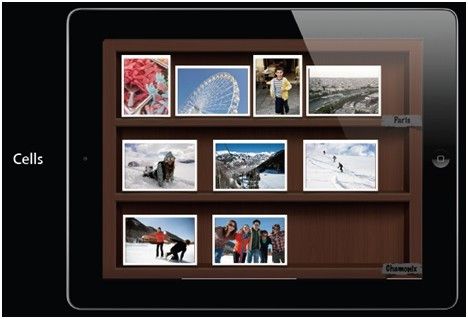
    n Cells(单元格)

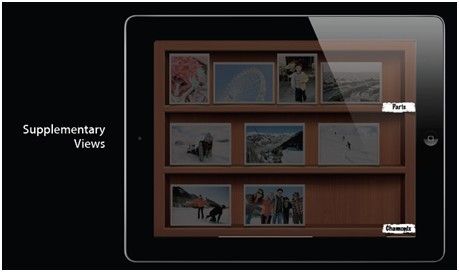
    n Supplementary Views(补充的view,相当于TableView的页眉和页脚)

    n Decoration Views(装饰View,用于装饰整个CollectionView的)


    我们可以分解一下这个照片墙,来描述上面的三个元素都对应什么内容

    Cells如下图,即每一张图片
     

    UICollectionView 使用 介绍_第2张图片


    SupplementaryViews如下图右边白色的文字部分


    UICollectionView 使用 介绍_第3张图片 

    Decoration Views如下图


    最终,三个元素,就构成了照片墙,下面是元素构成图


    1.1.2 数据模型与交互

    数据模型(数据提供者UICollectionViewDataSource)

    UICollectionViewDataSource是一个代理,主要用于向Collection View提供数据。

    UICollectionViewDataSource的主要功能:

    n  Section数目

    n  Section里面有多少item

    n  提供Cell和supplementary view设置

    下面我们依次讲解这些功能。


    1、numberOfSectionsInCollectionView:

    下图中有多少个sections呢?

    答案是2个。即我们在numberOfSectionsInCollectionView:方法中返回2即可。
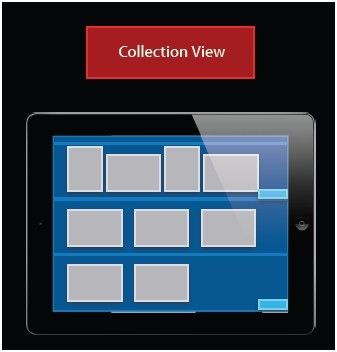
     

    UICollectionView 使用 介绍_第4张图片


    2、collectionView:numberOfItemsInSection:

    下图中section0中有多少个items呢?

    答案是4个。即我们在collectionView:numberOfItemsInSection:方法中对应的section 0返回4即可。


    3、collectionView:cellForItemAtIndexPath:

    下图中section0 item 0位置处应该显示什么内容呢?

    答案是使用方法collectionView:cellForItemAtIndexPath:返回一个cell,类似下图中的一个view。


    4、Cell和View的重用

    下面通过5个步骤,来演示Cell和View的重用

    1)如下图,左边是Collection View,右边是Cell和View的重用队列,刚开始,左边的数据显示内容,右边的重用队列还没有数据。

    UICollectionView 使用 介绍_第5张图片


    2)再看下图,当用户显示出了Collection View下面的内容后,Collection View中之前的一些Cell和View就已经不再被显示了,这是,系统是如何处理呢?


    3)看这里,系统会把不用的Cell和View添加到重用队列中,以备后面使用。
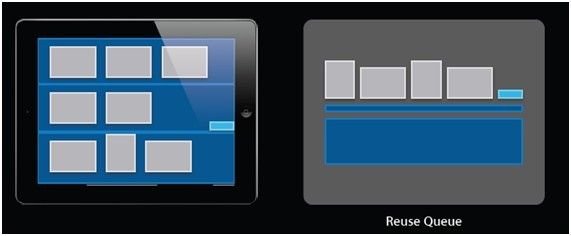
    UICollectionView 使用 介绍_第6张图片


    4)如何再次被使用呢,请看下图,当用户继续往下看内容的时候,系统就会提供队列中存在的Cell和View供使用。

    UICollectionView 使用 介绍_第7张图片


    5)最终使用效果如下图


    UICollectionView 使用 介绍_第8张图片 

    5、iOS6中,Cell重用改善

    在iOS6中,我们可以更加方便的使用Cell,系统总是为我们初始化Cell。我们可以直接使用。只需要简单的按照两步走即可:

    1)  必须使用下面的方法进行Cell类的注册:

    - (void)registerClass:forCellWithReuseIdentifier:

    - (void)registerClass:forSupplementaryViewOfKind:withReuseIdentifier:

    - (void)registerNib:forCellWithReuseIdentifier:

    - (void)registerNib:forSupplementaryViewOfKind:withReuseIdentifier:


    2)  从队列中取出一个Cell,具体方法如下:

    -(id)dequeueReusableCellWithReuseIdentifier:forIndexPath:

    -(id)dequeueReusableSupplementaryViewOfKind:withReuseIdentifier:forIndexPath:


    下面我们通过实际的代码,来演示具体如何进行Cell的重用

    第一步:在collection view中进行设置(Cell类的注册)

    // In collectionview setup...

    [collectionView registerClass:[MyCellclass]

    forCellWithReuseIdentifier:@”MY_CELL_ID”]


    第二步:在下面的函数中,从队列中取出一个cell即可。并且再也不用对cell进行空值判断,以做额外的初始化操作。Cell的一切初始化工作都由系统为我们做好了。我们只需要对cell进行一些赋值等操作即可。

    -(UICollectionView*)collectionView:(UICollectionView*)cv

    cellForItemAtIndexPath:(NSIndexPath*)indexPath

    {

    MyCell *cell =[cv dequeueReusableCellWithReuseIdentifier:@”MY_CELL_ID”];

    if (!cell) {

    // Well, nothingreally. Never again

    }

    // Configure thecell's content

    cell.imageView.image= ...

    return cell;

    }


    交互(UICollectionViewDelegate)

    UICollectionViewDelegate的主要功能:

    n  控制cell的高亮

    n  控制cell的选择

    n  在cell上支持菜单操作,如下图


    选择和高亮在iOS中都有所改进,高亮和flow的精确定位都非常好控制。

    下面列出了常用的相关方法,开发者可以参考sdk的帮助文档,进行详细了解。

    1) 管理cell的高亮


    collectionView:shouldHighlightItemAtIndexPath:

    collectionView:didHighlightItemAtIndexPath:

    collectionView:didUnhighlightItemAtIndexPath:


    这个方法collectionView:shouldHighlightItemAtIndexPath:的效果如下图所示:注意右边selected和highlighted的值。


    这个方法collectionView:didHighlightItemAtIndexPath:的效果如下图所示:注意右边selected和highlighted的值。

    UICollectionView 使用 介绍_第9张图片


    2) 管理cell的选择


    collectionView:shouldSelectItemAtIndexPath:

    collectionView:didSelectItemAtIndexPath:

    collectionView:shouldDeselectItemAtIndexPath:

    collectionView:didDeselectItemAtIndexPath:


    collectionView:shouldSelectItemAtIndexPath:的效果如下图
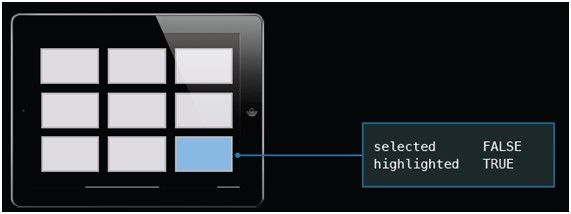
    UICollectionView 使用 介绍_第10张图片


    下面两个方法

    collectionView:didUnhighlightItemAtIndexPath:

    collectionView:didSelectItemAtIndexPath:的效果如下图所示:


    1.1.3 内容的显示

    UICollectionViewCell Styles

    iOS6中没有预定义cell的Style

    Collection View跟踪cell的选择和高亮

          通过设置cell的highlight和selection属性(包含子视图)

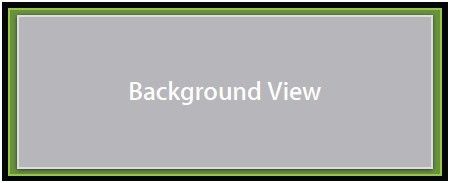
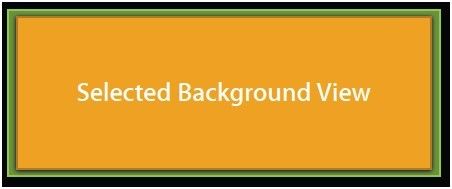
          如果进行了相关配置,这可以切换background view和selected background view


    我们来按顺序看下面四幅图。开发者可以自行领悟规律。

    UICollectionView 使用 介绍_第11张图片


    UICollectionView 使用 介绍_第12张图片


     UICollectionView 使用 介绍_第13张图片


    下图是UICollectionView相关的类图,从图中我们可以看到

    l UICollectionView继承自UIScrollView,

    l 尊循UICollectionViewDelegate和UICollectionViewDataSource两个协议

    l 管理UICollectionViewCell

    UICollectionView 使用 介绍_第14张图片


    图中貌似还缺点东西,什么呢?对了,就是缺少Layout。我们需要Layout对cell和其它的view进行布局。再看下图,图中多了UICollectionViewLayout和UICollectionViewFlowLayout。
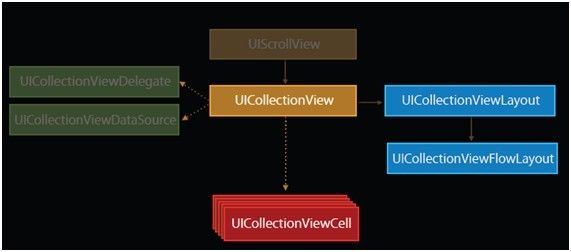
    UICollectionView 使用 介绍_第15张图片


    下面我们对UICollectionViewLayout进行介绍

    使用自己的layout(UICollectionViewLayout)

    UICollectionViewLayout是一个抽象基类,你需要继承自他,来为collection view生成layout信息。Layout对象的作用是决定cells,Supplementary views和Decorationviews在collection view中的布局位置。

    你需要计算如下view的layout属性

    n  Cells

    n  Supplementary views

    n  Decoration views


    系统也为我们定义了layout属性,即UICollectionViewLayoutAttributes,它主要包括如下内容:

    n  位置

    n  大小

    n  透明度

    n  ZIndex

    n  转场


    如下面的两个图是collection view的layout。

    UICollectionView 使用 介绍_第16张图片


    UICollectionView 使用 介绍_第17张图片

    1.2 Flow Layout

    1.2.1 核心概念

    UICollectionViewFlowLayout是一个具体的layout对象,用来把item布局在网格中,并且可选页眉和页脚。在collection view中的items,可以从一行或者一列flow至下一行或者下一列(行或者列取决于滚动的方向)。每行都会根据情况,包含尽可能多的Cells。Cells可以是相同的尺寸,也可以是不同的尺寸。

    下面是Flow Layout的一些特性

    n 面向线性布局

    n 可配置为网格

    n 一组lines

    n 具有页眉和页脚


    1.2.2 自定义 Flow Layout

    Flow Layout可以定制的主要功能如下

    n Item size

    n Line spacing

    n Inter cell spacing

    n Scrolling direction

    n Header and footer size

    n Section Inset

    下面我们来详细介绍这些可定制的功能。

    这里需要对通过全局和delegate定制进行说明一下:

    几乎所有的定制属性都是在UICollectionViewFlowLayout中,delegate实际上是collection view的delegate。UICollectionViewDelegateFlowLayout只是对UICollectionViewDelegate进行了一些扩展。

    Item size(每个item的大小)

    1、  可以进行全局配置,如下代码

    @property(CGSize)itemSize

    layout.itemSize= CGSizeMake(30,20);


    2、  也可以通过delegate对每一个item进行配置,如下代码

    collectionView:layout:sizeForItemAt

    IndexPath:

    {

    return...;

    }


    效果如下图所示

    UICollectionView 使用 介绍_第18张图片


    Line spacing(每行的间距)

    1、  可以进行全局配置,如下属性

    @property(CGFloat) minimumLineSpacing


    2、  也可以通过delegate对每一个section进行配置,如下代码

    ollectionView:layout:minimumLineSpacingForSectionAtIndex:


    请按顺序看下面的三个图

    UICollectionView 使用 介绍_第19张图片


    UICollectionView 使用 介绍_第20张图片


    UICollectionView 使用 介绍_第21张图片


    Inter cell spacing(每行内部cell item的间距)

    1、  可以进行全局配置,如下属性

    @property(CGFloat) minimumInteritemSpacing


    2、  也可以通过delegate对每一个section进行配置,如下代码

    collectionView:layout:minimumInteritemSpacingForSectionAtIndex:


    看看下面的两个图,蓝色是实际的item间距,绿色的是最小item间距。


    Scrolling direction(滚动方向)

    设置scrollDirection属性即可。两个值如下

    UICollectionViewScrollDirectionVertical

    UICollectionViewScrollDirectionHorizontal

    主要作用:

    n  定义了Flow Layout的基本行为

    n  控制页眉页脚的维度


    UICollectionViewScrollDirectionVertical效果如下图所示


    UICollectionViewScrollDirectionHorizontal效果如下图所示

    UICollectionView 使用 介绍_第22张图片


    Header and footer size(页眉和页脚大小)

    下面是页眉和页脚的一些解释。

    n 也就是supplementary views

    n 通过数据源的方法来提供内容,如下

    -collectionView:viewForSupplementaryElementOfKind:atIndexPath:


    n 两种常量(类型)

    UICollectionElementKindSectionHeader

    UICollectionElementKindSectionFooter


    n 同样需要注册一个类并从队列中取出view

    - registerClass:forSupplementaryViewOfKind:withReuseIdentifier:

    -registerNib:forSupplementaryViewOfKind:withReuseIdentifier:

    -dequeueReusableSupplementaryViewOfKind:withReuseIdentifier:forIndexPath:


    页眉和页脚的size配置方式:

    1)可以全局配置,如下属性

    @property(CGSize) headerReferenceSize

    @property(CGSize) footerReferenceSize


    2)也可以通过delegate对每一个section进行配置,如下代码

    collectionView:layout:referenceSizeForHeaderInSection:

    collectionView:layout:referenceSizeForFooterInSection:


    页眉页脚的属性如下图

    UICollectionView 使用 介绍_第23张图片


    当垂直的时候,需要设置Height,如下图

    UICollectionView 使用 介绍_第24张图片


    当水平的时候,需要设置Width,如下图

    UICollectionView 使用 介绍_第25张图片


    Section Inset

    我们先通过两个图来看看Sections Insets是怎么回事

    UICollectionView 使用 介绍_第26张图片


    UICollectionView 使用 介绍_第27张图片


    从上面的两个图中,我们大概知道了,Section Inset就是某个section中cell的边界范围。


    SectionInset的配置方式同样有两种

    1、  通过全局配置,如下属性

    @propertyUIEdgeInsets sectionInset;


    2、  也通过delegate对每一个section进行配置,如下函数

    - (UIEdgeInsets)collectionView:layout:insetForSectionAtIndex:


    DEMO


    你可能感兴趣的:(UICollectionView 使用 介绍)