微信公众号笔记---本地调试微信接口
前言:最近因为某些原因,要进行微信公众号开发,因此开始学习微信公众号开发的相关知识。本篇博文主要是介绍一下本人学习过程中如何进行“本地调试微信端口”?
一、准备资源:
- 自己的微信公众号:可以在该网址注册申请 微信公众平台:https://mp.weixin.qq.com/
- ngrok.exe 和 ngrok.cfg:该资源可以在该网址下载 http://www.tunnel.mobi/
- Eclipse
二、本地调试微信端口:
- 按下 win + R 组合键,输入 cmd(或者 powershell),进去 shell 窗口
- 将路径切换至自己 ngrok.exe 的存放路径:
- 输入命令 ngrok -config ngrok.cfg -subdomain 任取名 Tomcat端口号,然后执行:如 ngrok -config ngrok.cfg -subdomain johnnie 80
注:若是在 powershell 中输入命令则应该如下:
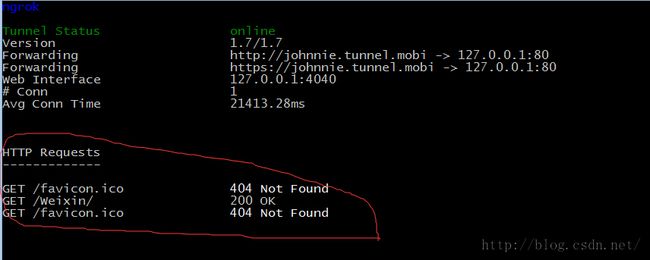
执行效果:
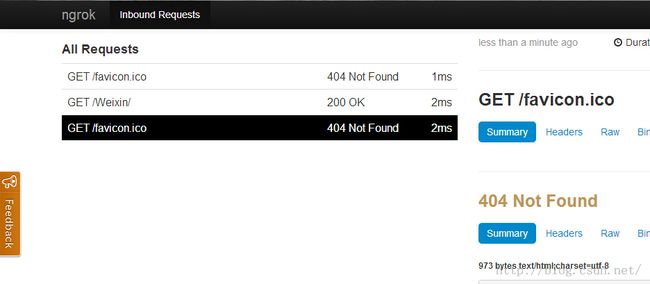
- 在浏览器上输入 http://localhost:4040/http/in 可以看到如下显示:
三、测试:
目前,基本的配置以及准备完毕。我们随意编写一个程序测试下,看是否能够通过外网来代替localhost来访问Web项目。
1. 新建一个 JavaWeb 项目:Weixin
2. 在 WebContent 下编辑一个 index.html 文件,代码随意
<span style="font-size:18px;"><!DOCTYPE html>
<html>
	<head>
		<meta charset="UTF-8">
		<title>Insert title here</title>
	</head>
	<body>
		This is index.html
	</body>
</html></span>
3. 部署到 Tomcat 服务器上,运行该项目,在地址栏上输入 http://localhost/Weixin/ ,显示如下:
4. 用我们刚刚的外网地址 http://johnnie.tunnel.mobi 替换掉 http://localhost,显示如下:
而且可以看到 http://localhost:4040/http/in 下的显示改变了:
还有 cmd 下的显示也改变了:
出现上面的情况就说明我们的基本环境已经 ok 了,Congratulation!!!
5. 编写 Servlet:
WeixinServlet.java:
package com.johnnie.weixin.servlet;

import java.io.IOException;
import java.io.PrintWriter;

import javax.servlet.ServletException;
import javax.servlet.annotation.WebServlet;
import javax.servlet.http.HttpServlet;
import javax.servlet.http.HttpServletRequest;
import javax.servlet.http.HttpServletResponse;

import com.johnnie.weixin.utils.CheckUtils;

@WebServlet("/WeixinServlet")
public class WeixinServlet extends HttpServlet {
	private static final long serialVersionUID = 1L;

    public WeixinServlet() {
        super();
    }

	protected void doGet(HttpServletRequest request, HttpServletResponse response) throws ServletException, IOException {
		this.doPost(request, response);
	}

	protected void doPost(HttpServletRequest request, HttpServletResponse response) throws ServletException, IOException {
		String signature = request.getParameter("signature");	// 微信加密签名
		String timestamp = request.getParameter("timestamp");	// 时间戳
		String nonce = request.getParameter("nonce");			// 随机数
		String echostr = request.getParameter("echostr");		// 随机字符串

		PrintWriter out = response.getWriter();
		if(CheckUtils.checkSignature(signature, timestamp, nonce)){
//			System.out.println("验证成功...");
			out.print(echostr);
		}
	}

}
CheckUtils.java:
package com.johnnie.weixin.utils;

import java.security.MessageDigest;
import java.util.Arrays;

/**
 * 校验工具类
 * @author johnnie
 *
 */
public class CheckUtils {

	private CheckUtils(){}

	private static final String TOKEN = "TOKEN";
	public static boolean checkSignature(String signature, String timestamp, String nonce){
		String[] arr = new String[]{TOKEN, timestamp, nonce};
		// 1. 排序
		Arrays.sort(arr);

		// 2. 生成字符串
		StringBuffer buff = new StringBuffer();
		for(int i = 0; i < arr.length; i ++){
			buff.append(arr[i]);
		}
		String content = buff.toString();

		// 3. sha1 加密
		String temp = getSha1(content);
//		System.err.println("temp--->" + temp);
//		System.out.println("signature--->" + signature);

		return temp.equals(signature);			// 将通过 sha1 加密后生成的字符串与微信传递过来的签名相比较
	}

	/**
	 * sha1 加密
	 * @param str
	 * @return
	 */
	public static String getSha1(String str){

	    if (str == null || str.length() == 0){
	        return null;
	    }

	    char[] hexDigits = { '0', '1', '2', '3', '4', '5', '6', '7', '8', '9',
	            'a', 'b', 'c', 'd', 'e', 'f'};
	    try {
	        MessageDigest mdTemp = MessageDigest.getInstance("SHA1");
	        mdTemp.update(str.getBytes("UTF-8"));

	        byte[] md = mdTemp.digest();
	        int j = md.length;
	        char[] buf = new char[j * 2];
	        int k = 0;
	        for (int i = 0; i < j; i++) {
	            byte byte0 = md[i];
	            buf[k++] = hexDigits[byte0 >>> 4 & 0xf];
	            buf[k++] = hexDigits[byte0 & 0xf];
	        }

	        return new String(buf);

	    } catch (Exception e) {
	        e.printStackTrace();
	        return null;
	    }
	}

}
6. 进入自己的微信公众平台:微信公众平台:https://mp.weixin.qq.com/,进入开发者中--->服务器配置--->修改配置,将相关信息输入,如下:
点击提交,若提交成功则显示如下:
这也就说明我们的开发环境和微信端已经连接成功,本地调试环境搭配完毕,Congratulation!!!
四、配置过程中的错误已经解决方法:
1. Server failed to allocate tunnel: The tunnel http://example.tunnel.mobi is already registered.
问题解决:将 example 名字换成自己任取的名字即可,如上面就是改为 johnnie
2. Unable to initiate connection to 127.0.0.1:8080. A web server must be running on port 127.0.0.1:8080 to complete the tunnel.
错误原因:端口号不正确,端口号必须是自己电脑上 Tomcat 服务器所配置的链接端口(因为我将Tomcat的端口改为80了,所以此处输入的8080就报错)
问题解决:将命令改为 ngrok -config ngrok.cfg -subdomain johnnie 80 即可


