iphone开发之通过代理模式实现自定义控件——代码示例图片库的处理
通过代理实现自定义控件的步骤如下:
{注意:代理设计模式中分为代理类:即仅仅在方法内实现调用别的类。真实实现类:执行具体的操作}
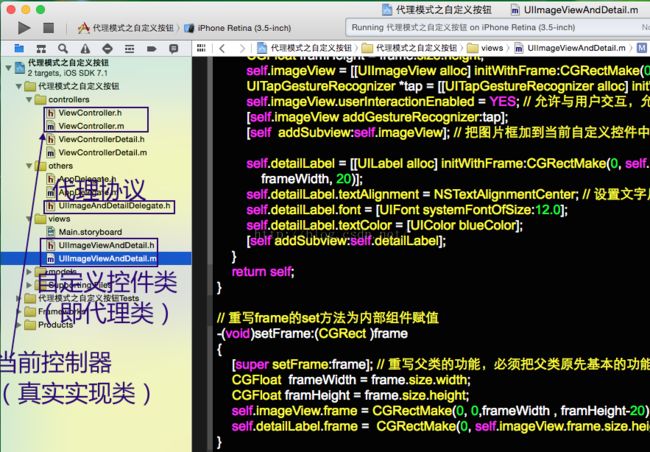
在自定义控件中,自定义的控件类充当代理类,一般由控件所在的视图控制器即viewController来充当真实实现类。
(1)新建代理协议。即代理对象必须遵守的协议,此协议中可以定义一个或多个方法。此协议中方法的具体内容由遵守协议的真实实现类对象进行实现,在代理类的成员方法内进行调用。
需要注意的是在协议中的方法声明中:可以将此代理类对象作为协议方法的参数,这样就可以把代理类的各种属性值传给了真实实现类的对象。例如在真实实现类的协议方法中可以根据代理类的Tag值进行区分是哪个组件,可以将代理类(自定义控件类)对象的各种属性传给即将要跳转的控制器。 切记: 任何对象、任何类型都可以作为代理协议中方法的参数,可以根据传值要求进行判定。
(2)新建自定义控件类。自定义控件类一般封装了多个组件,必须继承自UIView基本组件类。可以在外部对整体的自定义控件添加点击手势监听事件,也可以在自定义控件内部对内部封装的子控件例如UIImageView、等添加手势监听方法或者可能对内部封装的UIButton利用addTarget添加相应的监听方法,内部子控件的监听方法一般为代理类的成员方法,并在这些成员方法内由自身的代理调用协议中的相应方法。
(3)实现自定义控件的几个要点。
1> 自定义控件类必须继承自UIView类
2> 自定义控件类中必须设置自己的代理。即
@property(nonatomic,weak)id<UIImageAndDetailDelegate> delegate;
3> 一定要在重写父类的initWithFrame方法中设置子控件,并把传进来的参数frame的大小完全分配给子控件。
4>一定要重写父类的setFrame方法,并把参数frame的大小完全分配给子控件。
5> 一般在自定义控件类中封装子控件的监听方法,在监听方法内由自己的代理来调用协议中的方法。但是在自定义控件类的成员方法中由代理调用协议中的方法之前一定要判断一下自己的代理是否能响应协议中的相应方法。具体如下:
if ([self.delegaterespondsToSelector:@selector(tapImageViewClick:)]) {
[self.delegate tapImageViewClick:self];
}
6>在协议中的方法声明中可以根据需要添加各种对象参数,例如数组,字典等任意所需要传给真实实现类的对象。但是作为自定义组件一定要另外(必须)再附加一个此自定义控件类(代理类)的对象作参数,这样代理类就可以根据传进来的代理类对象的各种属性进行判断并分别执行各种不同的操作,例如根据自定义组件的tag值进行判断是哪个自定义组件对象,,,然后分别执行不同操作。
(4)在使用自定义控件时,如果需要的话就直接将当前控制器类对象遵守代理协议,由当前控制器充当真实实现类。在当前控制器中实现协议中的所需要的方法即可。
(5)切记:在编辑代理协议时需要代理类对象作为协议方法中的参数,用前向声明@Class声明代理类即可。切不可相互导入——即在代理类中导入协议的头文件且在协议中导入代理类的头文件,相互添加头文件会造成死循环类似于死锁。就会出错。
代码验证,实例如下:
具体布局如下:
新建工程如下:
新建代理协议,编辑UIImageAndDetailDelegate.h如下:
<span style="font-size:18px;">//
//  ImageAndDetailDelegate.h
//  代理模式之自定义按钮
//
//  Created by apple on 15/9/5.
//  Copyright (c) 2015年 LiuXun. All rights reserved.
//

#import <Foundation/Foundation.h>
@class UIImageViewAndDetail;

@protocol UIImageAndDetailDelegate <NSObject>

-(void) tapImageViewClick:(UIImageViewAndDetail *) imageViewClick;
@end
</span>
新建代理类:
编辑代理类即自定义控件类的头文件UIImageViewAndDetail.h如下:
<span style="font-size:18px;">//
//  UIImageViewAndDetail.h
//  代理模式之自定义按钮
//
//  Created by apple on 15/9/5.
//  Copyright (c) 2015年 LiuXun. All rights reserved.
//

#import <UIKit/UIKit.h>
#import "UIImageAndDetailDelegate.h"

@interface UIImageViewAndDetail : UIView

 @property    int  current; // 当前是第几张
@property (nonatomic, strong) UIImageView *imageView;
@property (nonatomic, strong) UILabel *detailLabel;
@property (nonatomic, assign)  CGRect  frame;
@property(nonatomic, weak) id<UIImageAndDetailDelegate> delegate;

@end
</span>
编辑自定义控件类的实现文件UIImageViewAndDetail.m如下:
<span style="font-size:18px;">//
//  UIImageViewAndDetail.m
//  代理模式之自定义按钮
//
//  Created by apple on 15/9/5.
//  Copyright (c) 2015年 LiuXun. All rights reserved.
//

#import "UIImageViewAndDetail.h"

@implementation UIImageViewAndDetail
#define WIDTH     [UIScreen mainScreen].bounds.size.width
#define  HEIGHT  [UIScreen mainScreen].bounds.size.height
- (id)initWithFrame:(CGRect)frame
{
    self = [super initWithFrame:frame];
    if (self ) {
       CGFloat  frameWidth = frame.size.width;
        CGFloat framHeight = frame.size.height;
        self.imageView = [[UIImageView alloc] initWithFrame:CGRectMake(0, 0,frameWidth , framHeight-20)];
        UITapGestureRecognizer *tap = [[UITapGestureRecognizer alloc] initWithTarget:self action:@selector(tap:)];
        self.imageView.userInteractionEnabled = YES; // 允许与用户交互,允许相应事件
        [self.imageView addGestureRecognizer:tap];
        [self  addSubview:self.imageView]; // 把图片框加到当前自定义控件中

        self.detailLabel = [[UILabel alloc] initWithFrame:CGRectMake(0, self.imageView.frame.size.height+self.imageView.frame.origin.y, frameWidth, 20)];
        self.detailLabel.textAlignment = NSTextAlignmentCenter; // 设置文字居中
        self.detailLabel.font = [UIFont systemFontOfSize:12.0];
        self.detailLabel.textColor = [UIColor blueColor];
        [self addSubview:self.detailLabel];
    }
    return self;
}

// 重写frame的set方法为内部组件赋值
-(void)setFrame:(CGRect )frame
{
    [super setFrame:frame]; // 重写父类的功能,必须把父类原先基本的功能给调用过来
    CGFloat  frameWidth = frame.size.width;
    CGFloat framHeight = frame.size.height;
    self.imageView.frame = CGRectMake(0, 0,frameWidth , framHeight-20);
    self.detailLabel.frame =  CGRectMake(0, self.imageView.frame.size.height+self.imageView.frame.origin.y, frameWidth, 20);
}

-(void) tap:(UITapGestureRecognizer *)gesture  // 代理类把点击后触发的事情交给实现类处理
{
    if ([self.delegate respondsToSelector:@selector(tapImageViewClick:)]) {
        [self.delegate  tapImageViewClick:self];
    }
}
@end
</span>
编辑当前控制器(充当了真实实现类)的声明文件如下:
<span style="font-size:18px;">//
//  ViewController.h
//  代理模式之自定义按钮
//
//  Created by apple on 15/9/5.
//  Copyright (c) 2015年 LiuXun. All rights reserved.
//

#import <UIKit/UIKit.h>
#import "UIImageAndDetailDelegate.h"
@interface ViewController : UIViewController <UIImageAndDetailDelegate>

@property (nonatomic, strong) NSMutableArray *arrayWithDetails;

@end
</span>
编辑当前控制器(充当了真实实现类)的.m文件如下:
<span style="font-size:18px;">//
//  ViewController.m
//  代理模式之自定义按钮
//
//  Created by apple on 15/9/5.
//  Copyright (c) 2015年 LiuXun. All rights reserved.
//

#import "ViewController.h"
#import "ViewControllerDetail.h"
#import "UIImageViewAndDetail.h"

#define WIDTH     [UIScreen mainScreen].bounds.size.width
#define  HEIGHT  [UIScreen mainScreen].bounds.size.height

@interface ViewController ()

@end

@implementation ViewController

- (void)viewDidLoad
{
    [super viewDidLoad];
    // 创建一个可变数组,用于存放每个自定义控件
    self.arrayWithDetails = [NSMutableArray array];
	for (int i= 1; i<=11; i++) {
        CGFloat width = (WIDTH-60)/5;  // 设置每行5张图片,间距为10
        CGFloat height = HEIGHT/6;      // 设置每列最多6行
        CGFloat x,y ;  //设置坐标
        if (i%5 == 0) {
            x = 50+ width*4;
            y = (i/5 )*10+(i/5-1)*height;
        }
        else
        {
            y = (i/5)*height+(i/5+1)*10;
            x = (i%5-1)*width+10*(i%5);
        }
        UIImageViewAndDetail *imageAndDetail = [[UIImageViewAndDetail alloc] initWithFrame:CGRectMake(x, y, width, height)];
        imageAndDetail.imageView.image = [UIImage imageNamed:[NSString stringWithFormat:@"%d.png",i]];
        imageAndDetail.current = i;
        imageAndDetail.detailLabel.text = [NSString stringWithFormat:@"第%d张",i];
        [self.arrayWithDetails addObject:imageAndDetail];

        imageAndDetail.delegate = self;
        [self.view addSubview:imageAndDetail];
    }
}

- (void)didReceiveMemoryWarning
{
    [super didReceiveMemoryWarning];
    // Dispose of any resources that can be recreated.
}

-(void) tapImageViewClick:(UIImageViewAndDetail *)imageViewClick
{   // 点击自定义的控件,仅仅让它跳转到另一个控制器的页面
    ViewControllerDetail  *detailVC = [[ViewControllerDetail alloc] init];

    detailVC.currentPage = [self.arrayWithDetails indexOfObject:imageViewClick];
    detailVC.arrayWithDetails = self.arrayWithDetails;
    [self presentViewController:detailVC animated:YES completion:^{

    }];

}
@end
</span>
编辑点击后即将跳转的控制器的.h文件如下:
<span style="font-size:18px;">//
//  ViewControllerDetail.h
//  代理模式之自定义按钮
//
//  Created by apple on 15/9/5.
//  Copyright (c) 2015年 LiuXun. All rights reserved.
//

#import <UIKit/UIKit.h>
#import "UIImageAndDetailDelegate.h"
#import "UIImageViewAndDetail.h"
@interface ViewControllerDetail : UIViewController<UIScrollViewDelegate,UIGestureRecognizerDelegate>
{
    BOOL mainScreenFlag;   // 图片是否全屏的标志
}

@property (nonatomic)  int  currentPage;  // 表示当前是第几页
@property  (nonatomic, strong) NSMutableArray *arrayWithDetails;
@property (nonatomic, strong) UIScrollView *scrollView;  //用于视图移动
@property (nonatomic, strong) UIButton *btnLeft;      // 用于向左旋转
@property (nonatomic, strong) UIButton *btnRight;   // 用于向右旋转
@end
</span>
编辑点击后即将跳转的控制器的.m文件如下:
<span style="font-size:18px;">//
//  ViewControllerDetail.m
//  代理模式之自定义按钮
//
//  Created by apple on 15/9/5.
//  Copyright (c) 2015年 LiuXun. All rights reserved.
//

#import "ViewControllerDetail.h"
#define WIDTH     [UIScreen mainScreen].bounds.size.width
#define  HEIGHT  [UIScreen mainScreen].bounds.size.height

@interface ViewControllerDetail ()

@property (nonatomic, assign) CGAffineTransform trans;  //保存上次编辑状态
@property (nonatomic, assign)  int originPage;  // 保存上次编辑的图片在数组中的位置
@end

@implementation ViewControllerDetail

- (id)initWithNibName:(NSString *)nibNameOrNil bundle:(NSBundle *)nibBundleOrNil
{
    self = [super initWithNibName:nibNameOrNil bundle:nibBundleOrNil];
    if (self) {
        // Custom initialization
    }
    return self;
}

- (void)viewDidLoad
{
    [super viewDidLoad];
    NSLog(@"%d",self.arrayWithDetails.count);

    // 创建滚动视图
    self.scrollView = [[UIScrollView alloc] initWithFrame:CGRectMake(0, 0, WIDTH, HEIGHT)];
    for (int i=1; i<=self.arrayWithDetails.count; i++)
    {
        UIImageViewAndDetail *detail = self.arrayWithDetails[i-1];
        detail.frame = CGRectMake((i-1)*WIDTH, HEIGHT/3, WIDTH, HEIGHT/3);
        detail.detailLabel.text = [NSString stringWithFormat:@"%d/%d",i,self.arrayWithDetails.count];
        [self.scrollView addSubview:detail];
    }
    self.scrollView.contentSize = CGSizeMake(self.arrayWithDetails.count*WIDTH,0);
    self.scrollView.pagingEnabled = YES;
    self.scrollView.bounces = NO;
    self.scrollView.showsHorizontalScrollIndicator = NO;
    self.scrollView.contentOffset = CGPointMake(self.currentPage*WIDTH, 0);
    self.scrollView.backgroundColor = [UIColor yellowColor];

    //为UIScrollView添加旋转的手势
    UIRotationGestureRecognizer *rotationRecon = [[UIRotationGestureRecognizer alloc] initWithTarget:self action:@selector(rotationGesture:)];
    [self.scrollView addGestureRecognizer:rotationRecon];

    // 为UIScrollView添加大小缩放的捏合手势
    UIPinchGestureRecognizer *pinRecon = [[UIPinchGestureRecognizer alloc] initWithTarget:self action:@selector(pinchGesture:)];
    pinRecon.delegate = self;
    [self.scrollView addGestureRecognizer:pinRecon];

    // 为UIScrollView组件添加点击手势
    UITapGestureRecognizer *gestureRecon = [[UITapGestureRecognizer alloc] initWithTarget:self action:@selector(scrollPinchGesture)];
    [gestureRecon  setNumberOfTapsRequired:2];     // 点击次数
    [gestureRecon  setNumberOfTouchesRequired:1];  // 手指个数
    [self.scrollView addGestureRecognizer:gestureRecon];
    self.scrollView.delegate = self;
    [self.view addSubview:self.scrollView];

    // 添加操作按钮
    //左旋转按钮
    self.btnLeft = [[UIButton alloc] initWithFrame:CGRectMake(40, HEIGHT*0.7, (WIDTH-40*5)/4, (WIDTH-40*5)/4)];
    [self.btnLeft  setBackgroundImage:[UIImage imageNamed:@"left_rotate_normal.png"] forState:UIControlStateNormal];
    [self.btnLeft setBackgroundImage:[UIImage imageNamed:@"left_rotate_highlighted.png"] forState:UIControlStateHighlighted];
    [self.btnLeft setTag:1];
    [self.btnLeft  addTarget:self action:@selector(btnAction:) forControlEvents:UIControlEventTouchUpInside];
    [self.view addSubview:self.btnLeft];

    // 添加右旋转按钮
    self.btnRight = [[UIButton alloc] initWithFrame:CGRectMake(80+(WIDTH-40*5)/4, HEIGHT*0.7, (WIDTH-40*5)/4, (WIDTH-40*5)/4)];
    [self.btnRight  setBackgroundImage:[UIImage imageNamed:@"right_rotate_normal.png"] forState:UIControlStateNormal];
    [self.btnRight setBackgroundImage:[UIImage imageNamed:@"right_rotate_highlighted.png"] forState:UIControlStateHighlighted];
    [self.btnRight setTag:2];
    [self.btnRight  addTarget:self action:@selector(btnAction:) forControlEvents:UIControlEventTouchUpInside];
    [self.view addSubview:self.btnRight];

    // 开始屏幕不全屏
    mainScreenFlag = NO;

}

-(void) scrollPinchGesture    // 点击点击手势监听事件,双击全屏或退出全屏
{
    UIImageViewAndDetail *detail = self.arrayWithDetails[self.currentPage];
    if (mainScreenFlag) {
        NSLog(@"退出全屏");
        detail.frame = CGRectMake( WIDTH*self.currentPage,HEIGHT/3, WIDTH, HEIGHT/3);
        for(UIImageViewAndDetail *  image  in  self.arrayWithDetails)
        {
            int index = [self.arrayWithDetails  indexOfObject:image];
            image.frame = CGRectMake(WIDTH*index, HEIGHT/3, WIDTH, HEIGHT/3);
        }
        mainScreenFlag = NO;
    }
    else
    {
        NSLog(@"开始全屏");
        detail.frame = CGRectMake( WIDTH*self.currentPage,0, WIDTH, HEIGHT);
        for(UIImageViewAndDetail *  image  in  self.arrayWithDetails)
        {
            int index = [self.arrayWithDetails  indexOfObject:image];
            image.frame = CGRectMake(WIDTH*index, 0, WIDTH, HEIGHT);
        }
        mainScreenFlag = YES;
    }

}

-(void)scrollViewDidScroll:(UIScrollView *)scrollView     //将当前页的下标保存到全局属性内
{
    self.currentPage =  (scrollView.contentOffset.x+WIDTH*0.5)/WIDTH;
    NSLog(@"%d",self.currentPage);
}

-(void)scrollViewDidEndDragging:(UIScrollView *)scrollView willDecelerate:(BOOL)decelerate  // 拖动后还原先前的图片
{    // 如果拖动到别的图片,则将原先的图片位置大小复位
    if (self.originPage != self.currentPage) {
        self.trans = CGAffineTransformIdentity;  // 如果切换图片,则将保存的上次编辑状态初始化
        UIImageViewAndDetail *originDetail = self.arrayWithDetails[self.originPage];
        originDetail.transform = CGAffineTransformIdentity;   // 如果切换图片,则将原来的图片归位
    }

}

- (void)didReceiveMemoryWarning
{
    [super didReceiveMemoryWarning];
    // Dispose of any resources that can be recreated.
}

// 添加按钮的监听方法
-(void)btnAction:(UIButton *) button
{
    UIImageViewAndDetail *detail = self.arrayWithDetails[self.currentPage];
    self.trans =  detail.transform;
    switch (button.tag) {
        case 1:
            NSLog(@"向左旋转");
            detail.transform =CGAffineTransformRotate(self.trans, -M_PI_2);
            break;
        case 2:
            detail.transform =CGAffineTransformRotate(self.trans, M_PI/2);
            NSLog(@"向右旋转");
            break;
    }
    self.originPage = self.currentPage;
}

// 添加大小缩放手势
-(void) pinchGesture: (UIPinchGestureRecognizer *) pinch
{     // 此种方法无法控制大小
    UIImageViewAndDetail *detail = self.arrayWithDetails[self.currentPage];
        detail.transform = CGAffineTransformScale(detail.transform, pinch.scale, pinch.scale);
        self.trans = detail.transform;
        self.originPage = self.currentPage;

}


//添加旋转手势
-(void)rotationGesture:(UIRotationGestureRecognizer *) rota
{
    UIImageViewAndDetail *detail = self.arrayWithDetails[self.currentPage];
    detail.transform = CGAffineTransformRotate(detail.transform, rota.rotation);
    self.trans = detail.transform;
    self.originPage = self.currentPage;
}

@end
</span>
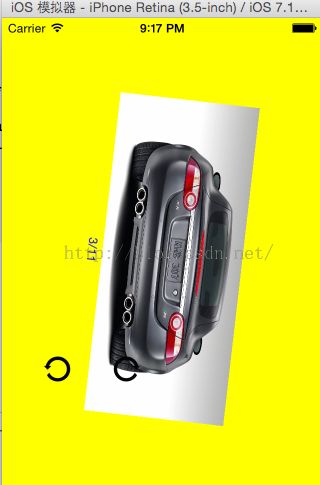
运行结果如下:
点击点击第三张图片跳转后,手势旋转如下:

