Android 我的第一个 NDK 程序 (AndroidStudio)
搞了一天终于搞出来了,写了这个帖子希望能给需要的人
Android中JNI编程的那些事儿
首先说明,Android系统不允许一个纯粹使用C/C++的程序出现,它要求必须是通过Java代码嵌入Native C/C++——即通过JNI的方式来使用本地(Native)代码。因此JNI对Android底层开发人员非常重要。
NDK简介
1.NDK是一系列工具的集合
NDK提供了一系列的工具,帮助开发者快速开发C(或C++)的动态库,并能自动将so和java应用一起打包成apk。这些工具对开发者的帮助是巨大的。
NDK集成了交叉编译器,并提供了相应的mk文件隔离CPU、平台、ABI等差异,开发人员只需要简单修改mk文件(指出“哪些文件需要编译”、“编译特性要求”等),就可以创建出so。
NDK可以自动地将so和Java应用一起打包,极大地减轻了开发人员的打包工作。
2.NDK提供了一份稳定、功能有限的API头文件声明
Google明确声明该API是稳定的,在后续所有版本中都稳定支持当前发布的API。从该版本的NDK中看出,这些API支持的功能非常有限,包含有:C标准库(libc)、标准数学库(libm)、压缩库(libz)、Log库(liblog)。
3.什么场景使用ndk
代码保护,使用大部分开源库都是用c/c++代码编写的,便于移至(c/c++)写的库便于其他嵌入式平台上再次使用。
4.交叉编译
在一个平台上生成另一个平台上可执行的代码。电脑x86 手机arm
5.JNI
他允许java代码和其他语言写的代码进行交互。
6.链接库
A:静态链接库 依赖资源编译到一个文件中 体积大 .a 整体性好
B:动态链接库 运行时去查找它所依赖的资源 体积小 .so 容易找不到资源
java层和native层进行字符串,数组...的交互处理
java官方JNI学习资料:http://docs.oracle.com/javase/6/docs/technotes/guides/jni/index.html
慕课网有对应JNI的课程(Eclipse)
Can Android NDK include a windows dll to a an Android shared library?
No. A Windows DLL is in a different format to Android and Linux. Android is not compatible with Windows out of the box.Also, Windows DLLs tend to be compiled for Intel x86 CPUs, while the majority of Android devices have ARM CPUs. While Windows for ARM exists (Windows Phone, Windows RT to name some), the environment that the DLL is supposed to live in doesn't exist on Android.So, get the source code and recompile it natively? That might work, but Windows DLLs sometimes have an optional DLLMain() entry point which Linux .so files have no direct equivalent. What about the rest of the code? Is it written in a portable manner? Has it stuck to using the ISO language standard throughout? To be truly portable, code has to be designed and written that way.
实践版本:
AS1.3
gradle 2.5
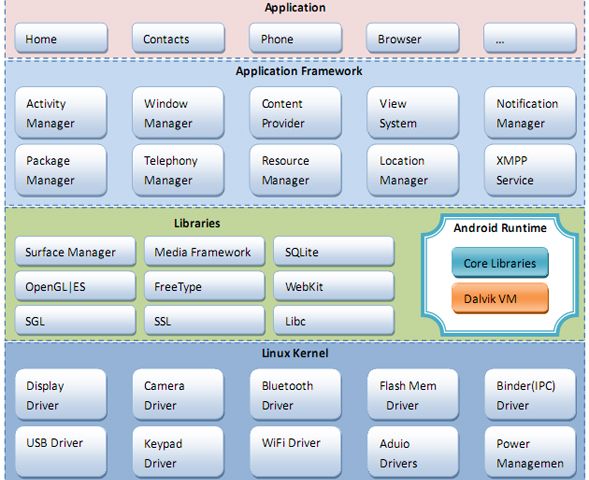
可以看到Android上层的Application和ApplicationFramework都是使用Java编写,
底层包括系统和使用众多的LIiraries都是C/C++编写的。
所以上层Java要调用底层的C/C++函数库必须通过Java的JNI来实现
实现步奏:
1.下载NDK 并配置环境变量。(自己查吧 我用的是android-ndk-r10e)
2.创建新工程 新建一个类 编写带有native 的本地方法
3.使用 javah -jni 生成头文件。
4.拷贝到新建的jni目录 手写.c .cpp文件 (内应用头文件)
5.使用gradle构建so 存于 app/build/intermediates/ndk/debug 下面
package c.example.com.jni;

/**  * Created by Administrator on 2015/10/29.  */ public class jnidemo {
    public jnidemo()
    {
        System.loadLibrary("JniTest");
    }
    static
    {
        System.loadLibrary("JniTest");
    }
    public static native String SayHello();
}
调用这个方法(先写好了在去搞他的实现别着急)
public class MainActivity extends AppCompatActivity {


private TextView id_text;
    @Override
    protected void onCreate(Bundle savedInstanceState) {
        super.onCreate(savedInstanceState);
        setContentView(R.layout.activity_main);
        id_text= (TextView) findViewById(R.id.id_text);
        jnidemo j=new jnidemo();
        id_text.setText(j.SayHello());
    }
配置app的build.gradle
apply plugin: 'com.android.application'

android {
    compileSdkVersion 23
    buildToolsVersion "23.0.1"

    defaultConfig {
        applicationId "c.example.com.jni"
        minSdkVersion 14
        targetSdkVersion 22
        versionCode 1
        versionName "1.0"
        ndk{
            moduleName "JniTest"
        }

    }
moduleName 是将要生成的so文件的名字
最外面的gradle
buildscript {
    repositories {
        jcenter()
    }
    dependencies {
        classpath 'com.android.tools.build:gradle:1.2.3'
//        classpath ' com.android.tools.build:gradle-experimental:0.2.0'

        // NOTE: Do not place your application dependencies here; they belong
        // in the individual module build.gradle files
    }
}
我用的这个版本 貌似可以不用实验版本
重点来啦
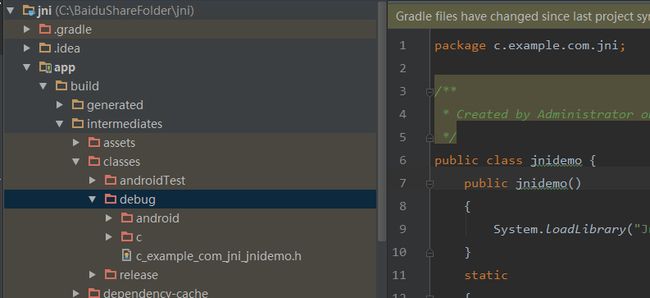
然后Makeproject得到其中中间文件,我们关注的是.class文件。编译OK以后生成的class文件在AS工程的如下目录:
app\build\intermediates\classes\debug
xxxxx\app> cd build\intermediates\classes\debug然后执行如下javah命令生成h文件。
xxxxx\debug> javah -jni c.example.com.jni.jnidemo app\build\intermediates\classes\debug下看见生成的 .h头文件为:
在工程的main目录下新建一个名字为jni的目录,然后将刚才的 .h文件剪切过来。在jni目录下新建一个c文件,随意取名,我的叫jnitest.c
头文件内容:
/* DO NOT EDIT THIS FILE - it is machine generated */
#include <jni.h>
/* Header for class c_example_com_jni_jnidemo */

#ifndef _Included_c_example_com_jni_jnidemo
#define _Included_c_example_com_jni_jnidemo
#ifdef __cplusplus
extern "C" {
#endif
/*
 * Class:     c_example_com_jni_jnidemo
 * Method:    SayHello
 * Signature: ()Ljava/lang/String;
 */
JNIEXPORT jstring JNICALL Java_c_example_com_jni_jnidemo_SayHello
  (JNIEnv *, jclass);

#ifdef __cplusplus
}
#endif
#endif
.c文件内容:
#include "c_example_com_jni_jnidemo.h"
#include <string.h>

/*
 * Class:     io_github_yanbober_ndkapplication_NdkJniUtils
 * Method:    getCLanguageString
 * Signature: ()Ljava/lang/String;
 */
JNIEXPORT jstring JNICALL Java_c_example_com_jni_jnidemo_SayHello
  (JNIEnv *env, jclass obj){
     return (*env)->NewStringUTF(env,"This just a test for Android Studio NDK JNI developer!");
  }
.cpp内容
#include "c_example_com_jni_jnidemo.h"
#include <string.h>

/*
 * Class:     io_github_yanbober_ndkapplication_NdkJniUtils
 * Method:    getCLanguageString
 * Signature: ()Ljava/lang/String;
 */

JNIEXPORT jstring JNICALL Java_c_example_com_jni_jnidemo_SayHello
  (JNIEnv *env, jclass obj){
//     return (*env)->NewStringUTF(env,"This just a test for Android Studio NDK JNI developer!");
return env->NewStringUTF("HelloWorld from JNI !");
  }
然后打开右边的gradler build 一下下 你会发现你的第一个NDK程序 跑起来了~~~
项目地址:http://download.csdn.net/detail/lvwenbo0107/9226683
注意事项:
1,如果采用静态注册的方式请注意C文件中严格按照命名规则 Java_packageName_className_method()的方式命名
2,在Android项目中建立同上述命名规则中packageName中相同的包名,在此包名下建立同上述命名规则中className相同的类名
3,在className声明native方法
4,程序中加载so库 System.loadLibrary("data/data/xxx.xxx.xxx/lib/xx.so")或者 System.loadLibrary("xx"),例如:System.loadLibrary("data/data/com.dtBank.app.service/lib/libjnixcld.so");
推荐用:System.loadLibrary("xx")

