Android自定义控件之乱涂
随着Android的不断壮大,你想要的很多控件在github上基本都能找到,对于爱折腾的我来说,闲暇之余更喜欢自己倒腾,之前博客有提到想研究图片这一块,今天就来折腾一下编辑图片.
先来实现在一张图片上坐标注,也就是说我可以在一张图片上乱画
在一张图片上乱花,首先要有一张图片,然后要有只画笔实现乱花
先把图片放上:
public class DrawPicture extends View{
private Paint mPaint;
private Bitmap mBitmap;
public DrawPicture(Context context) {
this(context, null);
}
public DrawPicture(Context context, AttributeSet attrs) {
this(context, attrs, 0);
}
public DrawPicture(Context context, AttributeSet attrs, int defStyleAttr) {
super(context, attrs, defStyleAttr);
mBitmap = BitmapFactory.decodeResource(getResources(), R.drawable.credit);
}
@Override
protected void onMeasure(int widthMeasureSpec, int heightMeasureSpec) {
super.onMeasure(widthMeasureSpec, heightMeasureSpec);
int[] size = MeasureUtil.compareSize(mBitmap.getWidth(),mBitmap.getHeight(),getMeasuredWidth(),getMeasuredHeight());
mBitmap = Bitmap.createScaledBitmap(mBitmap,size[0],size[1],true);
}
@Override
protected void onDraw(Canvas canvas) {
canvas.drawBitmap(mBitmap,0,0,null);
}
下面就是乱画了,这里主要涉及到贝赛尔曲线中的quadTo(),画之前需要一只笔
mPaint = new Paint();
mPaint.setAntiAlias(true);
mPaint.setDither(true);
mPaint.setColor(Color.RED);
mPaint.setStyle(Paint.Style.STROKE);
mPaint.setStrokeJoin(Paint.Join.ROUND); // 圆角
mPaint.setStrokeCap(Paint.Cap.ROUND);
mPaint.setStrokeWidth(20);
然后根据touch到的点连成线
@Override
public boolean onTouchEvent(MotionEvent event) {
int x = (int) event.getX();
int y = (int) event.getY();
switch (event.getAction()) {
case MotionEvent.ACTION_DOWN:
lastX = x;
lastY = y;
mPath.reset();
mPath.moveTo(x, y);
break;
case MotionEvent.ACTION_MOVE:
int dx = Math.abs(x - lastX);
int dy = Math.abs(y - lastY);
if (dx > 5 && dy > 5) {
mPath.quadTo(lastX, lastY, (x + lastX) / 2, (y + lastY) / 2);
}
lastX = x;
lastY = y;
}
invalidate();
return true;
}
最后一步就是draw到画布上了
@Override
protected void onDraw(Canvas canvas) {
mCanvas.drawPath(mPath, mPaint);
canvas.drawBitmap(mBitmap, 0, 0, null);
}
同时,我好饱露出了一个方法用来保存编辑过的图片
public boolean savePic(String path, String pic) {
File file = new File(path);
if (!file.exists()) {
file.mkdir();
}
File savePath = new File(path,pic);
if (savePath.exists()){
savePath.delete();
}
try {
FileOutputStream os = new FileOutputStream(savePath);
mBitmap.compress(Bitmap.CompressFormat.PNG, 90, os);
os.flush();
os.close();
return true;
} catch (FileNotFoundException e) {
return false;
} catch (IOException e) {
return false;
}
}
当然,这里的涂抹包括很多方面了,抛砖引玉,下面再来说一下擦掉图片上不想要的,也就是所谓的橡皮擦啦!
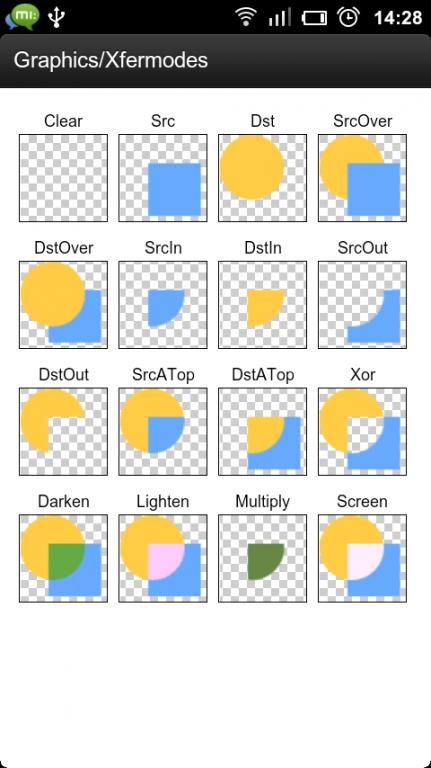
先绘制Dst,然后绘制Src,鉴于上面我们已经把图片画上去了,要想实现橡皮擦功能,就要用DstOut了
ok,擦完了,就是这么简单了,熟练使用Xfermodes能干很多事呢!
下篇继续图片旋转,裁剪and so on
版权声明:本文为博主原创文章,未经博主允许不得转载。