linux驱动篇之 driver_register 过程分析(二)bus_add_driver
linux驱动篇之 driver_register 过程分析(二)
个人笔记,欢迎转载,请注明出处,共同分享 共同进步
http://blog.csdn.net/richard_liujh/article/details/48245715
kernel版本3.10.14
1.概述
本篇主要围绕driver_register中的第二步bus_add_driver展开分析。在上一篇博文中主要分析了driver_find的过程,在driver_register中调用driver_find主要是为了检验驱动是否已经注册到kernel中,如果没有注册,那么接下来的几个步骤才是driver_register的核心作用。
driver_register简化过程如下:
int driver_register(struct device_driver *drv)
	|
	|--> driver_find //查找驱动是否已经装载 (上篇博文已经分析)
	|--> bus_add_driver//根据总线类型添加驱动
	|--> driver_add_groups//将驱动添加到对应组中
	|--> kobject_uevent//注册uevent事件
2.bus_add_driver分析
2.1 bus_add_driver源码
bus_add_driver源码在./drivers/base/bus.c文件中
/**
 * bus_add_driver - Add a driver to the bus.
 * @drv: driver.
 */
int bus_add_driver(struct device_driver *drv)
{
	struct bus_type *bus;
	struct driver_private *priv;
	int error = 0;

	bus = bus_get(drv->bus);
	if (!bus)
		return -EINVAL;

	pr_debug("bus: '%s': add driver %s\n", bus->name, drv->name);

	priv = kzalloc(sizeof(*priv), GFP_KERNEL);
	if (!priv) {
		error = -ENOMEM;
		goto out_put_bus;
	}
	klist_init(&priv->klist_devices, NULL, NULL);
	priv->driver = drv;
	drv->p = priv;
	priv->kobj.kset = bus->p->drivers_kset;
	error = kobject_init_and_add(&priv->kobj, &driver_ktype, NULL,
				     "%s", drv->name);
	if (error)
		goto out_unregister;

	klist_add_tail(&priv->knode_bus, &bus->p->klist_drivers);
	if (drv->bus->p->drivers_autoprobe) {
		error = driver_attach(drv);
		if (error)
			goto out_unregister;
	}
	module_add_driver(drv->owner, drv);

	error = driver_create_file(drv, &driver_attr_uevent);
	if (error) {
		printk(KERN_ERR "%s: uevent attr (%s) failed\n",
			__func__, drv->name);
	}
	error = driver_add_attrs(bus, drv);
	if (error) {
		/* How the hell do we get out of this pickle? Give up */
		printk(KERN_ERR "%s: driver_add_attrs(%s) failed\n",
			__func__, drv->name);
	}

	if (!drv->suppress_bind_attrs) {
		error = add_bind_files(drv);
		if (error) {
			/* Ditto */
			printk(KERN_ERR "%s: add_bind_files(%s) failed\n",
				__func__, drv->name);
		}
	}

	return 0;

out_unregister:
	kobject_put(&priv->kobj);
	kfree(drv->p);
	drv->p = NULL;
out_put_bus:
	bus_put(bus);
	return error;
}
代码稍微有点长,但是为了保留kernel源码的美感,所以上面代码没有做任何改动。
2.1 bus_add_driver简化过程
为了使分析bus_add_driver不显得太杂乱,这里我将bus_add_driver分为以下几个部分:
int bus_add_driver(struct device_driver *drv)
	|
	|---> bus_get/*获取总线类型(bus_type)*/
	|
	|---> klist_init/*          --\				                             */
	|---> kobject_init_and_add/*   >  kset, kobject节点初始化,插入链表(尾插)  */
	|---> klist_add_tail/*	   --/				               	       	     */
	|
	|---> module_add_driver
	|---> driver_create_file
	|---> driver_add_attrs
在bus_add_driver函数里,只传过来一个参数就是device_driver *drv。为什么bus_add_driver只需要device_driver的指针这一个参数?device_driver是不是很熟悉?我们在写驱动时,device_driver是一个非常重要的结构体。在文件./include/linux/device.h中有device_driver的定义。
struct device_driver {
	const char		*name;
	struct bus_type		*bus;

	struct module		*owner;
	const char		*mod_name;	/* used for built-in modules */

	bool suppress_bind_attrs;	/* disables bind/unbind via sysfs */

	const struct of_device_id	*of_match_table;
	const struct acpi_device_id	*acpi_match_table;

	int (*probe) (struct device *dev);
	int (*remove) (struct device *dev);
	void (*shutdown) (struct device *dev);
	int (*suspend) (struct device *dev, pm_message_t state);
	int (*resume) (struct device *dev);
	const struct attribute_group **groups;

	const struct dev_pm_ops *pm;

	struct driver_private *p;
};
从上面的device_driver结构内容可以看出,里面包含了driver的名字(name),总线的类型(bus),所属的模块(owner)。和一些非常重要的函数指针,例如嗅探函数指针probe,驱动删除函数指针remove,关机时调用的函数指针shutdown,睡眠时调用的函数指针suspend,睡眠唤醒时恢复驱动的函数指针resume等等....
对于一个初级的驱动,是不是最先了解的是name、bus、module、probe这个成员变量?通过后面的分析,我们可以深入理解这些变量的作用。
2.2 简化过程分析
在kernel中的函数名一般都很通俗易懂,例如我们要分析的bus_add_driver,就有简单bus、add和driver等单词组合。所以凭借男人的第六感,能够大概猜出是在某个bus上添加驱动了。所以在刚才简化bus_add_driver的第一个过程就是bus_get。bus_get的名字言简意赅,获得bus。因为我们要在某个bus上添加driver。
2.2.1 bus_get源码:
bus = bus_get(drv->bus);
/*--------------------------------------------------*/
static struct bus_type *bus_get(struct bus_type *bus)
{
	if (bus) {//判断bus是否为空
		kset_get(&bus->p->subsys);
		return bus;//不为空则return bus
	}
	return NULL;//bus 为空,那么return NULL;
}
bus_get相对比较简单,上一篇博文是以platform_driver_register开始讲解的,所以bus_type为platform_bus_type。
2.2.2 klist_init, kobject_init_and_add, klist_add_tail分析
klist_init,kobject_init_and_add 和klist_add_tail我把他们归纳在一起,主要完成了Kobject的初始化和将初始化的kobjec尾插到kset链表中。还记得在上篇博文讲解中driver_find的过程,就涉及到一个链表的遍历过程吧,如果链表里面有对应驱动的name说明驱动已经注册了。如果第一次注册,驱动的name当然是在链表中不存在的(除非冲突了),所以这里的操作就是将驱动相关的基类Kobject添加到对应kset的循环链表中。
klist_init
在bus_add_driver调用时如下:
klist_init(&priv->klist_devices, NULL, NULL);所以我们观察一下参数,后面两个是NULL,前面是&priv->klist_devices。注意有一个“&”符号,也就是将priv的成员 klist_devices地址传送过去。
补:像用C编写的代码,尤其是linux 源码,内核中会经常传送指针。一般传送一级指针要留意,传送二级指针要多留意,传送结构体指针要更加留意。
这个函数很明显是将klist_devices的地址传送过去进行初始化了。那么如何初始化?初始化了哪些内容呢?为了解决这个问题,我们得先知道要被初始化的变量是什么类型的!
首先来了解bus_add_driver中的struct driver_private *priv;这个priv是指向driver_private结构体的指针。其成员如下
struct driver_private {
	struct kobject kobj;
	struct klist klist_devices;
	struct klist_node knode_bus;
	struct module_kobject *mkobj;
	struct device_driver *driver;
};
private是私有的意思,很多面向对象的语言都有private关键字,表示资源是私有的,其他人不能随意使用。这里driver_private的意思是driver所拥有的资源,相当于将driver相关
的资源封装了一个结构体中,使得代码的层次感更强,面向对象的美感更好。对于priv ,bus_add_driver有如下几个操作:
struct driver_private *priv;//定义priv指针 priv = kzalloc(sizeof(*priv), GFP_KERNEL);//初始化priv指针,指向申请的driver_private结构体地址好了,这个清楚了后我们就该继续看klist_init初始化的 &priv->klist_devices ,klist_devices在driver_private定义如下:
struct klist klist_devices;klist结构体在文件 ./include/linux/klist.h中定义
struct klist {
	spinlock_t		k_lock;
	struct list_head	k_list;
	void			(*get)(struct klist_node *);
	void			(*put)(struct klist_node *);
}
这里就很简单了,既然是要对klist_devices初始化,通过上面的定义可以看到有4个成员变量:自旋锁k_lock,链表节点k_list和两个函数指针get,put。
klist_ini的t源码在文件./lib/klist.c
void klist_init(struct klist *k, void (*get)(struct klist_node *),
		void (*put)(struct klist_node *))
{
	INIT_LIST_HEAD(&k->k_list);
	spin_lock_init(&k->k_lock);
	k->get = get;
	k->put = put;
}
知道了klist_devices的成员,上面的代码就很简单了,就是对klist_devices的四个成员变量进行初始化。代码比较简单,就不细说了。只简单提一下
INIT_LIST_HEAD
,因为在内核中经常可以看到这个函数。
在文件./include/linux/list.h中有INIT_LIST_HEAD定义
static inline void INIT_LIST_HEAD(struct list_head *list)
{
	list->next = list;
	list->prev = list;
}
很明显,这是一个 内联函数(有inline)。实现的功能也很简单,list是链表,我们在实现循环链表时总会定义两个指针
next和
prev。next指向下一个节点的地址,prev指向上一个节点的地址。所以INIT_LIST_HEAD其实就是使next和prev都指向自己的地址,我们判断链表是否为空的时候不就是看看next和prev指向的地址是否相同吗,相同表示为空。
下面是INIT_LIST_HEAD的一个简单示意图
kobject_init_and_add
kobject_init_and_add源码在文件./lib/kobject.c
/**
 * kobject_init_and_add - initialize a kobject structure and add it to the kobject hierarchy
 * @kobj: pointer to the kobject to initialize
 * @ktype: pointer to the ktype for this kobject.
 * @parent: pointer to the parent of this kobject.
 * @fmt: the name of the kobject.
 *
 * This function combines the call to kobject_init() and
 * kobject_add().  The same type of error handling after a call to
 * kobject_add() and kobject lifetime rules are the same here.
 */
int kobject_init_and_add(struct kobject *kobj, struct kobj_type *ktype,
			 struct kobject *parent, const char *fmt, ...)
{
	va_list args;
	int retval;

	kobject_init(kobj, ktype);

	va_start(args, fmt);
	retval = kobject_add_varg(kobj, parent, fmt, args);
	va_end(args);

	return retval;
}
EXPORT_SYMBOL_GPL(kobject_init_and_add);
过注释可以很清楚的知道
kobject_init_and_add的作用,初始化
kobject结构体并添加到
kobject的层次中。
kobject_init_and_add通过kobject_init初始化kobject,通过kobject_add_varg完成添加操作。
kobject_init_and_add
|------ kobject_initkobject_init源码也在文件./lib/kobject.c 中
/**
 * kobject_init - initialize a kobject structure
 * @kobj: pointer to the kobject to initialize
 * @ktype: pointer to the ktype for this kobject.
 *
 * This function will properly initialize a kobject such that it can then
 * be passed to the kobject_add() call.
 *
 * After this function is called, the kobject MUST be cleaned up by a call
 * to kobject_put(), not by a call to kfree directly to ensure that all of
 * the memory is cleaned up properly.
 */
void kobject_init(struct kobject *kobj, struct kobj_type *ktype)
{
	char *err_str;

	if (!kobj) {//检查kobj指针是否指向有效的kobject
		err_str = "invalid kobject pointer!";
		goto error;
	}
	if (!ktype) {//检查ktype是否指向有效的kobj_type
		err_str = "must have a ktype to be initialized properly!\n";
		goto error;
	}
	if (kobj->state_initialized) {//检查kobj的初始化状态是否已经被初始化
		/* do not error out as sometimes we can recover */
		printk(KERN_ERR "kobject (%p): tried to init an initialized "
		       "object, something is seriously wrong.\n", kobj);
		dump_stack();
	}

	kobject_init_internal(kobj);//如果上面检查都通过,那么开始初始化
	kobj->ktype = ktype;
	return;

error:
	printk(KERN_ERR "kobject (%p): %s\n", kobj, err_str);
	dump_stack();
}
EXPORT_SYMBOL(kobject_init);
这个函数注释也写的很清楚了This function will properly initialize a kobject such that it can then be passed to the kobject_add() call. 功能虽简单,但是内核做事还是比较严谨,从代码中对kobj、ktype和kobj->state_initialized依次进行了检查。检查无误开始调用kobject_init_internal
kobject_init_internal源码如下:[ ./lib/kobject.c ]
static void kobject_init_internal(struct kobject *kobj)
{
	if (!kobj)
		return;
	kref_init(&kobj->kref);
	INIT_LIST_HEAD(&kobj->entry);
	kobj->state_in_sysfs = 0;
	kobj->state_add_uevent_sent = 0;
	kobj->state_remove_uevent_sent = 0;
	kobj->state_initialized = 1;
}
上面是对kobject真正的初始化。因为kobject是linux设备驱动的核心结构体之一,所涉及到的内容比较多也比较复杂,所以这里就不再深究具体初始化的含义。希望在以后的设备驱动相关博文中详解。
kobject_init_and_add
|------ kobject_add_varg上面初始化好kobject后,开始通过kobject_add_varg添加kobject
kobject_init_and_add源码如下,在文件./lib/kobject.c中
static int kobject_add_varg(struct kobject *kobj, struct kobject *parent,
			    const char *fmt, va_list vargs)
{
	int retval;

	retval = kobject_set_name_vargs(kobj, fmt, vargs);
	if (retval) {
		printk(KERN_ERR "kobject: can not set name properly!\n");
		return retval;
	}
	kobj->parent = parent;
	return kobject_add_internal(kobj);
}
在分析这个函数时,有必要看看kobject_init_and_add的函数接口定义:
int kobject_init_and_add(struct kobject *kobj, struct kobj_type *ktype, struct kobject *parent, const char *fmt, ...)最后的参数 const char *fmt, ...是可变参数,那么fmt的值是什么呢?再来看看调用kobject_init_and_add时的传参:
error = kobject_init_and_add(&priv->kobj, &driver_ktype, NULL, "%s", drv->name);所以可变参数 const char *fmt, ...的内容是 "%s", drv->name也就是驱动的名字。在kobject_init_and_add中的kobject_set_name_vargs函数通过处理可变参数,最终将drv->name的内容给kobj->name。
最后的重点就是
return kobject_add_internal(kobj);kobject_add_internal的作用还是非常多的。通过kobject_add_internal将准备好的kobject添加到kset的循环列表中,并且在sys/目录下创建kobject的目录。
kobject_init_and_add
|------ kobject_add_varg|-------kobject_add_internal
kobject_add_internal源码在在文件./lib/kobject.c中
static int kobject_add_internal(struct kobject *kobj)
{
	int error = 0;
	struct kobject *parent;

	if (!kobj)
		return -ENOENT;

	if (!kobj->name || !kobj->name[0]) {
		WARN(1, "kobject: (%p): attempted to be registered with empty "
			 "name!\n", kobj);
		return -EINVAL;
	}

	parent = kobject_get(kobj->parent);

	/* join kset if set, use it as parent if we do not already have one */
	if (kobj->kset) {
		if (!parent)
			parent = kobject_get(&kobj->kset->kobj);
		kobj_kset_join(kobj);
		kobj->parent = parent;
	}

	pr_debug("kobject: '%s' (%p): %s: parent: '%s', set: '%s'\n",
		 kobject_name(kobj), kobj, __func__,
		 parent ? kobject_name(parent) : "<NULL>",
		 kobj->kset ? kobject_name(&kobj->kset->kobj) : "<NULL>");

	error = create_dir(kobj);
	if (error) {
		kobj_kset_leave(kobj);
		kobject_put(parent);
		kobj->parent = NULL;

		/* be noisy on error issues */
		if (error == -EEXIST)
			WARN(1, "%s failed for %s with "
			     "-EEXIST, don't try to register things with "
			     "the same name in the same directory.\n",
			     __func__, kobject_name(kobj));
		else
			WARN(1, "%s failed for %s (error: %d parent: %s)\n",
			     __func__, kobject_name(kobj), error,
			     parent ? kobject_name(parent) : "'none'");
	} else
		kobj->state_in_sysfs = 1;

	return error;
}
上面的的代码说多不多,说少也不简单....
还是为了简化,我把kobject_add_internal的功能简化如下(一些简单的if 判断就不细讲了):
static int kobject_add_internal(struct kobject *kobj)
{
	parent = kobject_get(kobj->parent);//读取kobject的parent指针
<span style="white-space:pre">	</span>……
	/* join kset if set, use it as parent if we do not already have one */
	if (kobj->kset) {//判断kobject的kset是否为空
		if (!parent)
			parent = kobject_get(&kobj->kset->kobj);
		kobj_kset_join(kobj);
		kobj->parent = parent;
	}
<span style="white-space:pre">	</span>……
	error = create_dir(kobj);//穿件kobject的相关目录
<span style="white-space:pre">	</span>……
		kobj->state_in_sysfs = 1;//更改kobject的sys文件系统状态标志

	return error;
}
代码里面if (kobj->kset)对kobject的kset进行的检查,那么我们这里的kset什么值呢?这就要回到bus_add_driver函数,其中有这么一句话priv->kobj.kset = bus->p->drivers_kset;所以此时的kobject->kset不为空。
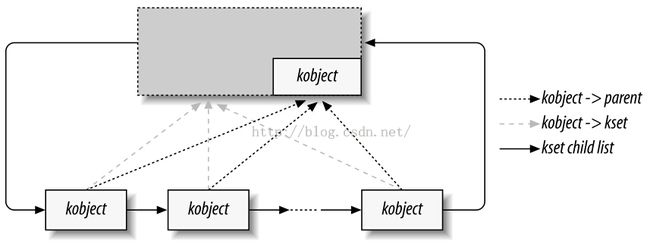
if (!parent)的作用是判断kobject是否有父类,对于kset、kobject、parent和list,在权威书籍LDD3-chapter14(linux设备驱动)中有一个很经典的图,所以我就借花献佛了。
上图~![]()
解释:
- 在链表中每一个kobject都有一个指向kset的指针。
- 在链表中每一个kobject都有指向父类kobject(内嵌在kset中)的指针
- 在链表中每一个kobject 都有链表指针(next、prev)指向相邻的节点
这张图很简洁的解释了kset和kobject的基本关系。感兴趣的请直接阅读葵花宝典《LDD3》。点击下载LDD3
他们之间的关系清楚了后,我们开始分析kobject是如何添加到kset的链表中的。这个功能是由kobj_kset_join完成的
kobj_kset_join源码在./lib/kobject.c中
/* add the kobject to its kset's list */
static void kobj_kset_join(struct kobject *kobj)
{
	if (!kobj->kset)
		return;

	kset_get(kobj->kset);//获取kset
	spin_lock(&kobj->kset->list_lock);<span style="font-family: Arial, Helvetica, sans-serif;">//上锁</span>
	list_add_tail(&kobj->entry, &kobj->kset->list);
	spin_unlock(&kobj->kset->list_lock);解锁
}
其中spin_lock和spin_unlock都是对自旋锁的操作,这里不多讲了。比较重要的就是
list_add_tail。list_add_tail通过名字,我们能猜到这个函数就是在链表中添加节点,其中tail应该就是从尾部添加也就是尾插法了。
kobject_init_and_add
|------ kobject_add_varg|-------kobject_add_internal
|------list_add_tail
list_add_tail源码在头文件./include/linux/list.h 中
/**
 * list_add_tail - add a new entry
 * @new: new entry to be added
 * @head: list head to add it before
 *
 * Insert a new entry before the specified head.
 * This is useful for implementing queues.
 */
static inline void list_add_tail(struct list_head *new, struct list_head *head)
{
	__list_add(new, head->prev, head);
}
而__list_add的源码如下:
static inline void __list_add(struct list_head *new,
			      struct list_head *prev,
			      struct list_head *next)
{
	next->prev = new;
	new->next = next;
	new->prev = prev;
	prev->next = new;
}
很明显,上面的代码就是链表插入节点的操作。只是稍微注意一下传参过程,因为参数的名称并不一致,但是都是指针,细心一点就没有问题的。
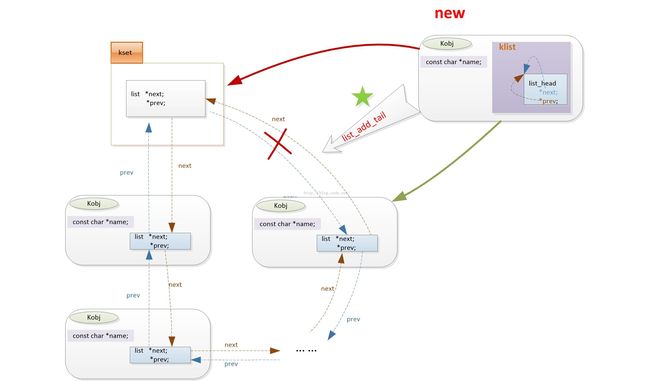
总结上述过程,通下图表示:
上图~
当kobject成功添加到kset的链表中后,开始在sysfs中创建kobject的相关目录,这个过程由error = create_dir(kobj);完成。
一下是sysfs穿件目录的核心代码:在文件 ./fs/sysfs/dir.c中
/**
 *	sysfs_create_dir - create a directory for an object.
 *	@kobj:		object we're creating directory for.
 */
int sysfs_create_dir(struct kobject * kobj)
{
	enum kobj_ns_type type;
	struct sysfs_dirent *parent_sd, *sd;
	const void *ns = NULL;
	int error = 0;

	BUG_ON(!kobj);

	if (kobj->parent)
		parent_sd = kobj->parent->sd;
	else
		parent_sd = &sysfs_root;

	if (!parent_sd)
		return -ENOENT;

	if (sysfs_ns_type(parent_sd))
		ns = kobj->ktype->namespace(kobj);
	type = sysfs_read_ns_type(kobj);

	error = create_dir(kobj, parent_sd, type, ns, kobject_name(kobj), &sd);
	if (!error)
		kobj->sd = sd;
	return error;
}
sysfs穿件目录的代码就不详细说明了,记得在前面分析
kobject_init_and_add时,有这样的一句注释
initialize a kobject structure and add it to the kobject hierarchy
单词hierarchy是 层级,等级的意思。注释的大致意思是将kobject添加到kobject等级中。这里的“等级”体现最明显的就是目录结构。
说到目录,我们会很快联想到子目录或者上一级目录。要在sysfs里面创建kobject相关的目录,也需要遵守目录的等级制度啦。按照kobject的parent(也是kobject类)就是上一级目录的规则去创建,目录名是kobject->name。为了能让读者更加清楚创建的规则,我就以目前手中的平台为例:
文章开头,我们是以platform_driver_register为例子讲解,目前我手上刚好有一个国产君正M200平台的开发板。处理器是mips架构。
假设,我们要注册的驱动是framebuffer。在君正平台代码中,有如下定义:
static struct platform_driver jzfb_driver = {
	.probe = jzfb_probe,
	.remove = jzfb_remove,
	.shutdown = jzfb_shutdown,
	.driver = {
		   .name = "jz-fb",
#ifdef CONFIG_PM
		   .pm = &jzfb_pm_ops,
#endif

		   },
};
可以看到driver->name 是“jz-fb”。通过platform_driver_register(&jzfb_driver);注册platform架构驱动。当代码执行到上述过程,肯定会在sysfs下创建相关的目录,并且以
kobject->name命名。
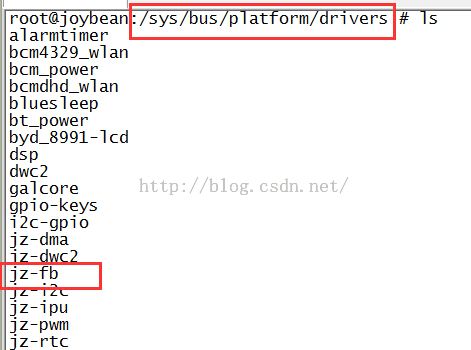
我通过终端,访问sys目录,结果如下:
上图~
所以可以观察到/sys/bus/platform/drivers/jz-fb 的目录结构刚好符合了我们分析代码的顺序。
总结
上面主要分析了driver在注册过程中,初始化driver的kobject和将kobject添加到对应的层级结构中。


