仿微信系列(一)-- 项目框架以及弹出视图
写在前面
之前一直在想出个一套的项目开发案例,找了好久,发现远在天边,近在眼前,我们就来模仿微信吧!希望在过程中,所用到的知识点或技术点能够对各位朋友的项目有所帮助。我使用了cocoapods管理三方库,最初导入了RAC、MJExtension和SDWebImage,关于cocoapods的使用不是今天我们的重点,所以这方面的问题还是请三部曲:1.打开Safari 2.输入www.baidu.com 3.输入cocoapods点击搜索。so,got it!本次项目使用的是storyBoard和xib开发,如果不会,请自重!!!
生产环境
Xcode: Version 7.2.1 (7C1002)
Language:Objective-C
项目地址:
SSH:这里写链接内容
HTTPS:https://github.com/yxiangBeauty/yxWechat.git
新建pch文件
通常我们都很喜欢有个叫pch的文件 – 全局引用文件。我们如何配置它呢?
在我印象中Xcode在6.0以前是会默认生成好pch,而之后就无端消失了,也不知道苹果是什么用意,难道以后不需要这个好东西了?首先,你需要新建一个pch文件,并拷贝名字以备后用。command+n,点击other你就看到PCH了。接着需要配置他的路劲,这里有点需要注意的是我们千万不要设置成绝对路劲,如果你换一台设备或换一个文件路径的话就over了。所以我们会配置为相对路径:工程名/pch名.pch
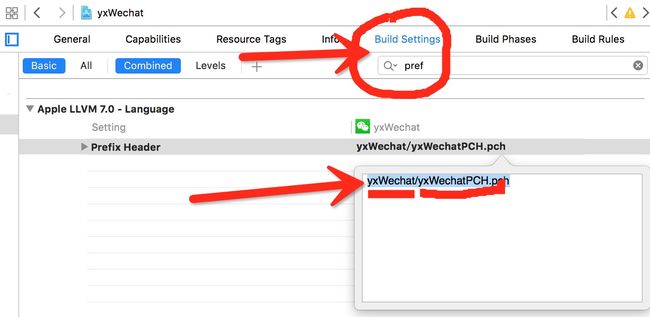
设置完成后就可以导入你的全局文件了。
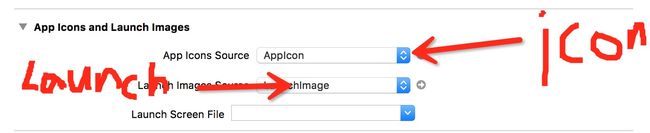
配置icon
相信这里不用我多说,看图:
框架搭建
其实微信的基础框架很简单,就是一个UITabBarController管理了四个模块,每个模块用UINavigationController包装一次。所以在STB(我对storyBoard的简称,后面都设这样的叫法,叫sb不好听)应该是这样的:
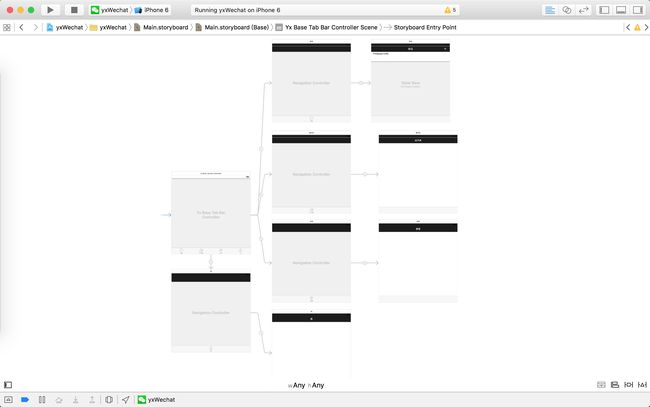
眼神好的朋友可能看到了,我使用了自定义的TabBarController,for what?实际上很简单,因为UITabBarController默认情况下选中后Item的颜色是偏蓝色的,并非图片本来的颜色。我们需要设置Item选中的图片颜色不tintColor渲染。所以在自定义的yxTabBarController的viewDidLoad中有这样的代码:
- (void)viewDidLoad {
    [super viewDidLoad];
    self.tabBar.tintColor = yxColorFromRGBA(9, 187, 7, 1);
    //由于tabBarItem选中后的图片会变成蓝色,需要将其更改为保持与图片一致的。
    for (UIViewController * vc in self.viewControllers) {
        vc.tabBarItem.selectedImage = [vc.tabBarItem.selectedImage imageWithRenderingMode:UIImageRenderingModeAlwaysOriginal];
    }
}
首页
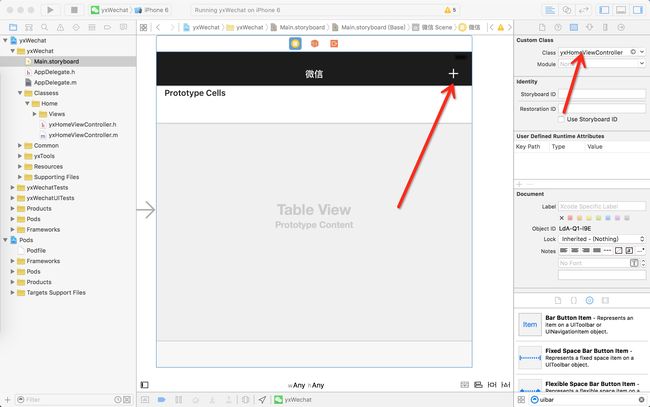
首页是一个聊天记录页面,可以考虑用TableViewController实现,于是我有了yxHomeViewController,继承与UITableViewController。并在STB中关联好。
在Nav的右边有一个“+”,点击后会弹出一个弹出框。先拖一个UIBarButtomItem到Nav的右边吧。这时候你的首页会变成这样
这个页面还有一个UISearchController,反正我在STB中没有找到,所以用的代码写的,在yxHomeViewController.m中:
@property (strong, nonatomic) UISearchController *searchController;看到属性,我就想用懒加载(强迫症重度患者,惹不起):
- (UISearchController *)searchController {
    if (!_searchController) {
        _searchController = [[UISearchController alloc] initWithSearchResultsController:[[UIViewController alloc] init]];
        _searchController.searchBar.barStyle = UIBarStyleDefault;
        _searchController.searchBar.placeholder = @"搜索";
        _searchController.searchBar.barTintColor = [UIColor groupTableViewBackgroundColor];
        _searchController.searchBar.backgroundColor = [UIColor whiteColor];
        UIImageView *view = [[[_searchController.searchBar.subviews objectAtIndex:0] subviews] firstObject];
        view.layer.borderColor = [UIColor groupTableViewBackgroundColor].CGColor;
        view.layer.borderWidth = 1;
        _searchController.searchBar.showsBookmarkButton = YES;
        [_searchController.searchBar setImage:[UIImage imageNamed:@"VoiceSearchStartBtn"] forSearchBarIcon:UISearchBarIconBookmark state:UIControlStateNormal];
        _searchController.searchBar.delegate = self;
    }
    return _searchController;
}
然后添加到tableView上,viewDidLoad中:
self.tableView.tableHeaderView = self.searchController.searchBar;
这时候你会惊奇的发现有这样的效果:

接下来我们关联“+”的点击事件,这时候你可以双屏操作,按住control,拖到@implement中。
- (IBAction)leftBarAction:(id)sender {
    yxPopView * pop = [yxPopView popViewFromXIBFile];
    [self.view addSubview:pop];
    pop.center = self.view.center;
}
这就是关联好的方法,也就是说当你点击了“+”后就会走该方法。shit,yxPopView是什么东东?
弹出视图
这里我取名为yxPopView。新建好类文件后,再创建一个xib,我们使用可视化的开发完成这样的一个弹出视图。

可以看到这里有一个tableView,我们加上相应的约束。另外,你需要将这个view放小一点,size选项选择freeform就可以调整大小了,这里我的大小是135和160 。
在yxPopView.h中加入一个初始化的工厂方法,该方法用于从xib加载视图。
///初始化方法
+ (instancetype)popViewFromXIBFile;
.m实现如下:
+ (instancetype)popViewFromXIBFile {
    return [[UINib nibWithNibName:NSStringFromClass(self) bundle:nil] instantiateWithOwner:nil options:nil].firstObject;
}
别问我为什么。上面的三角形如何来做呢–CAShapeLayer画一个吧。
@property (strong, nonatomic) CAShapeLayer * deltaShape;getter方法:
- (CAShapeLayer *)deltaShape {
    if (!_deltaShape) {
        _deltaShape = [CAShapeLayer layer];
        _deltaShape.bounds = CGRectMake(0, 0, 12, 8);
        _deltaShape.position = CGPointMake(self.width-18, 4);
        CGMutablePathRef path = CGPathCreateMutable();
        CGPathMoveToPoint(path, NULL, 0, 8);
        CGPathAddLineToPoint(path, NULL, 6, 0);
        CGPathAddLineToPoint(path, NULL, 12, 8);
        CGPathCloseSubpath(path);
        _deltaShape.path = path;
        CGPathRelease(path);
        _deltaShape.fillColor = yxColorFromRGBA(0.1, 0.1, 0.1, 1).CGColor;
    }
    return _deltaShape;
}
三角形有了后就是tableView的设置了,这种代码写了无数遍了,直接上码:
- (void)awakeFromNib {
[super awakeFromNib];
[self.layer addSublayer:self.deltaShape];
self.mainTableView.backgroundColor = yxColorFromRGBA(0.1, 0.1, 0.1, 1);
self.mainTableView.layer.cornerRadius = 2;
self.mainTableView.layer.masksToBounds = YES;
self.mainTableView.tableFooterView = [[UIView alloc] init];
self.cellImages = @[@"contacts_add_newmessage",@"contacts_add_friend",@"contacts_add_scan",@"contacts_add_friend"];
self.cellTitles = @[@"发起群聊",@"添加朋友",@"扫一扫",@"收付款"];
self.mainTableView.delegate = self;
self.mainTableView.dataSource = self;
[self.mainTableView registerClass:[UITableViewCell class] forCellReuseIdentifier:@"cell"];
}
- (void)tableView:(UITableView *)tableView didSelectRowAtIndexPath:(NSIndexPath *)indexPath {
}
- (CGFloat)tableView:(UITableView *)tableView heightForRowAtIndexPath:(NSIndexPath *)indexPath { return 38; }
- (NSInteger)tableView:(UITableView *)tableView numberOfRowsInSection:(NSInteger)section { return 4; }
- (UITableViewCell *)tableView:(UITableView *)tableView cellForRowAtIndexPath:(NSIndexPath *)indexPath {
UITableViewCell * cell = [tableView dequeueReusableCellWithIdentifier:@"cell"];
cell.imageView.image = yxImageFromName(self.cellImages[indexPath.row]);
cell.textLabel.text = self.cellTitles[indexPath.row];
cell.textLabel.font = [UIFont systemFontOfSize:15];
cell.textLabel.textColor = [UIColor whiteColor];
cell.backgroundColor = [UIColor clearColor];
cell.selectionStyle = UITableViewCellSelectionStyleNone;
return cell;
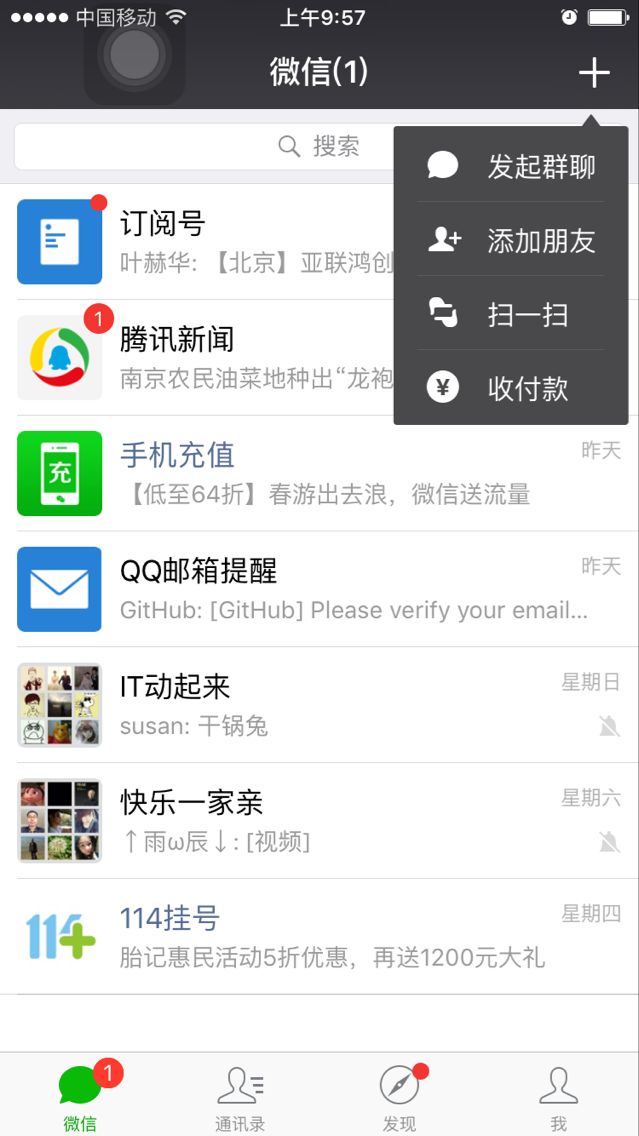
}我们来试验一下,点击“+”号后弹出该视图:
- (IBAction)leftBarAction:(id)sender {
    yxPopView * pop = [yxPopView popViewFromXIBFile];
    [self.view addSubview:pop];
    pop.center = self.view.center;
}
效果如下:

有了这个东西后,你就可以完成“+”后的事情了。最后就这样了:
总结
今天我们能容还算充实,框架搭建,项目配置和一个简单的弹出视图。其中重点是如何用一个UIView关联xib。可以细细琢磨一下我们是怎么完成的。