iOS开发-------涂鸦板(UIBezierPath 贝赛尔曲线)与 MVC初尝试
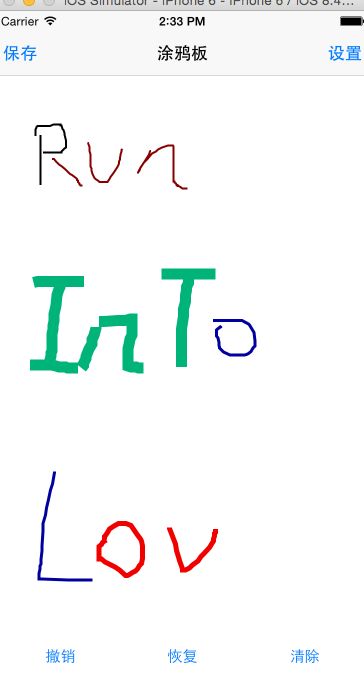
涂鸦板,顾名思义就是能够在上面画点东西,贝赛尔曲线(UIBezierPath),也可以叫做贝赛尔路径。因为path的直译就是路径,看起来很高大上,之前楼主也确实这么认为的,很高大上,细细了解,其实也不难,毕竟难的东西苹果都给我们封装好了。初次用MVC模式来些iOS的东西,错误难免,请包涵,首先来看一下效果吧
首先写一点测试的字,楼主写字不好看,如图一, 然后点击两下撤销,那么如图二, 然后点击恢复一下,如图三,当点击clear的时候,全屏就清除了。
如果想用MVC,逻辑很重要,首先来屡屡逻辑
ViewController的直系下属:
LineManager:完成对基础模型Line的管理,负责Line的增删改
TouchEvents:一个响应触摸的View,捕捉触摸点,汇报给VC,让LineManager为线添加轨迹点
RenderView:只接触是没用的,还需要显示的,根据LineManager汇报的Line的数组来绘制轨迹
ButtonView:下面的按钮是掌管按钮功能的,通过汇报VC点击按钮tag值,让LineManager进行相应的操作
SettingManager:负责记录修改后的相关属性,并只在VC中进行读取操作
MySettingViewController的直系下属
SettingView:负责响应修改的相应,反馈给SettingVC,并将数据存到SettingManager中
SettingManager:完成记录修改后的数据
Line
首先完成模型,Line,能够想到的属性如下
//
//  Line.h
//  涂鸦板
//
//  Created by YueWen on 15/9/24.
//  Copyright (c) 2015年 YueWen. All rights reserved.
//

#import <Foundation/Foundation.h>
#import <UIKit/UIKit.h>

@interface Line : NSObject

/**
 *  线的颜色
 *  默认是红色
 */
@property(nonatomic,strong)UIColor * lineColor;

/**
 *  线的宽度
 *  默认宽度是2.0
 */
@property(nonatomic,assign)NSInteger width;

/**
 *  存储路径点的数组,不能随意修改,所以设置为readOnly
 */
@property(nonatomic,strong,readonly)NSArray * points;

/**
 *  贝赛尔曲线
 */
@property(nonatomic,strong,readonly)UIBezierPath * path;

/**
 *  添加点
 *
 *  @param point 添加的点
 */
-(void)addPoint:(CGPoint)point;

@end
/**
 *  延展中点的数组
 */
@property(nonatomic,strong)NSMutableArray * mPoints;
实现相关的方法
- (instancetype)init
{
    self = [super init];
    if (self) {

        //初始化数组
        self.mPoints = [NSMutableArray array];

        //默认为红色
        self.lineColor = [UIColor redColor];

        //默认大小为2.0
        self.width = 2.0;
    }
    return self;
}


/**
 *  为线中添加点
 *
 *  @param point 添加的点
 */
-(void)addPoint:(CGPoint)point
{
    //转成NSValue类型的对象
    NSValue * value = [NSValue valueWithCGPoint:point];

    //添加到数组
    [self.mPoints addObject:value];
}


/**
 *  重写点数组的get方法
 *
 *  @return 返回点的数组
 */
-(NSArray *)points
{
    return [NSArray arrayWithArray:self.mPoints];
}


/**
 *  重写 贝赛尔曲线的get方法
 *
 *  @return 返回线的贝赛尔曲线
 */
-(UIBezierPath *)path
{

    //创建一个贝赛尔曲线
    UIBezierPath * pathTemp = [UIBezierPath bezierPath];

    //首先移动到第一个点
    [pathTemp moveToPoint:[self.mPoints[0] CGPointValue]];

    for (int i = 1 ;i < self.mPoints.count; i++)
    {
        //转成普通的点
        CGPoint point = [self.mPoints[i] CGPointValue];

        //贝赛尔曲线添加点
        [pathTemp addLineToPoint:point];
    }
    return pathTemp;
}
TouchEventsView
touchEventsView主要负责汇报触摸的点,所以比较简单,首先定义三个Block代码块,分别负责传出开始触摸的点,移动中的点,手指离开屏幕的点
typedef void(^TouchBeginEventsBlock)(CGPoint point);
typedef void(^TouchMoveEventsBlock)(CGPoint point);
typedef void(^TouchEndEventsBlock)(CGPoint point);
在touchEventsView.m的文件中,依旧声明三个属性,并在头文件中声明三个赋值方法(当然还可以在头文件中声明属性,直接赋值)
/*声明block的赋值方法*/
-(void)touchBeginEventsBlockHandle:(TouchBeginEventsBlock)b;

-(void)touchMoveEventsBlockHandle:(TouchMoveEventsBlock)b;

-(void)touchEndEventsBlockHandle:(TouchEndEventsBlock)b;
延展的属性声明
@property(nonatomic,strong)TouchBeginEventsBlock  touchBeginEvents;
@property(nonatomic,strong)TouchMoveEventsBlock touchMoveEvents;
@property(nonatomic,strong)TouchEndEventsBlock  touchEndEvents;
实现赋值方法
-(void)touchBeginEventsBlockHandle:(TouchBeginEventsBlock)b
{
    self.touchBeginEvents = b;
}

-(void)touchMoveEventsBlockHandle:(TouchMoveEventsBlock)b
{
    self.touchMoveEvents = b;
}

-(void)touchEndEventsBlockHandle:(TouchEndEventsBlock)b
{
    self.touchEndEvents = b;
}
最后实现的方法就是触摸事件,只要是继承与UIView的类都可以实现方法
//开始触摸
- (void)touchesBegan:(NSSet *)touches withEvent:(UIEvent *)event
{
    //捕获点
    CGPoint point = [[touches anyObject] locationInView:self];

    //运行代码块,通知VC
    if (self.touchBeginEvents)
    {
        self.touchBeginEvents(point);
    }
}

//滑动的时候
- (void)touchesMoved:(NSSet *)touches withEvent:(UIEvent *)event
{
    //捕获点
    CGPoint point = [[touches anyObject] locationInView:self];

    //运行代码块,通知VC
    if (self.touchMoveEvents)
    {
        self.touchMoveEvents(point);
    }

}

//滑动结束,即手离开屏幕时
- (void)touchesEnded:(NSSet *)touches withEvent:(UIEvent *)event
{
    //捕获点
    CGPoint point = [[touches anyObject] locationInView:self];

    //运行代码块,通知VC
    if (self.touchEndEvents)
    {
        self.touchEndEvents(point);
    }

}

//功能被抢的时候
- (void)touchesCancelled:(NSSet *)touches withEvent:(UIEvent *)event
{
    //捕获点
    CGPoint point = [[touches anyObject] locationInView:self];

    //运行代码块,通知VC
    if (self.touchEndEvents)
    {
        self.touchEndEvents(point);
    }

}
RenderView
renderView只负责绘图功能,自然属性中只需要一个存储线的数组,每次划线的时候,根据每个对象里面的贝赛尔曲线(UIBezierPath)来绘制,因为存储线的数组是在延展中声明的,所以头文件中声明一个赋值的方法
/**
 *  设置线的数组
 *
 *  @param array 参数线的数组
 */
-(void)setRenderLines:(NSArray *)array;
RenderView的init方法不再给出,别忘记给数组初始化即可,下面是数组的set方法
/**
 *  设置线的数组
 *
 *  @param array 参数line数组
 */
-(void)setRenderLines:(NSArray *)array
{
    self.lines = array;

    //相当于系统调用drawRect的绘制方法,不能手动调用,手动调用会出现卡屏
    [self setNeedsDisplay];
}
由于数组中存储的都是Line对象,需要的UIBezierPath(贝赛尔曲线)都存在Line对象中,所以需要遍历绘制
//绘制方法只能在该方法下进行,在此方法中提供了一个绘画的环境
- (void)drawRect:(CGRect)rect
{

    for (Line * line in self.lines)
    {
        UIBezierPath * path = line.path;

        //设置宽度
        path.lineWidth = line.width;

        //设置颜色
        [line.lineColor setStroke];

        //根据贝赛尔曲线进行绘图
        [path stroke];
    }

}
LineManager
LineManager负责汇报给VC 他所存的线,所以需要一个回调,楼主比较熟悉Block回调,所以选择Block,方法不为一
typedef void(^lineManagerDidChangeBlock)(NSArray * lines);
既然可以对线进行保存删除,必然需要一个可变数组来存数,用延展定义相关的属性
@property(nonatomic,strong)NSMutableArray * linesArray;//存储需要绘制的线
@property(nonatomic,strong)NSMutableArray * deleteLinesArray;//存储不需要绘制的线
@property(nonatomic,strong)lineManagerDidChangeBlock lineManagerDidChange;//回调的代码块
/**
 *  单例方法
 *
 *  @return 返回单例
 */
+(instancetype)shareLineMangaer;
+(instancetype)shareLineMangaer
{
    static LineManager * lineManager = nil;

    static dispatch_once_t onceToken;
    dispatch_once(&onceToken, ^{
        lineManager = [[LineManager alloc]init];
    });

    return lineManager;
}
当前面的开始触碰时,需要lineManager重新创建一条线,并且将点赋值给贝塞尔曲线的首点,需要在.h中声明,这里只给出实现方法
/**
 *  新添加一条线,并初始化
 *
 *  @param point 起始点
 *  @param color 线的颜色
 *  @param width 线的宽度
 */
-(void)addPointWithStartEvents:(CGPoint)point WithColor:(UIColor *)color Width:(NSInteger)width
{
    //创建一条线
    Line * line = [[Line alloc]init];

    //设置属性
    [line addPoint:point];
    line.lineColor = color;
    line.width = width;

    //添加到数组
    [self.linesArray addObject:line];

    //运行代码块通知VC
    if (self.lineManagerDidChange)
    {
        self.lineManagerDidChange(self.linesArray);
    }

}
在移动过程中以及结束后,需要不断地往最后一个Line里添加获取到的点
/**
 *  为最后一次的线更新点
 *
 *  @param point 参数点
 */
-(void)addPointForLastLine:(CGPoint)point
{
    //获取最后一条线
    Line * line = [self.linesArray lastObject];

    //增加点
    [line addPoint:point];

    //运行代码块,通知VC
    if (self.lineManagerDidChange)
    {
        self.lineManagerDidChange(self.linesArray);
    }
}
撤销键的点击,从表面看是删除了一条线,但实际不是,而是从需要渲染的Line数组中取出最后一条线,放到暂时保存的数组中,相当于一个栈的操作,就是一个出栈与入栈的过程,因为两者相似,只给出一段即可
/**
 *  删除前一根线
 */
-(void)beforeButtonToDeleteLine
{
    //如果线数组中的线存在线
    if (self.linesArray.count > 0)
    {
        //取出最后一根线
        Line * line = [self.linesArray lastObject];

        //缓存数组中添加
        [self.deleteLinesArray addObject:line];

        //从线数组中删除线
        [self.linesArray removeLastObject];

        //返回修改后的数组
        if (self.lineManagerDidChange)
        {
            self.lineManagerDidChange(self.linesArray);
        }

    }

}
清除按钮最简单,只需要清空两个数组的元素即可
/**
 *  删除所有储存的线
 */
-(void)clearButtonToRemoveLine
{
    //清空数组
    [self.linesArray removeAllObjects];
    [self.deleteLinesArray removeAllObjects];

    //返回修改后的数组
    if (self.lineManagerDidChange)
    {
        self.lineManagerDidChange(self.linesArray);
    }

}
最后是根据button传入的tag值进行相应的操作,rag值传入的回调在下面的ButtonView中提到
-(void)lineManagerDidChangeWithTag:(NSInteger)tag
{
    //根据tag值进行相应的操作
    switch (tag) {
        case 0://撤销键
            [self beforeButtonToDeleteLine];
            break;
        case 1://恢复键
            [self nextButtonToRecoveryLine];
            break;
        case 2://清除键
            [self clearButtonToRemoveLine];
            break;
        default:
            break;
    }
}
ButtonView
buttonView就是一个防止按钮的小View,因为它简单,没有用xib或者storyboard来写,所以是一个纯代码的小视图
首先要有一个返回button的tag值的回调
typedef void(^buttonPressedInButtonViewBlock)(NSInteger buttonTag);
自然需要在.m中的延展中定义一个代码块的属性以及set方法,这里不再赘余
首先定义一下属性
@property(nonatomic,strong)UIButton * beforeButton;//返回先一步,消除一条线
@property(nonatomic,strong)UIButton * nextButton;//撤销前一步
@property(nonatomic,strong)UIButton * clearButton;//清除所有的线

@property(nonatomic,strong)buttonPressedInButtonViewBlock buttonPressedBlock;
初始化两个方法
-(void)awakeFromNib//从xib中实例化的时候才走
{
    [self myInitView];
}


-(instancetype)initWithFrame:(CGRect)frame
{
    if (self = [super initWithFrame:frame])
    {
        [self myInitView];
    }
    return self;
}
实现自己写的初始化方法myInitView
-(void)myInitView
{
    //初始化按钮属性
    self.beforeButton = [self myButtonInitWithTitle:@"撤销" Tag:0];
    self.nextButton = [self myButtonInitWithTitle:@"恢复" Tag:1];
    self.clearButton = [self myButtonInitWithTitle:@"清除" Tag:2];

    //添加组件
    [self addSubview:self.beforeButton];
    [self addSubview:self.nextButton];
    [self addSubview:self.clearButton];

    //设置背景颜色
    self.backgroundColor = [UIColor whiteColor];

    //为按钮进行布局
    [self myLayoutConstrains];

}
/**
 *  自定义按钮初始化
 *
 *  @param title 按钮上的文字
 *  @param tag   按钮的tag值
 *
 *  @return 初始化按钮的地址
 */
-(UIButton *)myButtonInitWithTitle:(NSString *)title Tag:(NSInteger)tag
{
    //初始化按钮,系统类型的
    UIButton * button = [UIButton buttonWithType:UIButtonTypeSystem];

    //设置tag值
    button.tag = tag;

    //设置按钮上的文字
    [button setTitle:title forState:UIControlStateNormal];

    //取消按钮的自动布局
    button.translatesAutoresizingMaskIntoConstraints = NO;

    //确定button的目标动作回调
    [button addTarget:self action:@selector(buttonPressed:) forControlEvents:UIControlEventTouchUpInside];

    //返回创建好按钮的地址
    return button;
}
/**
 *  开始布局
 */
-(void)myLayoutConstrains
{
    //设置水平布局
    NSArray * buttonHorizatal = [NSLayoutConstraint constraintsWithVisualFormat:[NSString stringWithFormat:@"H:|-[_beforeButton]-[_nextButton(==_beforeButton)]-[_clearButton(==_beforeButton)]-|"] options:0 metrics:nil views:NSDictionaryOfVariableBindings(_beforeButton,_nextButton,_clearButton)];
    [self addConstraints:buttonHorizatal];

    //设置垂直布局
    NSArray * buttonVerital1 = [NSLayoutConstraint constraintsWithVisualFormat:[NSString stringWithFormat:@"V:|-7-[_beforeButton(30)]-7-|"] options:0 metrics:nil views:NSDictionaryOfVariableBindings(_beforeButton)];
    [self addConstraints:buttonVerital1];

    NSArray * buttonVerital2 = [NSLayoutConstraint constraintsWithVisualFormat:[NSString stringWithFormat:@"V:|-7-[_nextButton(30)]-7-|"] options:0 metrics:nil views:NSDictionaryOfVariableBindings(_nextButton)];
    [self addConstraints:buttonVerital2];

    NSArray * buttonVerital3 = [NSLayoutConstraint constraintsWithVisualFormat:[NSString stringWithFormat:@"V:|-7-[_clearButton(30)]-7-|"] options:0 metrics:nil views:NSDictionaryOfVariableBindings(_clearButton)];
    [self addConstraints:buttonVerital3];
}
/**
 *  按钮被点击
 *
 *  @param button 进行目标动作回调的按钮
 */
-(void)buttonPressed:(UIButton *)button
{
    //自身的回调存在
    if (self.buttonPressedBlock)
    {
        //返回按钮的tag值
        self.buttonPressedBlock(button.tag);
    }
}
SettingView
settingView是掌管设置的页面,因为说道MySettingManager必须需要settingView,所以先介绍settingView,这个比较复杂布局,所以用的xib进行的布局,如下
首先汇报肯定少不了回调方法,楼主依旧选择用Block回调,当然方法肯定不唯一,定义两个block,一个返回颜色,一个返回线宽,延展中的属性定义以及set方法依旧不赘余。
typedef void(^settingViewChangeColorBlock)(UIColor * lineColor);

typedef void(^settingViewChangeLineWidthChangeBlock)(CGFloat lineWidth);
接下来是当颜色的Slider发生变化时产生的回调方法
/**
 *  颜色调节器发生变化的回调
 *
 *  @param sender 调节器的发送者
 */
- (IBAction)colorSliderChanged:(id)sender
{
    //根据 三原色 以及 透明度 创建Color对象
    UIColor * lineColor = [UIColor colorWithRed:(self.redColorSlider.value / 255) green:(self.greenColorSlider.value / 255) blue:(self.blueColorSlider.value / 255) alpha:1];

    //改变预览label的颜色
    self.colorText.textColor = lineColor;

    //如果代码块存在
    if (self.colorChangeBlock)
    {
        self.colorChangeBlock(lineColor);
    }
}
然后是线宽发生变化时产生的回调
/**
 *  线的宽度调节器发生变化的回调
 *
 *  @param sender 调节器的发送者
 */
- (IBAction)lineWidthsliderChanged:(id)sender
{

    //获取 线的宽度
    CGFloat lineWidth = self.lineWidthSlider.value;

    //如果代码块存在
    if (self.lineWidthChangeBlock)
    {
        self.lineWidthChangeBlock(lineWidth);
    }
}
settingView就是这么多,依旧很简单
MySettingManager
mySettingManager是一个存储修改后的线的颜色以及线宽的一个单例,既然是单例自然少不了单例方法,依旧习惯用share开头,只给出实现方法,不要忘记头文件中声明相关属性以及声明方法
//不允许外界修改,所以用readOnly,只能通过相应的方法设置
@property(nonatomic,strong,readonly)UIColor * lineColor;

@property(nonatomic,assign,readonly)CGFloat lineWidth;
接下来是单例的实现,以上两个属性不要忘记在init里面初始化
+(instancetype)shareSettingManager
{
    static SettingManager * settingManager = nil;

    static dispatch_once_t onceToken;
    dispatch_once(&onceToken, ^{

        settingManager = [[SettingManager alloc]init];

    });

    return settingManager;
}
接下来就是当颜色以及线宽发生变化时进行相应的赋值了,如下
-(void)settingManagerSetColor:(UIColor *)lineColor withLineWidth:(CGFloat)lineWidth
{
    //如果存在颜色
    if (lineColor)
    {
       _lineColor = lineColor;

    }

    //如果存在线宽
    if (lineWidth > 0)
    {
        _lineWidth = lineWidth;
    }

}
ViewController
viewController既为主页面的控制器,属性如下,前面都已经细解释了各个属性,因此不注释了
@property(nonatomic,strong)TouchEventsView * touchEventsView;

@property(nonatomic,strong)RenderView * renderView;

@property(nonatomic,strong)LineManager * lineManager;

@property(nonatomic,strong)SettingManager * settingManager;

@property(nonatomic,strong)ButtonView * buttonView;
接下来就是看起来比较繁琐的viewDidLoad方法了,其实就是一堆设置回调的过程,会比较长,不过有注释,可以慢慢研究
- (void)viewDidLoad {
    [super viewDidLoad];

    //初始化线的管理者
    self.lineManager = [LineManager shareLineMangaer];

    //初始化设置管理者
    self.settingManager = [SettingManager shareSettingManager];

    //初始化触碰view
    self.touchEventsView = [[TouchEventsView alloc]initWithFrame:touchFrame];

    //初始化绘图view
    self.renderView = [[RenderView alloc]initWithFrame:touchFrame];

    //初始化按钮view
    self.buttonView = [[ButtonView alloc]initWithFrame:CGRectMake(0, self.touchEventsView.frame.size.height, self.view.frame.size.width, 44)];

    //配置导航栏的相关组件
    [self otherSetting];

    //避免强引用循环
    __weak __block ViewController * copy_self = self;

    //当开始触摸屏幕的时候
    [self.touchEventsView touchBeginEventsBlockHandle:^(CGPoint point) {

        //管理者创建线并且添加点为起始点
        [copy_self.lineManager addPointWithStartEvents:point WithColor:copy_self.settingManager.lineColor  Width:copy_self.settingManager.lineWidth];

    }];

    //手在触摸屏上移动的时候
    [self.touchEventsView touchMoveEventsBlockHandle:^(CGPoint point) {

        //管理者为最后一个线更新点
        [copy_self.lineManager addPointForLastLine:point];

    }];

    //手离开触摸屏的时候
    [self.touchEventsView touchEndEventsBlockHandle:^(CGPoint point) {

        //管理者为最后一个线更新点
        [copy_self.lineManager addPointForLastLine:point];

    }];

    //线的数组发生变化时
    [self.lineManager lineManagerDidChangeBlockHandle:^(NSArray *lines) {

        //渲染视图绘制
        [copy_self.renderView setRenderLines:lines];

    }];

    //buttonView被点击
    [self.buttonView buttonPressedBlockHandle:^(NSInteger buttonTag) {

        //管理者根据不同的tag值执行相应的操作
        [copy_self.lineManager lineManagerDidChangeWithTag:buttonTag];
    }];


    //设置背景颜色
    self.touchEventsView.backgroundColor = [UIColor whiteColor];
    self.renderView.backgroundColor = [UIColor clearColor];

    //添加
    [self.view addSubview:self.buttonView];
    [self.view addSubview:self.touchEventsView];
    [self.touchEventsView addSubview:self.renderView];

}
因为是在navigationController进行的跳转,所以添加两个itembarbutton,能够进行相应的操作
/**
 *  配置导航栏的相关组件
 */
-(void)otherSetting
{
    //添加左右两个tabBarbutton
    self.navigationItem.leftBarButtonItem = [[UIBarButtonItem alloc]initWithTitle:@"保存" style:UIBarButtonItemStyleDone target:self action:@selector(toSavePicture)];
    self.navigationItem.rightBarButtonItem = [[UIBarButtonItem alloc]initWithTitle:@"设置" style:UIBarButtonItemStyleDone target:self action:@selector(toSettingViewContoller)];
}
设置按钮的回调方法如下
/**
 *  跳转页面的回调方法
 */
-(void)toSettingViewContoller
{
    //创建settingViewController对象
    MySettingViewController * mySettingViewController = [[MySettingViewController alloc]init];

    //跳转
    [self.navigationController pushViewController:mySettingViewController animated:YES];

}
/**
 *  保存当前图片(截屏)
 */
-(void)toSavePicture
{
    //创建一个基于位图的图形上下文并指定大小
    UIGraphicsBeginImageContext(self.renderView.bounds.size);

    //renderIncontext呈现接受者以及其子范围到指定的上下文
    [self.renderView.layer renderInContext:UIGraphicsGetCurrentContext()];

    //返回一个基于当前图形上的上下文图片
    UIImage * image = UIGraphicsGetImageFromCurrentImageContext();

    //移除栈定基于当前位图的图形上下文
    UIGraphicsEndImageContext();

    //将图片保存到图片库
    UIImageWriteToSavedPhotosAlbum(image, nil, nil, nil);
}
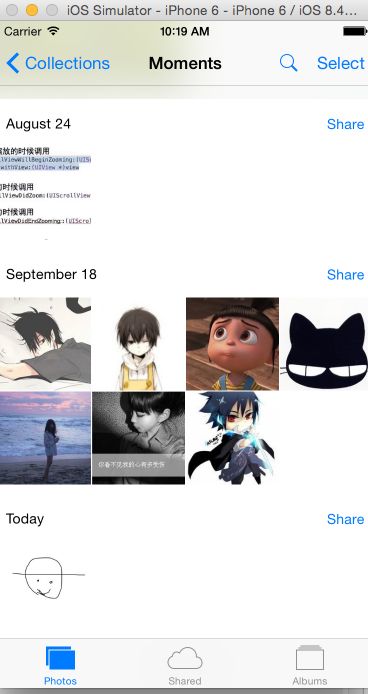
看一下保存的结果吧
画一张测试图,点击保存后,去相册中看
MySettingController
mySettingController是设置页面的控制器,所以理论和上面的控制器逻辑是一样的,而且更为简单,因为只负责显示设置View的功能,以下是viewDidLoad的方法
- (void)viewDidLoad {
    [super viewDidLoad];

    //获取单例
    self.settingManager = [SettingManager shareSettingManager];

    //初始化setting对象
    self.settingView = [[[NSBundle mainBundle] loadNibNamed:@"SettingView" owner:nil options:nil] lastObject];

    //设置frame
    self.settingView.frame = self.view.frame;


    //避免强引用循环
    __block __weak MySettingViewController * copy_self = self;


    //如果颜色调色器发生变化
    [self.settingView settingViewChangeColorBlockHandle:^(UIColor *lineColor)
    {
        //为设置管理者设置颜色
        [copy_self.settingManager settingManagerSetColor:lineColor withLineWidth:-1];


    }];

    //如果线宽调节器发生变化
    [self.settingView settingViewChangeLineWidthBlock:^(CGFloat lineWidth) {

        //为设置管理者设置线宽
        [copy_self.settingManager settingManagerSetColor:nil withLineWidth:lineWidth];
    }];

    //添加组件
    [self.view addSubview:self.settingView];

}
AppDelegate
因为全程没有使用storyboard,所以需要在appDelegate中设置相关的属性,方法如下,很简单
- (BOOL)application:(UIApplication *)application didFinishLaunchingWithOptions:(NSDictionary *)launchOptions {

    //设置根window
    UIWindow * window = [[UIWindow alloc]initWithFrame:[UIScreen mainScreen].bounds];
    self.window = window;

    //初始化一个画板Controller
    ViewController * viewController = [[ViewController alloc]init];
    viewController.navigationItem.title = @"涂鸦板";

    //初始化一个navigationController
    UINavigationController * navigationController = [[UINavigationController alloc]initWithRootViewController:viewController];

    //设置根视图
    self.window.rootViewController = navigationController;

    [self.window makeKeyAndVisible];


    return YES;
}

