iOS的二维码扫描
项目简介
做iOS的二维码扫描,有两个第三方库可以选择,ZBar和ZXing。IOS 7.0之后,可以使用AVFoundation框架开发原生的二维码扫描功能。
这里,实现一个案例,具有以下功能:
1.使用AVFoundation扫描二维码,扫描的同时扫描线上下移动
2.使用ZBar SDK解析 相册中现有的二维码图片
3.可以切换灯光的开闭。
项目的界面。
扫描二维码功能的实现
首先,创建与扫描二维码相关的一系列AVFoundation对象
<span style="font-weight: normal;">- (void)prepareForCaptureQRCode{
    AVCaptureSession *captureSession=[[AVCaptureSession alloc] init];
    captureSession.sessionPreset=AVCaptureSessionPreset640x480;
    self.captureSession=captureSession;

    AVCaptureDevice *captureDevice=[AVCaptureDevice defaultDeviceWithMediaType:AVMediaTypeVideo];
    self.captureDevice=captureDevice;

    NSError *deviceInputError;
    AVCaptureDeviceInput *captureDeviceInput=[AVCaptureDeviceInput deviceInputWithDevice:captureDevice error:&deviceInputError ];

    AVCaptureMetadataOutput *captureMetadataOutput=[[AVCaptureMetadataOutput alloc] init];
    dispatch_queue_t myQueue=dispatch_queue_create("myQueue", NULL);
    [captureMetadataOutput setMetadataObjectsDelegate:self queue:myQueue];

    if ([captureSession canAddInput:captureDeviceInput]) {
        [captureSession addInput:captureDeviceInput];
    }
    if ([captureSession canAddOutput:captureMetadataOutput]) {
        [captureSession addOutput:captureMetadataOutput];
    }
    //注意,在设置输出数据类型之前,一定要把输出对象添加到session中
    [captureMetadataOutput setMetadataObjectTypes:@[AVMetadataObjectTypeQRCode]];

    AVCaptureVideoPreviewLayer *captureVideoPreviewLayer=[[AVCaptureVideoPreviewLayer alloc] initWithSession:self.captureSession];
    captureVideoPreviewLayer.frame=self.view.bounds;
    captureVideoPreviewLayer.videoGravity=AVLayerVideoGravityResizeAspectFill;
    self.captureVideoPreviewLayer=captureVideoPreviewLayer;
    [self.view.layer insertSublayer:captureVideoPreviewLayer atIndex:0];

    captureMetadataOutput.rectOfInterest=[self resizeRectOfInterest:CGSizeMake(480, 640)];
}</span>
有几个重要的属性需要解释一下。
1.AVCaptureSession的sessionPreset属性 指定拍摄的视频或者图片的大小。如AVCaptureSessionPreset640x480,指定视频或者图片的高为640,宽为480.
2.设置AVCaptureMetadataOutput的MetadataObjectType属性之前,一定要把AVCaptureMetadataOutput添加到AVCaptureSession对象中。
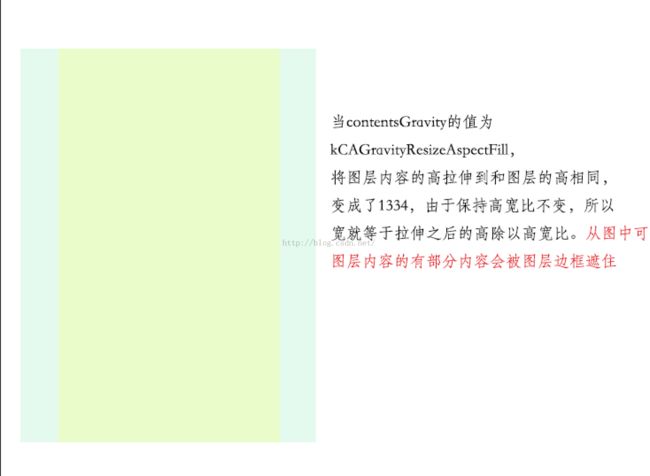
3.AVCaptureVideoPreviewLayer用于预览拍摄到的视频或者图片。拍摄内容的大小是由AVCaptureSession对象的sessionPreset属性确定的,预览图层的大小是由AVCaptureVideoPreviewLayer的frame属性确定的,那么拍摄内容如何显示在预览图层中了?拉伸到整个layer 的范围,还是以拍摄内容的原来高宽比缩放了,这是由AVCaptureVideoPreviewLayer的videoGravity属性决定的。AVCaptrueVideoPreviewLayer的videoGravity属性的概念和CALayer的contentsGravity是相同的,下面详细解释一下CALayer的contentsGravity和Frame之间的关系
图层内容被拉伸之前
公式计算
图aspect
图aspectFill
4.AVCapure捕捉到内容之后,会解析二维码,为了提高解析效率,AVCaptureMetadataOutput定义了属性rectOfInterest用于决定解析范围,这个属性的坐标参考的是经过伸缩变换之后的捕捉内容的坐标系。值得注意的是,我们使用AVFoundation捕捉视频或者图片时,产生的结果是高宽 颠倒的。比如,我们手机竖着扫描二维码,那么拍摄的结果是横着的。所以,假设拉伸变换之后的捕捉内容的 高为height,宽为width ,解析范围的左上角坐标为(x,y),高为interestHeight,宽为interestWidth。那么rectOfInterest的 值 应该是(y/height,x/width,interestHeight/height,interestWidth/width)。
这里封装了一个方法resizeRectOfInterest:,根据捕捉内容的原始大小,videoGravity属性,和 解析区域 在预览图层的坐标,产生rectOfInterest。
- (CGRect)resizeRectOfInterest:(CGSize)contentSize{
    //layer有个边框,边框里面有内容,内容的大小不一定等于边框的大小,gravity的作用,就是告诉你怎么显示内容,可以任意比例缩放直至填充整个layer,也可以等比例缩放
    NSString *videoGravity=self.captureVideoPreviewLayer.videoGravity;
    CGRect rectOfInterest=self.rectOfIntrest;
    CGSize screenSize=self.captureVideoPreviewLayer.bounds.size;

    CGFloat contentRitio=contentSize.height/contentSize.width;//图层的内容的高宽比
    CGFloat screenRitio=screenSize.height/screenSize.width;//图层的高宽比

    CGRect resizedContentRect=self.captureVideoPreviewLayer.bounds;
    CGFloat resizedWidth;
    CGFloat resizedHeight;
    if ([videoGravity isEqualToString:AVLayerVideoGravityResizeAspect]) {
        if (screenRitio>contentRitio) {
            resizedWidth=screenSize.width;
            resizedHeight=resizedWidth*contentRitio;
        }else{
            resizedHeight=screenSize.height;
            resizedWidth=resizedHeight/contentRitio;
        }

    }else if ([videoGravity isEqualToString:AVLayerVideoGravityResizeAspectFill]){
        if (screenRitio>contentRitio) {
            resizedHeight=screenSize.height;
            resizedWidth=resizedHeight/contentRitio;
        }else{
            resizedWidth=screenSize.width;
            resizedHeight=resizedWidth*contentRitio;
        }
    }
    //确定拉伸后的内容在图层的坐标系中的位置
    resizedContentRect.origin=CGPointMake((screenSize.width-resizedWidth)/2.0, (screenSize.height-resizedHeight)/2.0);
    resizedContentRect.size=CGSizeMake(resizedWidth, resizedHeight);

    //确定 感兴趣的解析区域相对于图层内容(也就是拍摄的内容)的空间位置
    rectOfInterest.origin=CGPointMake(rectOfInterest.origin.x-resizedContentRect.origin.x, rectOfInterest.origin.y-resizedContentRect.origin.y);

    //
    rectOfInterest.origin.x/=resizedContentRect.size.width;
    rectOfInterest.origin.y/=resizedContentRect.size.height;
    rectOfInterest.size.width/=resizedContentRect.size.width;
    rectOfInterest.size.height/=resizedContentRect.size.height;

    return CGRectMake(MIN(rectOfInterest.origin.y, 0) , MIN(rectOfInterest.origin.x, 0) , MIN(rectOfInterest.size.height, 1) , MIN(rectOfInterest.size.width, 1) );
}
创建于捕捉视频相关的对象之后,调用AVCaptureSession的startRunning方法,开启摄像头。
[self.captureSession startRunning];
捕捉到二维码之后,会 调用AVCaptureMetadataOutput的代理方法captureOutput:didOutputMetadataObjects:fromConnection:。在这里,我们可以通过AVMetadataMachineReadableCodeObject的属性stringValue获取二维码包含的信息。
- (void)captureOutput:(AVCaptureOutput *)captureOutput didOutputMetadataObjects:(NSArray *)metadataObjects fromConnection:(AVCaptureConnection *)connection{
    if (metadataObjects.count<1) {
        return;
    }

    //停止扫描
    [self.captureSession stopRunning];
    //停止定时器,(定时器控制扫描线的上下移动)
    [self.timer invalidate];
    [self dismissViewControllerAnimated:YES completion:nil];

    //震动效果
    AudioServicesPlaySystemSound(kSystemSoundID_Vibrate);

    AVMetadataMachineReadableCodeObject *codeObject=metadataObjects[0];
    if ([codeObject.stringValue containsString:@"http"]) {
        //内置浏览器打开二维码中的网页地址
       [[UIApplication sharedApplication] openURL:[NSURL URLWithString:codeObject.stringValue]];
}
}
摄像头的灯光的开启于关闭
更改AVCaptureDevice的属性的时候,要先使用lockForConfiguration锁定设备的配置,更改属性之后,解锁
self.flashModeChanged=!self.flashModeChanged;
    NSError *lockError;
    if ([self.captureDevice lockForConfiguration:&lockError]) {
        if ([self.captureDevice hasTorch]) {
            if (self.flashModeChanged) {
                [self.captureDevice setTorchMode:AVCaptureTorchModeOn];
            }else{
                [self.captureDevice setTorchMode:AVCaptureTorchModeOff];
            }
        }else{
            NSLog(@"设备不支持手电筒");
        }
        [self.captureDevice unlockForConfiguration];
    }else{
        NSLog(@"设置设备属性过程发生错误:%@" ,lockError.description);
    }
ZBar SDK解析 相册中现有的二维码图片
导入ZBar sdk第三方库
zbar sdk下载地址下载之后,文件是dmg格式,双击之后,内容如下
如何使用ZBar库,可以遵循README文档的指导
To add the SDK to an Xcode project:
1. Drag ZBarSDK into your Xcode project.
3. Add these system frameworks to your project:
* AVFoundation.framework (weak)
* CoreMedia.framework (weak)
* CoreVideo.framework (weak)
* QuartzCore.framework
* libiconv.dylib
使用ZBarReaderController解析二维码
这里,我们想使用ZBar提供的类 ZBarReaderController 从相册中选择二维码,然后在- (void)imagePickerController:didFinishPickingMediaWithInfo:方法中解析二维码,然后调用系统的浏览器打开解析的信息。注意,ZBarReaderController的delegate需要遵循协议
- (IBAction)pickAlbum:(id)sender {

    ZBarReaderController *imagePicker = [ZBarReaderController new];
    imagePicker.delegate = self;
    imagePicker.allowsEditing = YES;
    imagePicker.sourceType =UIImagePickerControllerSourceTypePhotoLibrary;
    self.readerController=imagePicker;
    [self presentViewController:imagePicker animated:YES completion:^{
        [self.captureSession stopRunning];
        [self.timer invalidate];
    }];
}

- (void)imagePickerController:(UIImagePickerController *)picker didFinishPickingMediaWithInfo:(NSDictionary<NSString *,id> *)info{
    id<NSFastEnumeration> results = [info objectForKey:ZBarReaderControllerResults];
    ZBarSymbol *symbol = nil;
    for(symbol in results) {
        NSLog(@"symbol:%@", symbol);
        break;
    }
    [self.readerController dismissViewControllerAnimated:YES completion:^{
                if (symbol) {
                    [self dismissViewControllerAnimated:YES completion:nil];
                    AudioServicesPlayAlertSound(kSystemSoundID_Vibrate);
                    [[UIApplication sharedApplication] openURL:[NSURL URLWithString:symbol.data]];
                }else{
                    [self.captureSession startRunning];
                    [self.timer fire];
                }
    }];
}

- (void)imagePickerControllerDidCancel:(UIImagePickerController *)picker{
    [self.readerController dismissViewControllerAnimated:YES completion:^{
        [self.captureSession startRunning];
        [self.timer fire];
    }];
}
然后,我们运行一下程序,会发现有如下的错误
ld: warning: ignoring file /Users/huberysun/Desktop/Coding/dd/ZBarSDK/libzbar.a, missing required architecture x86_64 in file /Users/huberysun/Desktop/Coding/dd/ZBarSDK/libzbar.a (3 slices)
<span style="color:#ff0000;">Undefined symbols for architecture x86_64:
  "_OBJC_CLASS_$_ZBarReaderController", referenced from:
      objc-class-ref in ViewController.o</span>
  "_ZBarReaderControllerResults", referenced from:
      -[ViewController imagePickerController:didFinishPickingMediaWithInfo:] in ViewController.o
<span style="color:#ff0000;">ld: symbol(s) not found for architecture x86_64</span>
以上的报错信息大概意思就是,zbar不支持64位架构。自2015年2月1日开始,开发者上传到App Store官方应用商店的iOS应用都必须要支持64位。苹果要求,应用必须采用iOS 8 以上SDK开发,包括Xcode 6或更新版,而为了支持64位,苹果建议使用默认的Xcode编译设定“标准架构”(Standard architectures),这样只需一个编译程序就可以同时兼容32、64位。因此,我们需要在xcode中重新编译一下zbar的项目,并且使用编译得到静态库libzbar.a替换我们从zbar for iPhone下载文件中的libzbar.a。具体方法如下
1.到github下载zbar的项目文件,地址
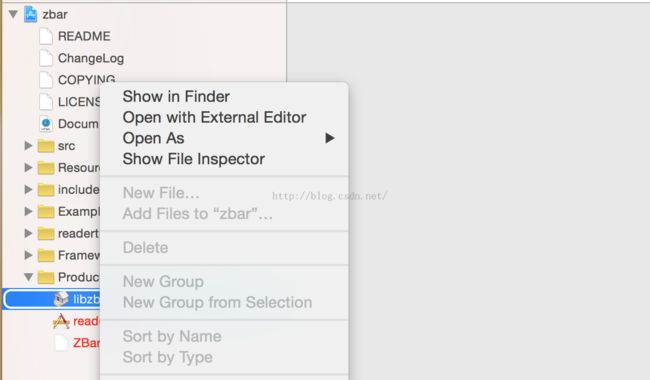
2.解压压缩文件,浏览到iPhone子目录下面,用xcode(我使用的是xcode 7)打开文件 zbar.xcodeproj
3.在项目的Build Setting 中设置Architectures 为Standard architectures(armv7,armv72,arm64)


