一步一步利用django创建博客应用(五)
为博客添加全文搜索引擎
Solr:开源的搜索引擎平台,提供全文检索,高亮显示等
Haystack:django为搜索引擎提供得抽象API
首先需要java1.7以上支持
下载安装java RE 检查java -version
http://www.oracle.com/technetwork/java/javase/downloads/index.html
下载Solr 4.10.4
http://archive.apache.org/dist/lucene/solr/
进入 solr-4.10.4/example/目录
运行
java -jar start.jar 打开Jetty web server服务器
打开地址:http://127.0.0.1:8983/solr/ 显示如下:
为blog应用创建核心--即一个搜索引擎
首先创建一个核心的文件结构
在solr-4.10.4/example/solr目录下创建blog目录和底下的文件结构
复制底下的xml内容到solrconfig.xml,这是最小的配置
<?xml version="1.0" encoding="utf-8" ?>
<config>
<luceneMatchVersion>LUCENE_36</luceneMatchVersion>
<requestHandler name="/select" class="solr.StandardRequestHandler"
default="true" />
<requestHandler name="/update" class="solr.UpdateRequestHandler" />
<requestHandler name="/admin" class="solr.admin.AdminHandlers" />
<requestHandler name="/admin/ping" class="solr.PingRequestHandler">
<lst name="invariants">
<str name="qt">search</str>
<str name="q">*:*</str>
</lst>
</requestHandler>
</config>
编辑schema.xml文件,添加下面代码
<?xml version="1.0" ?>
<schema name="default" version="1.5">
</schema>
注:这是一个空的schema,这个主要用来定义被搜索引擎索引的域和类型
后面会覆盖它
回到web 添加核心
安装Haystack
pip install django-haystack
安装solr搜索引擎后端
pip install pysolr==3.3.2
在setting文件中添加 haystack 应用
定义haystack的后端搜索引擎
HAYSTACK_CONNECTIONS = {
    'default': {
    'ENGINE': 'haystack.backends.solr_backend.SolrEngine',
    'URL': 'http://127.0.0.1:8983/solr/blog'
    },
}
创建索引
在blog应用下创建 search_indexes.py
from haystack import indexes
from .models import Post
class PostIndex(indexes.SearchIndex, indexes.Indexable):
    text = indexes.CharField(document=True, use_template=True)
    publish = indexes.DateTimeField(model_attr='publish')
    def get_model(self):
        return Post
    def index_queryset(self, using=None):
        return self.get_model().published.all()
这里定义了哪些域将会被索引(已经出版的post对象和出版时间)
在blog应用的模板目录下创建下面路径的文件
search/indexes/blog/post_text.txt
添加如下代码
{{ object.title }}
{{ object.tags.all|join:", " }}
{{ object.body }}
这是我们索引text域的默认路径
生成schema
python manage.py build_solr_schema
将输出的xml内容复制到schema.xml文件中
打开web 点击Reload重新加载shcema
重建索引数据
python manage.py rebuild_index
打开web: http://127.0.0.1:8983/solr/#/blog
显示如下信息:
你可以看到上面显示索引文档的数量
打开http://127.0.0.1:8983/solr/#/blog/query
这是solr 提供查询接口 点击执行查询能够看到json格式的结果
可以看到每个字典就是一个post对象, 而且text的格式也是之前定义好的
注: python manage.py rebuild_index 会移除之前的索引
python manage.py update_index 不会移除之前的索引
你可以设置一个定时任务 自动更新索引
创建一个搜索视图
添加一个搜索的Form
class SearchForm(forms.Form):
query = forms.CharField()
添加视图post_search
def post_search(request):
    form = SearchForm()
    if 'query' in request.GET:
        form = SearchForm(request.GET)
        if form.is_valid():
            cd = form.cleaned_data
            results = SearchQuerySet().models(Post).filter(content=cd['query']).load_all()
            # count total results
            total_results = results.count()
    else:
        cd = {}
        results = []
        total_results = []
    return render(request,
            'blog/post/search.html',
            {'form': form,
            'cd': cd,
            'results': results,
            'total_results': total_results})
为视图创建模板
在blog应用模板目录下新建 search.html
{% extends "blog/base.html" %}
{% block title %}Search{% endblock %}
{% block content %}
    {% if "query" in request.GET %}
        <h1>Posts containing "{{ cd.query }}"</h1>
        <h3>Found {{ total_results }} result{{ total_results|pluralize}}</h3>
        {% for result in results %}
            {% with post=result.object %}
                <h4><a href="{{ post.get_absolute_url }}">{{ post.title }}</a></h4>
                {{ post.body|truncatewords:5 }}
            {% endwith %}
        {% empty %}
            <p>There are no results for your query.</p>
        {% endfor %}
        <p><a href="{% url "blog:post_search" %}">Search again</a></p>
    {% else %}
        <h1>Search for posts</h1>
        <form action="." method="get">
        {{ form.as_p }}
        <input type="submit" value="Search">
        </form>
    {% endif %}
{% endblock %}
为视图添加url
url(r'^search/$', views.post_search, name='post_search'),
现在打开浏览器
http://127.0.0.1:8000/blog/search/
你应该看到如下
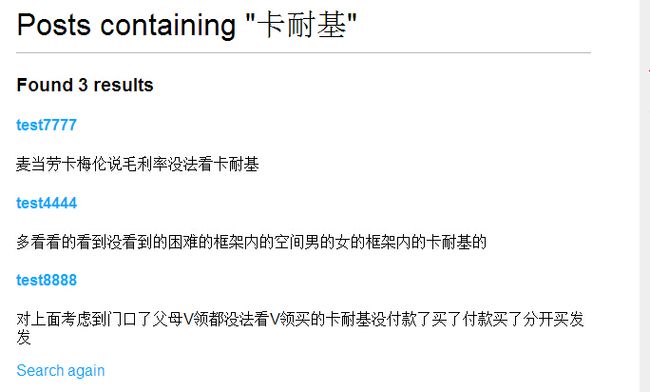
执行查询结果如下:
至此,整个blog应用结束,欢迎大家提出意见,一起学习!


