视图UIView动画
在iOS中,图形可分为以下几个层次:
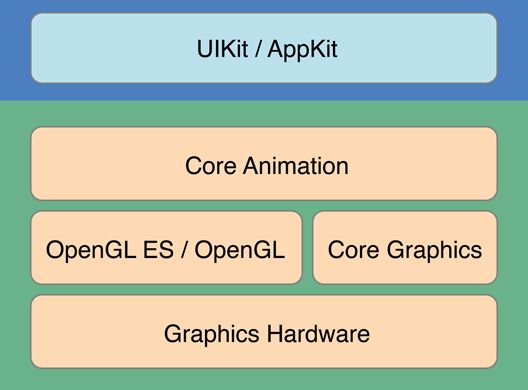
越上层,封装程度越高,动画实现越简洁越简单,但是自由度越低;反之亦然。本文着重介绍Core Animation层的基本动画实现方案。
在iOS中,展示动画可以类比于显示生活中的“拍电影”。拍电影有三大要素:演员+剧本+开拍,概念类比如下:
演员--->CALayer,规定电影的主角是谁
剧本--->CAAnimation,规定电影该怎么演,怎么走,怎么变换
开拍--->AddAnimation,开始执行
一、概念介绍
1、使用CALayer
CALayer代表一个层,它提供了一个+layer类方法来创建CALayer层。
提示:所有的UIView都有一个默认的CALayer,通过UIView的layer属性即可访问UIView上的CALayer层。
使用CALayer的步骤非常简单,具体如下:
- 创建一个CALayer;
- 设置CALayer的contents属性即可设置该CALayer所显示的内容,该属性通常可指定一个CGImage,即代表CALayer将要显示的图片。如果需要自行绘制CALayer所显示的内容,可为CALayer指定delegate属性,该属性值应该是一个实现CALayerDelegate非正式协议的对象,重写该协议中的drawLayer:inContext:方法,即可完成CALayer的绘制。
- 为CALayer设置backgroundColor(背景色)、frame(设置大小和设置)、position(位置)、anchorPoint(锚点)、borderXxx(设置边框相关属性)、shadowXxx(设置阴影相关属性)等属性;
- 将该CALayer添加到父CALayer中即可。
与CALayer显示相关的还有如下几个常用属性:
- (1)、contents:该属性控制CALayer显示的内容;
- (2)、contentsRect:该属性控制CALayer的显示区域,其属性值是一个形如(0.0,0.0,1.0,1.0)的CGRect结构体,其中,1.0代表CALayer完整的宽和高;
- (3)、contentsCenter:该属性控制CALayer的显示中心,其属性值是一个形如(0.0,0.0,1.0,1.0)的CGRect结构体,其中1.0代表CALayer完整的宽和高。通过该属性,可以把CALayer分成#字形网格,该属性指定的区域位置位于#字形中心。如果指定contentsCenter的contentsGravity属性为缩放模式,那么该CALayer被分成#字形的网格的上、下区域值进行水平缩放,#字形的网格的左、右区域只进行垂直缩放,中间区域进行两个方法的缩放,四个角则不进行缩放;
- (4)、contentsGravity:该属性是一个NSString类型的常量值,用于控制CALayer中内容的缩放、对齐方式,它支持kCAGravityCenter等表示中心、上、下、左、右等对齐方式的属性值,也支持kCAGravityResizeXxx表示缩放的属性值;
具体详情请查看CALayer层
2、Core Animation动画基础
使用Core Animation创建动画不仅简单,而且具有更好地性能,原因有如下两个:
- (1)、Core Animation动画在单独的线程中完成,不会阻塞主线程;
- (2)、Core Animation动画只会重绘界面上变化的部分(局部刷新);
Core Animation动画的核心是CALayer,每个UIView都有自己的CALayer,而且每个CALayer都可以不断地添加子CALayer,CALayer所在的CALayer被称为父CALayer,CALayer的这种组织方式被称为Layer Tree(各Layer之间的结构就像一棵树)。
除此之外,Core Animation动画还涉及如下API:
- (1)、CAAnimation:它是所有动画类的基类,它实现了CAMediaTiming协议,提供了动画的持续时间、数独和重复计数等。CAAnimation还实现了CAAction协议,该协议为CALayer动画触发的动作提供标准化响应;
- (2)、CATransition:CAAnimation的子类,CAAnimation可通过预置的过渡效果来控制CALayer层的过渡动画;
- (3)、CAPropertyAnimation:它是CAAnimation的一个子类,它代表一个属性动画,可通过+animationWithKeyPath:类方法来创建属性动画实例(程序一般创建该子类的实例),该方法需要指定一个CALayer支持动画的属性,然后通过它的子类(CABasicAnimation、CAKeyframeAnimation)控制CALayer的动画属性慢慢地改变,即可实现CALayer动画;
- (4)、CABasicAnimation:CAPropertyAnimation的子类,简单控制CALayer层的属性慢慢改变,从而实现动画效果。很多CALayer层的属性值的修改默认会执行这个动画类。比如大小、透明度、颜色等属性;
- (5)、CAKeyframeAnimation:CAPropertyAnimation的子类,支持关键帧的属性动画,该动画最大的特点在于可通过values属性指定多个关键帧,通过多个关键帧可以指定动画的各阶段的关键帧;
- (6)、CAAnimationGroup:它是CAAnimation的子类,用于将多个动画组合在一起执行。
二、动画实现
1、使用UIView控制动画方式
实际上,控制UIView内子控件的过渡还有另一种方式,通过UIView的+ (void)beginAnimations:(NSString )animationID context:(void )context;与 + (void)commitAnimations;方法控制,——如果子组件的过渡动画不是特别复杂,只需要实现一些简单的动画,即可通过这种方式控制。步骤如下:
- 调用UIView的+ (void)beginAnimations:(NSString )animationID context:(void )context;方法开始动画;
- 调用UIView的+ (void)setAnimationTransition:(UIViewAnimationTransition)transition forView:(UIView *)view cache:(BOOL)cache;设置动画类型、+ (void)setAnimationCurve:(UIViewAnimationCurve)curve;方法设置动画的变化曲线。除此之外,UIView还提供了系列setAnimationXxx方法来设置动画的持续时间、延迟时间、重复次数等属性;
- 调用UIView的+ (void)commitAnimations;方法提交动画;
上面的+ (void)setAnimationTransition:(UIViewAnimationTransition)transition forView:(UIView *)view cache:(BOOL)cache;方法用于控制UIView的过渡动画的动画方式,它支持如下动画方式:
- ①、UIViewAnimationTransitionNone:不适用动画;
- ②、UIViewAnimationTransitionFlipFromLeft:指定从左边滑入的动画过渡方式;
- ③、UIViewAnimationTransitionFlipFromRight:指定从右边滑出的动画过渡方式;
- ④、UIViewAnimationTransitionCurlUp:指定“翻开书页”的动画过渡方式;
- ⑤、UIViewAnimationTransitionCurlDown:指定“放下书页”的动画过渡方式;
另:+ (void)setAnimationCurve:(UIViewAnimationCurve)curve;方法用于控制动画的变化曲线,也就是控制动画的变化速度,该方法支持如下几种变化速度:
- ①、UIViewAnimationCurveEaseInOut:动画先比较缓慢,然后逐渐加快;
- ②、UIViewAnimationCurveEaseIn:动画逐渐变慢;
- ③、UIViewAnimationCurveEaseOut:动画逐渐加快;
- ④、UIViewAnimationCurveLinear:匀速动画;
例如:
- (void)curl:(UIButton *)sender{
    //开始执行动画
    [UIView beginAnimations:@"animation" context:nil];
    [UIView setAnimationDuration:1.0f];
    //控制UIView内过渡动画的类型
    [UIView setAnimationTransition:UIViewAnimationTransitionCurlUp forView:self.view cache:YES];
    //设置动画的变化曲线
    [UIView setAnimationCurve:UIViewAnimationCurveEaseInOut];
    //交换视图控制器所显示的UIView中两个子控件的位置
    [self.view exchangeSubviewAtIndex:0 withSubviewAtIndex:1];
    [UIView commitAnimations];
}
2、CAAnimation
CAAnimation提供了如下属性和方法:
- (1)、BOOL removedOnCompletion;该属性用于指定该动画完成时是否从目标CALayer上删除该动画
- (2)、CAMediaTimingFunction *timingFunction;该属性用于指定一个CAMediaTimingFunction对象,该对象负责控制动画边长的步长;
- (3)、- (void)animationDidStart:(CAAnimation *)anim;该动画开始时将会回调该方法。开发者可以重写该方法执行自定义处理;
- (4)、- (void)animationDidStop:(CAAnimation *)anim finished:(BOOL)flag;该动画结束时将会回调该方法。开发者可以重写该方法执行自定义处理;
3、 CAMediaTiming
(1)、 @property CFTimeInterval beginTime;
- ①、如果一animation是在一个animation group中,则beginTime就是其parent object——animation group 开始的一个偏移。如果一个animation的beginTime为5,则此动画再group animation开始之后的5秒再开始动画
②、如果一个animation是直接添加再layer上,beginTime同样是其parent object——layer开始的一个偏移,但是一个layer的beginning是一个过去的时间,因此不能简单的设置beginTime为5去延迟动画5s之后开始,因为可能layer的beginning加上5s之后也是过去的时间,因此,当要延迟一个添加layer上的动画的时候,需要定义一个addTime,先获取addTime如下:
CFTimeInterval addTime = [layer convertTime:CACurrentMediaTime() fromLayer:nil];然后延迟delay秒:
animation.beginTime = addTime + delay;
(2)、 @property CFTimeInterval duration;设置时间;
注意,我们设置的duration可能和动画进行的真是duration不一样,这个依赖于superLayer的time space或者就是speed;
(3)、 @property float speed;动画速度;
注意:如果一个动画A:duration为1秒,speed为1;而另一个动画B:duration为2秒,speed为2。则这两个动画的效果是相同的;前提它们的super layer相同;
(4)、 @property CFTimeInterval timeOffset;
假设一个3s的动画,它的状态为t0,t1,t2,t3,当没有timeOffset的时候,正常的状态序列应该为:t0->t1->t2->t3;当设置timeOffset为1的时候状态序列就变为:t1->t2->t3->t0;同理当timeOffset为2的时候状态序列就变味t2->t3->t0->t1;(5)、 @property float repeatCount;动画重复次数;
(6)、 @property CFTimeInterval repeatDuration;动画重复时间;
(7)、 @property BOOL autoreverses;动画结束后是否返回到原来的位置;
4、使用CATransition控制过渡动画
CATransition通常用于通过CALayer控制UIView内子控件的过度画面,比如,删除子控件、添加子控件、切换两个子控件。继承CAAnimation
使用CATransition控制UIView内子控件的过度画面的步骤如下:
- 创建CATransition对象;
- 为CATransition设置type和subtype两个属性,其中,type指定动画类型,subtype指定动画移动方向;
- 如果不需要动画执行整个过程(就是只要动画执行到中间部分就停止),可以指定startProgress(动画的开始速度)、endProgress(动画的结束进度)属性;
- 调用UIView的layer属性的addAnimation:forKey:方法控制该UIView内子控件的过渡动画。addAnimation:forKey:方法的第一个参数为CAAnimation对象,第二个参数用于为该动画对象执行一个唯一标识。
提示:CATransition继承了CAAnimation,因此也支持指定CAAnimation的removedOnCompletion等属性;
CATransition属性如下:
(1)、 @property(copy) NSString *type;
CATransition的type属性用于控制动画类型,它支持如下值(每个值代表一种类型的动画)。- ①、NSString * const kCATransitionFade;通过渐隐效果控制子组件的过渡。这是默认的属性值;
- ②、NSString * const kCATransitionMoveIn;通过移入动画控制子组件的过渡;
- ③、NSString * const kCATransitionPush;通过推入动画控制子组件的过渡;
- ④、NSString * const kCATransitionReveal;通过揭开动画控制子组件的过渡;
除此之外,该属性该支持如下私有动画: - ①、cube:通过立方体旋转动画控制子组件的过渡;
- ②、suckEffect:通过收缩动画(就像被吸入的效果)控制子组件的过渡;
- ③、oglFlip:通过翻转动画控制子组件的过渡;
- ④、rippleEffect:通过水波动画控制子组件的过渡;
- ⑤、pageCurl:通过页面揭开动画控制子组件的过渡;
- ⑥、pageUnCurl:通过放下页面动画控制子组件的过渡;
- ⑦、cameraIrisHollowOpen:通过镜头打开动画控制子组件的过渡;
- ⑧、cameraIrisHollowClose:通过镜头关闭动画控制子组件的过渡;
(2)、 @property(nullable, copy) NSString *subtype;
CATransition的subtype属性用于控制动画方向,它支持如下值:- ①、NSString * const kCATransitionFromRight;
- ②、NSString * const kCATransitionFromLeft;
- ③、NSString * const kCATransitionFromTop;
- ④、 NSString * const kCATransitionFromBottom;
例如:
- (void)oglFlip:(UIButton *)sender{
    //开始执行动画
    CATransition* transition = [CATransition animation];
    transition.duration = 2.0f;
    //通过翻转动画控制子组件的过渡;
    transition.type = @"oglFlip";
    //指定动画方向,从下向上
    transition.subtype = kCATransitionFromBottom;
    [self.view.layer addAnimation:transition forKey:@"animation"];
    [self.view exchangeSubviewAtIndex:0 withSubviewAtIndex:1];
}
5、使用属性动画(CAPropertyAnimation)
属性动画由CAPropertyAnimation代表,该对象用于控制CALayer的动画属性(所有支持数值型属性值的属性几乎都可作为动画属性)持续改变,当CALayer的动画属性持续改变时,CALayer的外观就会持续改变——用户看上去就变成了动画。
CAPropertyAnimation提供了如下类方法来创建属性动画:
方法+ (id)animationWithKeyPath:(NSString *)path;仅需要一个参数,该参数只是一个字符串类型的值,指定CALayer的动画属性名,设置该属性动画控制CALayer的哪个动画属性持续改变。
除此之外,CAPropertyAnimation还支持如下属性:
- (1)、@property(nullable, copy) NSString *keyPath;
该属性值返回创建CAPropertyAnimation时指定的参数; - (2)、@property(getter=isAdditive) BOOL additive;
该属性指定该属性动画是否以当前动画效果为基础; - (3)、@property(getter=isCumulative) BOOL cumulative;
该属性指定动画是否为累加效果; - (4)、@property(nullable, strong) CAValueFunction *valueFunction;
该属性值是一个CAValueFunction对象,该对象负责对属性改变的插值计算。系统已经提供了默认的插值计算方式,因此一般无需指定该属性。
如果要控制CALayer的位移动画,直接使用属性动画控制CALayer的postion持续改变即可。如果要控制该CALayer的缩放、旋转、斜切等效果,则需要控制如下属性。
- (1)、affineTransform:该属性值指定一个CGAffineTransform对象,该对象代表对CALayer执行X、Y两个维度(也就是平面)上的旋转、缩放、位移、斜切、镜像等变换矩阵;
- (2)、transform:该属性值指定一个CATransform3D对象,该对象代表对CALayer指定X、Y、Z三个维度(也就是三维空间)中的旋转、缩放、位移、斜切、镜像等变换矩阵。
一般来说,可使用Core Animation提供了如下属性来创建三维变换矩阵:
- (1)、bool CATransform3DIsIdentity (CATransform3D t);判断t矩阵是否为单位矩阵;
- (2)、bool CATransform3DEqualToTransform (CATransform3D a, CATransform3D b);判断连个变换矩阵是否相等;
- (3)、CATransform3D CATransform3DMakeTranslation (CGFloat tx, CGFloat ty, CGFloat tz);创建在X方向上移动tx、Y方向上移动ty、Z方向上移动tz的变换矩阵;
- (4)、CATransform3D CATransform3DMakeScale (CGFloat sx, CGFloat sy, CGFloat sz);创建在X方向上缩放sx、Y方向上缩放sy、Z方向上缩放sz的变换矩阵;
- (5)、CATransform3D CATransform3DMakeRotation (CGFloat angle, CGFloat x, CGFloat y, CGFloat z);创建基于指定旋转轴旋转angle弧度的变换。其中参数x、y、z的值用于确定旋转轴的方向。比如(1,0,0)指定旋转轴为X轴,(1,1,0)指定以X轴、Y周夹角的中线为旋转轴;
- (6)、CATransform3D CATransform3DTranslate (CATransform3D t, CGFloat tx, CGFloat ty, CGFloat tz);以已有t变换矩阵为基础进行位移变换;
- (7)、CATransform3D CATransform3DScale (CATransform3D t, CGFloat sx, CGFloat sy, CGFloat sz);以已有t变换矩阵为基础执行缩放变换;
- (8)、CATransform3D CATransform3DRotate (CATransform3D t, CGFloat angle, CGFloat x, CGFloat y, CGFloat z);以已有的t变换为基础执行旋转变换;
- (9)、CATransform3D CATransform3DConcat (CATransform3D a, CATransform3D b);对a变换矩阵执行累加;
- (10)、CATransform3D CATransform3DInvert (CATransform3D t);对已有的t变换执行反转;
- (11)、CATransform3D CATransform3DMakeAffineTransform (CGAffineTransform m);将CGAffineTransform矩阵包装成CATransform3D变换矩阵,该CATransform3D也只有X、Y维度的变换;
- (12)、bool CATransform3DIsAffine (CATransform3D t);如果t变换只是一个CGAffineTransform矩阵,则该函数返回YES;
- (13)、CGAffineTransform CATransform3DGetAffineTransform (CATransform3D t);获取t变换矩阵所包含的CGAffineTransform变换矩阵。
使用属性动画控制CALayer的执行动画创建属性动画:
- ①、利用animationWithKeyPath类方法创建属性动画;
- ②、如果使用CABasicAnimation属性动画,则可指定fromValue、toValue两个属性值,其中,formValue指定动画属性开始时的属性值,toValue指定动画属性结束时的属性值;
③、如果使用CAKeyframeAnimation属性动画,则指定values属性值,该属性值是一个NSArray属性,其中第一个元素指定动画属性开始时的属性值,toValue指定动画属性结束时的属性值,其他数组元素指定动画变化过程中的属性值。
提示:CABasicAnimation,CAKeyframeAnimation都继承了CAPropertyAnimation,他们都是
属性动画,只是CABasicAnimation只能指定动画属性的开始值和结束值,该CALayer的动画属性
就由开始值变化到结束值;而CAKeyframeAnimation则可为动画属性指定多个值,该CALayer的
动画属性就从values的第一个属性值开始,依次经历每个属性值,知道变成最后一个属性值。
④、调用CALayer的addAnimation:forKey:添加动画即可;
CALayer为动画支持提供了如下方法:
- (1)、- (void)addAnimation:(CAAnimation )anim forKey:(NSString )key;为该CALayer添加一个动画,第二个参数为该动画指定key(相当于该动画的唯一标识,这样保证每个CALayer可绑定多个动画对象);
- (2)、- (CAAnimation )animationForKey:(NSString )key;控制该CALayer执行指定key所对应的动画;
- (3)、- (void)removeAllAnimations;删除CALayer上添加的所有动画;
- (4)、- (void)removeAnimationForKey:(NSString *)key;根据key删除该CALayer上指定的动画;
- (5)、- (NSArray *)animationKeys;获取CALayer上添加的所有动画key所组成的数组;
1)、CABasicAnimation
- ①、移动动画
- (void)move:(UIButton *)sender{
    //获取animationLayer的位置
    CGPoint fromPoint = animationLayer.position;
    CGPoint toPoint = CGPointMake(fromPoint.x + 80, fromPoint.y);
    //创建不断改变CALayer的position属性的属性动画
    CABasicAnimation* anim = [CABasicAnimation animationWithKeyPath:@"position"];
    //设置动画开始的属性值
    anim.fromValue = [NSValue valueWithCGPoint:fromPoint];
    //设置动画结束的属性值
    anim.toValue = [NSValue valueWithCGPoint:toPoint];
    anim.duration = 2;
    animationLayer.position = toPoint;
    anim.removedOnCompletion = YES;
    //添加动画到图层,注意key相当于给动画进行命名,以后获得该图层时可以使用此名称获取
    [animationLayer addAnimation:anim forKey:@"KCBasicAnimation_Translation"];
}- ②、旋转动画
- (void)rotationAnimation:(UIButton *)sender{
    //1.创建动画并指定动画属性
    CABasicAnimation *basicAnimation=[CABasicAnimation animationWithKeyPath:@"transform.rotation.z"];
    //2.设置动画属性初始值、结束值
    // basicAnimation.fromValue=[NSNumber numberWithInt:M_PI_2];
    basicAnimation.toValue=[NSNumber numberWithFloat:M_PI_2*3];
    //设置其他动画属性
    basicAnimation.duration=6.0;
    basicAnimation.autoreverses=true;//旋转后再旋转到原来的位置
    //4.添加动画到图层,注意key相当于给动画进行命名,以后获得该动画时可以使用此名称获取
    [animationLayer addAnimation:basicAnimation forKey:@"KCBasicAnimation_Rotation"];
}- ③、缩小放大
- (void)scaleAnimation:(UIButton *)sender{
    CABasicAnimation *pulse = [CABasicAnimation animationWithKeyPath:@"transform.scale"];
    pulse.timingFunction = [CAMediaTimingFunction functionWithName:kCAMediaTimingFunctionEaseOut];
    pulse.duration = 0.5 + (rand() % 10) * 0.05;
    pulse.repeatCount = 1;
    pulse.autoreverses = YES;
    pulse.fromValue = [NSNumber numberWithFloat:.8];
    pulse.toValue = [NSNumber numberWithFloat:1.2];
    [animationLayer addAnimation:pulse forKey:nil];
}
2)、CAKeyframeAnimation
- (void)scale:(UIButton *)sender{
    //创建不断改变CALayer的transform属性的属性动画
    CAKeyframeAnimation* anim = [CAKeyframeAnimation animationWithKeyPath:@"transform"];
    //设置CAKeyframeAnimation控制transform属性依次经过的属性值
    anim.values = [NSArray arrayWithObjects:[NSValue valueWithCATransform3D:imageLayer.transform],[NSValue valueWithCATransform3D:CATransform3DScale(imageLayer.transform, 0.2, 0.2, 1)],[NSValue valueWithCATransform3D:CATransform3DScale(imageLayer.transform, 2, 2, 1)],[NSValue valueWithCATransform3D:imageLayer.transform], nil];
    anim.duration = 5;
    anim.removedOnCompletion = YES;
    [imageLayer addAnimation:anim forKey:nil];
}
注意:path其他还有transform.scale = 比例转换、transform.scale.x = 宽的比例转换、transform.scale.y = 高的比例转换、transform.rotation.z = 平面圆的旋转、opacity = 透明度、backgroundColor=背景颜色、cornerRadius=圆角。。。
6、使用CAAnimationGroup控制动画方式
- (void)group:(UIButton *)sender{
    CGPoint fromPoint = imageLayer.position;
    CGPoint toPoint = CGPointMake(fromPoint.x + 80, fromPoint.y);
    //创建不断改变CALayer的position属性的属性动画
    CABasicAnimation* moveAnim = [CABasicAnimation animationWithKeyPath:@"positon"];
    //设置动画开始的属性值
    moveAnim.fromValue = [NSValue valueWithCGPoint:fromPoint];
    //设置动画结束的属性值
    moveAnim.toValue = [NSValue valueWithCGPoint:toPoint];
    moveAnim.duration = 6;
    imageLayer.position = toPoint;
    moveAnim.removedOnCompletion = YES;
    //--------------------
    //创建不断改变CALayer的transform属性的属性动画
    CABasicAnimation* transformAnim = [CABasicAnimation animationWithKeyPath:@"transform"];
    CATransform3D fromValue = imageLayer.transform;
    //设置动画开始的属性值
    transformAnim.fromValue = [NSValue valueWithCATransform3D:fromValue];
    //创建在X、Y两个方向上缩放为0.5的变换矩阵
    CATransform3D scaleValue = CATransform3DScale(fromValue, 0.5, 0.5, 1);
    //绕Z轴旋转180度的变换矩阵
    CATransform3D rotateValue = CATransform3DRotate(fromValue, M_PI, 0, 0, 1);
    //计算两个变换矩阵的和
    CATransform3D toValue = CATransform3DConcat(scaleValue, rotateValue);
    //设置动画结束的属性值
    transformAnim.toValue = [NSValue valueWithCATransform3D:toValue];
    //动画效果累加
    transformAnim.cumulative = YES;
    //动画重复执行次数,旋转360度
    transformAnim.repeatCount = 2;
    transformAnim.duration = 6;
    //位移、缩放、旋转组合起来执行
    CAAnimationGroup* animGroup = [CAAnimationGroup animation];
    animGroup.animations = [NSArray arrayWithObjects:moveAnim,transformAnim, nil];
    animGroup.duration = 6;
    [imageLayer addAnimation:animGroup forKey:nil];
}
三、关于CAShapeLayer+ CAGradientLayer的动画
1、设定动画基础
- (void)viewDidLoad {
    [super viewDidLoad];
    CGFloat pathBorder = WIN_WIDTH/2;
    UIView* bgView = [[UIView alloc]initWithFrame:CGRectMake(0, 20, self.view.frame.size.width, self.view.frame.size.height - 20)];
    bgView.backgroundColor = [UIColor redColor];
    [self.view addSubview:bgView];
    //画出一个完成的进度的背景轨道
    //创建一个路径图层
    trackLayer = [CAShapeLayer layer];
    trackLayer.frame = CGRectMake(0, 100, pathBorder, pathBorder);
    trackLayer.fillColor = [[UIColor clearColor] CGColor];
    //指定path的渲染颜色
    trackLayer.strokeColor = [[UIColor redColor] CGColor];
    //背景同学你就甘心做背景吧,不要太明显了,透明度小一点
    trackLayer.opacity = 1;
    //指定线的边缘是圆的
    trackLayer.lineCap = kCALineCapRound;
    //线的宽度
    trackLayer.lineWidth = 4;
    //上面说明过了用来构建圆形
    UIBezierPath *path = [UIBezierPath bezierPathWithArcCenter:CGPointMake(pathBorder/2, pathBorder/2) radius:(pathBorder-4)/2 startAngle:degreesToRadians(-360) endAngle:degreesToRadians(0) clockwise:YES];
    //把path传递給layer,然后layer会处理相应的渲染,整个逻辑和CoreGraph是一致的。
    trackLayer.path =[path CGPath];
    [bgView.layer addSublayer:trackLayer];

    //创建背景图层
    gradientLayer =  [CAGradientLayer layer];
    [gradientLayer setColors:[NSArray arrayWithObjects:
                              (id)[[[UIColor blackColor] colorWithAlphaComponent:1] CGColor],
                              (id)[[[UIColor yellowColor] colorWithAlphaComponent:1] CGColor],
                              (id)[[[UIColor purpleColor] colorWithAlphaComponent:1] CGColor],
                              (id)[[UIColor whiteColor] CGColor],
                              nil]];
    gradientLayer.frame = bgView.bounds;
    [gradientLayer setLocations:[NSArray arrayWithObjects:
                                 [NSNumber numberWithFloat:0.0],
                                 [NSNumber numberWithFloat:0.3],
                                 [NSNumber numberWithFloat:0.8],
                                 [NSNumber numberWithFloat:1.0],
                                 nil]];
    [gradientLayer setStartPoint:CGPointMake(0, 0.5)];
    [gradientLayer setEndPoint:CGPointMake(1, 0.5)];
    [bgView.layer addSublayer:gradientLayer];
    [gradientLayer setMask:trackLayer]; //用progressLayer来截取渐变层

    UIButton* btn = [UIButton buttonWithType:UIButtonTypeCustom];
    btn.frame = CGRectMake(0, 20, self.view.frame.size.width, 40);
    [btn addTarget:self action:@selector(startGreenHeadAnimation) forControlEvents:UIControlEventTouchUpInside];
    [btn setTitle:@"动画跳转" forState:UIControlStateNormal];
    [self.view addSubview:btn];
}
2、移动路径图层动画
- (void)startGreenHeadAnimation{
    //动画
    CABasicAnimation *animation = [CABasicAnimation animationWithKeyPath:@"position"];
    animation.duration = 2;
    //获取animationLayer的位置
    CGPoint fromPoint = trackLayer.position;
    CGPoint toPoint = CGPointMake(fromPoint.x + WIN_WIDTH/2, fromPoint.y);
    //设置动画开始的属性值
    animation.fromValue = [NSValue valueWithCGPoint:fromPoint];
    //设置动画结束的属性值
    animation.toValue = [NSValue valueWithCGPoint:toPoint];
    trackLayer.position = toPoint;
    animation.removedOnCompletion = YES;
    [trackLayer addAnimation:animation forKey:@"position"];
}
总结:移动路径图层,背景图层不会跟着移动;
3、移动背景图层动画
- (void)startGreenHeadAnimation{
    //动画
    CABasicAnimation *animation1 = [CABasicAnimation animationWithKeyPath:@"position"];
    animation1.duration = 2;
    //获取animationLayer的位置
    CGPoint fromPoint1 = gradientLayer.position;
    CGPoint toPoint1 = CGPointMake(fromPoint1.x + WIN_WIDTH/2, fromPoint1.y);
    //设置动画开始的属性值
    animation1.fromValue = [NSValue valueWithCGPoint:fromPoint1];
    //设置动画结束的属性值
    animation1.toValue = [NSValue valueWithCGPoint:toPoint1];
    gradientLayer.position = toPoint1;
    animation1.removedOnCompletion = YES;
    [gradientLayer addAnimation:animation1 forKey:@"position"];
}
总结:移动背景图层,路径图层跟着移动;
4、同时移动路径图层和背景图层
- (void)startGreenHeadAnimation{

    //动画
    CABasicAnimation *animation = [CABasicAnimation animationWithKeyPath:@"position"];
    animation.duration = 2;
    //获取animationLayer的位置
    CGPoint fromPoint = trackLayer.position;
    CGPoint toPoint = CGPointMake(fromPoint.x + WIN_WIDTH/2, fromPoint.y);
    //设置动画开始的属性值
    animation.fromValue = [NSValue valueWithCGPoint:fromPoint];
    //设置动画结束的属性值
    animation.toValue = [NSValue valueWithCGPoint:toPoint];
    trackLayer.position = toPoint;
    animation.removedOnCompletion = YES;
    [trackLayer addAnimation:animation forKey:@"position"];

    //动画
    CABasicAnimation *animation1 = [CABasicAnimation animationWithKeyPath:@"position"];
    animation1.duration = 2;
    //获取animationLayer的位置
    CGPoint fromPoint1 = gradientLayer.position;
    CGPoint toPoint1 = CGPointMake(fromPoint1.x - WIN_WIDTH/2, fromPoint1.y);
    //设置动画开始的属性值
    animation1.fromValue = [NSValue valueWithCGPoint:fromPoint1];
    //设置动画结束的属性值
    animation1.toValue = [NSValue valueWithCGPoint:toPoint1];
    gradientLayer.position = toPoint1;
    animation1.removedOnCompletion = YES;
    [gradientLayer addAnimation:animation1 forKey:@"position"];
}