Activiti5学习之【HelloWorld】
相信看完第一节的朋友都已经把Activiti需要的环境搭建起来了吧,那么咱们来干一件程序员学习一门新的技术都喜欢干的事情 HelloWorld!! 本文将会讲到如果和创建activiti运行时所需要的数据库 以及如何绘制流程图、如何发布一个流程、如何启动一个流程、和如何结束一个流程。
要想写这个HelloWorld还是需要费点劲的,因为这个不像别的HelloWorld一样直接写一些代码就行 这个还涉及到了数据库的操作。所以咱们第一步就是创建Acitviti运行时所需要的数据库。
创建数据库
创建Acitviti运行时需要的数据库有好几种方法,比如运行Acitviti项目然后让其自动创建。但本人不太喜欢这种方式,我还是喜欢你给我sql语句我自己去执行 用着比较自然……那么我们当前之急就是去找所需要的sql脚本哈,在咱们下载的activiti的jar中activiti-engine-5.8.jar 这个包中就有我们要的东西。首先加压这个包 然后进到 org/activiti/db/create目录下 大家可以看到各种sql 那么大家根据自己使用的数据库来选择相应的脚本 本人使用的mysql 所以我选择如图中的四个脚本。
首先创建数据库activiti(名称随便) 然后到这个数据库中直接上述四个创建表的脚本,执行完毕后。数据库的工作就完成了哈,简单吧!
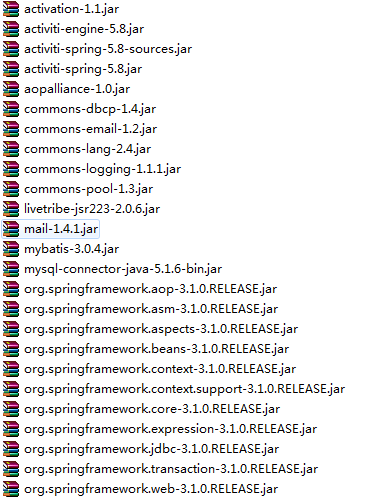
创建项目(J2EE)导入jar包
编写配置文件
<?xml version="1.0" encoding="UTF-8"?> <beans xmlns="http://www.springframework.org/schema/beans" xmlns:context="http://www.springframework.org/schema/context" xmlns:tx="http://www.springframework.org/schema/tx" xmlns:xsi="http://www.w3.org/2001/XMLSchema-instance" xsi:schemaLocation="http://www.springframework.org/schema/beans http://www.springframework.org/schema/beans/spring-beans.xsd http://www.springframework.org/schema/context http://www.springframework.org/schema/context/spring-context-2.5.xsd http://www.springframework.org/schema/tx http://www.springframework.org/schema/tx/spring-tx-3.0.xsd"> <!-- 配置数据源 --> <bean id="dataSource" class="org.springframework.jdbc.datasource.SimpleDriverDataSource"> <property name="driverClass" value="com.mysql.jdbc.Driver" /> <property name="url" value="jdbc:mysql://localhost:3306/activiti" /> <property name="username" value="root" /> <property name="password" value="1234" /> </bean> <!--配置事务管理器 --> <bean id="transactionManager" class="org.springframework.jdbc.datasource.DataSourceTransactionManager"> <property name="dataSource" ref="dataSource" /> </bean> <!--流程引擎配置 --> <bean id="processEngineConfiguration" class="org.activiti.spring.SpringProcessEngineConfiguration"> <property name="dataSource" ref="dataSource" /> <property name="transactionManager" ref="transactionManager" /> <property name="databaseSchemaUpdate" value="true" /> <property name="jobExecutorActivate" value="false" /> </bean> <!--配置流程引擎 --> <bean id="processEngine" class="org.activiti.spring.ProcessEngineFactoryBean"> <property name="processEngineConfiguration" ref="processEngineConfiguration" /> </bean> <!--配置流程相关的服务 --> <bean id="repositoryService" factory-bean="processEngine" factory-method="getRepositoryService" /> <bean id="runtimeService" factory-bean="processEngine" factory-method="getRuntimeService" /> <bean id="taskService" factory-bean="processEngine" factory-method="getTaskService" /> <bean id="historyService" factory-bean="processEngine" factory-method="getHistoryService" /> <bean id="managementService" factory-bean="processEngine" factory-method="getManagementService" /> <!--配置流程中工具类--> <bean id="commonUtil" class="activiti.process.util.CommonUtil"> </bean> </beans>绘制流程图
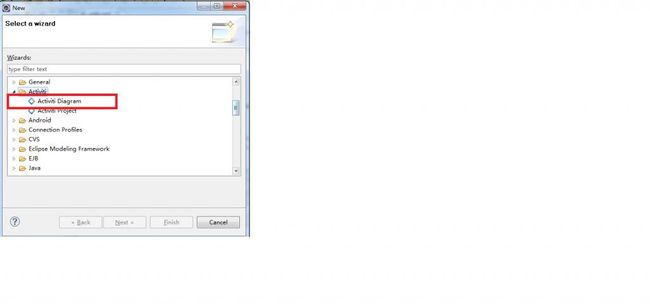
创建一个流程图(如图)点击next以后 filename 自己随便输入 这里面我输入 HelloWorld.activiti 然后直接Finsh.
创建完后会发现它自动把流程图放到main.resources.diagrams 包下面了,如果不想放在这下面可以直接移动过去。本人移动到了activiti.process.def包下面,这样比较符合编码规范。
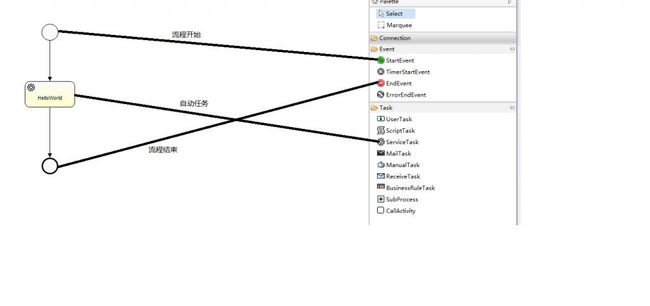
接下来就是打开创建的流程图,开始绘制了。这个涉及到JBPM的东西了,本文就不详述。
按照上面绘制完后,就该编写相应的代码了。既然是HelloWorld那么咱们就在走到HelloWorld流程的时候就输出一个HelloWorld吧。
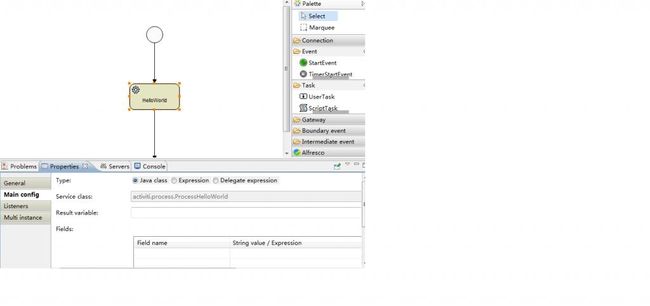
package activiti.process; import org.activiti.engine.delegate.DelegateExecution; import org.activiti.engine.delegate.JavaDelegate; public class ProcessHelloWorld implements JavaDelegate { @Override public void execute(DelegateExecution arg0) throws Exception { System.out.println("HelloWorld"); } }然后给HelloWorld这个节点指定相应的执行相应的代码,需要打开流程图HelloWorld.activiti 然后点击HelloWorld节点 在下面的点开Main config选项卡里面指定Service class 为刚才写的流程代码。这样当流程走到这一步的时候就会执行这个类里面的execute方法。
接下来咱们需要做的就是发布流程以及启动流程了。
编写ProcessUtil封装一些方法,方便调用。
package activiti.process; import java.util.HashMap; /** * 与流程有关的工具类 * * */ public class ProcessUtil { /** * 发布流程的方法 */ public static void deploy() { RepositoryService service = (RepositoryService) CommonUtil.getBean("repositoryService"); service.createDeployment().addClasspathResource("activiti/process/def/HelloWorld.bpmn20.xml") .addClasspathResource("activiti/process/def/HelloWorld.png").deploy(); } /** * 启动流程 */ public static String start() { RuntimeService service = (RuntimeService) CommonUtil.getBean("runtimeService"); ProcessInstance instance = service.startProcessInstanceByKey("HelloWorld"); return instance.getProcessInstanceId(); } }CommonUtil代码
public class CommonUtil implements ApplicationContextAware { private static ApplicationContext springFactory = null; public static Object getBean(String name) { return springFactory.getBean(name); } public void setApplicationContext(ApplicationContext applicationContext) throws BeansException { springFactory = applicationContext; } }
编写相应的servlet,方便咱们的操作。
public class ProcessAction extends HttpServlet { private static final long serialVersionUID = 1L; public ProcessAction() { super(); } /** * @see HttpServlet#service(HttpServletRequest request, HttpServletResponse * response) */ @Override protected void service(HttpServletRequest request, HttpServletResponse response) throws ServletException, IOException { String cmd = request.getParameter("cmd"); String page = null; if ("deploy".equals(cmd)) { ProcessUtil.deploy(); request.setAttribute("result", "流程发布成功"); page = "success.jsp"; } else if ("start".equals(cmd)) { String id = ProcessUtil.start(); request.setAttribute("result", "流程启动成功,流程ID:" + id); page = "success.jsp"; } request.getRequestDispatcher(page).forward(request, response); } }相应的页面index.jsp
<%@ page language="java" contentType="text/html; charset=utf-8" pageEncoding="utf-8"%> <!DOCTYPE html PUBLIC "-//W3C//DTD HTML 4.01 Transitional//EN" "http://www.w3.org/TR/html4/loose.dtd"> <html> <head> <meta http-equiv="Content-Type" content="text/html; charset=utf-8"> <title>流程测试</title> </head> <body> <form action="process" method="post"> <input type="radio" name="cmd" value="deploy">发布流程</input> <input type="radio" name="cmd" value="start">启动流程</input> <input type="radio" name="cmd" value="view">查看当前启动用户流程</input> <input type="submit" value="提交"> </form> </body> </html>
success.jsp
<%@ page language="java" contentType="text/html; charset=utf-8" pageEncoding="utf-8"%> <!DOCTYPE html PUBLIC "-//W3C//DTD HTML 4.01 Transitional//EN" "http://www.w3.org/TR/html4/loose.dtd"> <html> <head> <meta http-equiv="Content-Type" content="text/html; charset=utf-8"> <title>成功</title> </head> <body> 处理结果:<%=request.getAttribute("result") %> <a href="index.jsp">返回</a> </body> </html>
web.xml配置
<?xml version="1.0" encoding="UTF-8"?> <web-app xmlns:xsi="http://www.w3.org/2001/XMLSchema-instance" xmlns="http://java.sun.com/xml/ns/javaee" xmlns:web="http://java.sun.com/xml/ns/javaee/web-app_2_5.xsd" xsi:schemaLocation="http://java.sun.com/xml/ns/javaee http://java.sun.com/xml/ns/javaee/web-app_2_5.xsd" id="WebApp_ID" version="2.5"> <context-param> <param-name>contextConfigLocation</param-name> <param-value> classpath*:*.xml </param-value> </context-param> <listener> <listener-class> org.springframework.web.context.ContextLoaderListener </listener-class> </listener> <servlet> <servlet-name>ProcessAction</servlet-name> <servlet-class>com.hollycrm.servlet.ProcessAction</servlet-class> </servlet> <servlet-mapping> <servlet-name>ProcessAction</servlet-name> <url-pattern>/process</url-pattern> </servlet-mapping> </web-app>至此编码工作已经全部完成, 那么接下来就是验证下大家的代码了哈……发布应用进入index.jsp,首先点击发布流程。然后再点击启动流程。现在大家看看是不是控制台输出了HelloWorld! 因为ServiceTask
为自动任务不需要人工干预,所以会自动执行。启动流程以后直接进入到了HellorWorld执行完后流程也就结束了。
本文只是演示如何运行起来Activiti的HelloWorld,万事开头难 有了开头那么接下来学起来也就比较容易了。后面的文章我将会与大家一起学习Activiti的一些核心方法,敬请期待!


