android4.4 AlarmManagerService深入分析
AlarmManager深入分析
转载地址http://blog.csdn.net/codefly/article/details/17058425,自己补充了一些代码分析
1.概述
在Android系统中,闹钟和唤醒功能都是由Alarm Manager Service控制并管理的。我们所熟悉的RTC闹钟以及定时器都和它有莫大的关系。为了便于称呼,我常常也把这个service简称为ALMS。
另外,ALMS还提供了一个AlarmManager辅助类。在实际的代码中,应用程序一般都是通过这个辅助类来和ALMS打交道的。就代码而言,辅助类只不过是把一些逻辑语义传递给ALMS服务端而已,具体怎么做则完全要看ALMS的实现代码了。
ALMS的实现代码并不算太复杂,主要只是在管理“逻辑闹钟”。它把逻辑闹钟分成几个大类,分别记录在不同的列表中。然后ALMS会在一个专门的线程中循环等待闹钟的激发,一旦时机到了,就“回调”逻辑闹钟对应的动作。
以上只是一些概要性的介绍,下面我们来看具体的技术细节。
先看下具体ALMS在应用中的使用
1. Intent intent = new Intent(this, OneShotAlarm.class);
2. PendingIntent sender = PendingIntent.getBroadcast(this, 0, intent, 0);
3.
4. // 设置警报时间
5. Calendar calendar = Calendar.getInstance();
6. calendar.setTimeInMillis(System.currentTimeMillis());
7. calendar.add(Calendar.SECOND, 30);
8.
9. // 设置警报时间,除了用Calendar之外,还可以用
10. long firstTime = SystemClock.elapsedRealtime();
11.
12. AlarmManager am = (AlarmManager) getSystemService(ALARM_SERVICE);
13. // 只会警报一次
14. am.set(AlarmManager.RTC_WAKEUP, calendar.getTimeInMillis(), sender);
15. // 会重复警报多次
16. am.setRepeating(AlarmManager.ELAPSED_REALTIME_WAKEUP, firstTime, 15*1000, sender);
17.
18. // 要取消这个警报,只要通过PendingIntent就可以做到
19. am.cancel(sender);
2.AlarmManager
前文我们已经说过,ALMS只是服务端的东西。它必须向外提供具体的接口,才能被外界使用。在Android平台中,ALMS的外部接口为IAlarmManager。其定义位于frameworks\base\core\java\android\app\IAlarmManager.aidl脚本中,定义截选如下:
interface IAlarmManager {
    void set(int type, long triggerAtTime, in PendingIntent operation);
    void setRepeating(int type, long triggerAtTime, long interval, in PendingIntent operation);
    void setInexactRepeating(int type, long triggerAtTime, long interval, in PendingIntent operation);
    void setTime(long millis);
    void setTimeZone(String zone);
    void remove(in PendingIntent operation);
}
在一般情况下,service的使用者会通过Service Manager Service接口,先拿到它感兴趣的service对应的代理I接口,然后再调用I接口的成员函数向service发出请求。所以按理说,我们也应该先拿到一个IAlarmManager接口,然后再使用它。可是,对Alarm Manager Service来说,情况略有不同,其最常见的调用方式如下:
manager = (AlarmManager)context.getSystemService(Context.ALARM_SERVICE);
其中,getSystemService()返回的不再是IAlarmManager接口,而是AlarmManager对象。
2.1 AlarmManager的成员函数
AlarmManager的成员函数有:
public void set( int type, long triggerAtTime, PendingIntent operation)
public void setRepeating( int type, long triggerAtTime, long interval,
PendingIntent operation)
public void setInexactRepeating( int type, long triggerAtTime, long interval,
PendingIntent operation)
public void cancel(PendingIntent operation)
public void setTime( long millis)
public void setTimeZone(String timeZone)即1个构造函数,6个功能函数。基本上完全和IAlarmManager的成员函数一一对应。
另外,AlarmManager类中会以不同的公共常量来表示多种不同的逻辑闹钟,在Android 4.0的原生代码中有4种逻辑闹钟:
1) RTC_WAKEUP
2) RTC
3) ELAPSED_REALTIME_WAKEUP
4) ELAPSED_REALTIME
应用侧通过调用AlarmManager对象的成员函数,可以把语义传递到AlarmManagerService,并由它进行实际的处理。
3.AlarmManagerService
ALMS的重头戏在AlarmManagerService中,这个类继承于IAlarmManager.Stub,所以是个binder实体。它包含的重要成员如下:
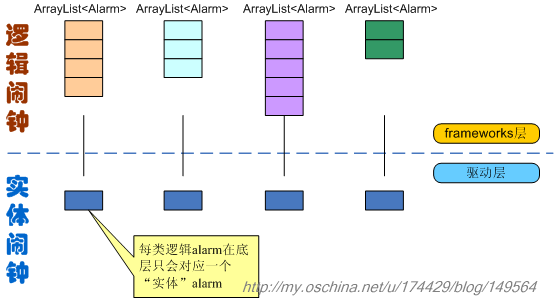
其中,mRtcWakeupAlarms等4个ArrayList<Alarm>数组分别对应着前文所说的4种“逻辑闹钟”。为了便于理解,我们可以想象在底层有4个“实体闹钟”,注意,是4个,不是4类。上面每一类“逻辑闹钟”都会对应一个“实体闹钟”,而逻辑闹钟则可以有若干个,它们被存储在ArrayList中,示意图如下:
当然,这里所说的“实体闹钟”只是个概念而已,其具体实现和底层驱动有关,在frameworks层不必过多关心。
Frameworks层应该关心的是那几个ArrayList<Alarm>。这里的Alarm对应着逻辑闹钟。
3.1 逻辑闹钟
Alarm是AlarmManagerService的一个内嵌类Alarm,定义截选如下:
private static class Alarm {
    public int type;
    public int count;
    public long when;
    public long repeatInterval;
    public PendingIntent operation;
    public int uid;
    public int pid;
    . . . . . .
其中记录了逻辑闹钟的一些关键信息。
- type域:记录着逻辑闹钟的闹钟类型,比如RTC_WAKEUP、ELAPSED_REALTIME_WAKEUP等;
- count域:是个辅助域,它和repeatInterval域一起工作。当repeatInterval大于0时,这个域可被用于计算下一次重复激发alarm的时间,详细情况见后文;
- when域:记录闹钟的激发时间。这个域和type域相关,详细情况见后文;
- repeatInterval域:表示重复激发闹钟的时间间隔,如果闹钟只需激发一次,则此域为0,如果闹钟需要重复激发,此域为以毫秒为单位的时间间隔;
- operation域:记录闹钟激发时应该执行的动作,详细情况见后文;
- uid域:记录设置闹钟的进程的uid;
- pid域:记录设置闹钟的进程的pid。
总体来说还是比较简单的,我们先补充说明一下其中的count域。这个域是针对重复性闹钟的一个辅助域。重复性闹钟的实现机理是,如果当前时刻已经超过闹钟的激发时刻,那么ALMS会先从逻辑闹钟数组中摘取下Alarm节点,并执行闹钟对应的逻辑动作,然后进一步比较“当前时刻”和“Alarm理应激发的理想时刻”之间的时间跨度,从而计算出Alarm的“下一次理应激发的理想时刻”,并将这个激发时间记入Alarm节点,接着将该节点重新排入逻辑闹钟列表。这一点和普通Alarm不太一样,普通Alarm节点摘下后就不再还回逻辑闹钟列表了。
“当前时刻”和“理应激发时刻”之间的时间跨度会随实际的运作情况而变动。我们分两步来说明“下一次理应激发时刻”的计算公式:
1) count = (时间跨度 / repeatInterval ) + 1 ;
2) “下一次理应激发时刻” = “上一次理应激发时刻”+ count * repeatInterval ;
我们画一张示意图,其中绿色的可激发时刻表示“上一次理应激发时刻”,我们假定“当前时刻”分别为now_1处或now_2处,可以看到会计算出不同的“下一次理应激发时刻”,这里用桔红色表示。
可以看到,如果当前时刻为now_1,那么它和“上一次理应激发时刻”之间的“时间跨度”是小于一个repeatInterval的,所以count数为1。而如果当前时刻为now_2,那么“时间跨度”与repeatInterval的商取整后为2,所以count数为3。另外,图中那两个虚线箭头对应的可激发时刻,只是用来做刻度的东西。
3.2 主要行为
接下来我们来看ALMS中的主要行为,这些行为和AlarmManager辅助类提供的成员函数相对应。
3.2.1 设置alarm
外界能接触的设置alarm的函数是set():publicvoid set(int type,long triggerAtTime, PendingIntent operation)
type:表示要设置的alarm类型。如前文所述,有4个alarm类型。triggerAtTime:表示alarm“理应激发”的时间。
operation:指明了alarm闹铃激发时需要执行的动作,比如执行某种广播通告。
设置alarm的动作会牵扯到一个发起者。简单地说,发起者会向Alarm Manager Service发出一个设置alarm的请求,而且在请求里注明了到时间后需要执行的动作。由于“待执行的动作”一般都不会马上执行,所以要表达成PendingIntent的形式。(PendingIntent的详情可参考其他文章)
另外,triggerAtTime参数的意义也会随type参数的不同而不同。简单地说,如果type是和RTC相关的话,那么triggerAtTime的值应该是标准时间,即从1970 年 1 月 1 日午夜开始所经过的毫秒数。而如果type是其他类型的话,那么triggerAtTime的值应该是从本次开机开始算起的毫秒数。
3.2.2 重复性alarm
另一个设置alarm的函数是setRepeating():
public void setRepeating(int type, long triggerAtTime, long interval,PendingIntent operation)
其参数基本上和set()函数差不多,只是多了一个“时间间隔”参数。事实上,在Alarm Manager Service一侧,set()函数内部也是在调用setRepeating()的,只不过会把interval设成了0。
setRepeating()的实现函数如下:
public void setRepeating(int type, long triggerAtTime, long interval,
                         PendingIntent operation)
{
    if (operation == null) {
        Slog.w(TAG, "set/setRepeating ignored because there is no intent");
        return;
    }
    synchronized (mLock) {
        Alarm alarm = new Alarm();
        alarm.type = type;
        alarm.when = triggerAtTime;
        alarm.repeatInterval = interval;
        alarm.operation = operation;

        // Remove this alarm if already scheduled.
        removeLocked(operation);

        if (localLOGV) Slog.v(TAG, "set: " + alarm);

        int index = addAlarmLocked(alarm);
        if (index == 0) {
            setLocked(alarm);
        }
    }
}
代码很简单,会创建一个逻辑闹钟Alarm,而后调用addAlarmLocked()将逻辑闹钟添加到内部逻辑闹钟数组的某个合适位置。
private int addAlarmLocked(Alarm alarm) {
    ArrayList<Alarm> alarmList = getAlarmList(alarm.type);

    int index = Collections.binarySearch(alarmList, alarm, mIncreasingTimeOrder);
    if (index < 0) {
        index = 0 - index - 1;
    }
    if (localLOGV) Slog.v(TAG, "Adding alarm " + alarm + " at " + index);
    alarmList.add(index, alarm);
    . . . . . .
    return index;
}
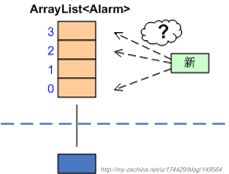
逻辑闹钟列表是依据alarm的激发时间进行排序的,越早激发的alarm,越靠近第0位。所以,addAlarmLocked()在添加新逻辑闹钟时,需要先用二分查找法快速找到列表中合适的位置,然后再把Alarm对象插入此处。
如果所插入的位置正好是第0位,就说明此时新插入的这个逻辑闹钟将会是本类alarm中最先被激发的alarm,而正如我们前文所述,每一类逻辑闹钟会对应同一个“实体闹钟”,此处我们在第0位设置了新的激发时间,明确表示我们以前对“实体闹钟”设置的激发时间已经不准确了,所以setRepeating()中必须重新调整一下“实体闹钟”的激发时间,于是有了下面的句子:
if (index == 0) {
    setLocked(alarm);
}
setLocked()内部会调用native函数set():
private native void set(int fd, int type, long seconds, long nanoseconds);
重新设置“实体闹钟”的激发时间。这个函数内部会调用ioctl()和底层打交道。具体代码可参考frameworks/base/services/jni/com_android_server_AlarmManagerService.cpp文件:
static void android_server_AlarmManagerService_set(JNIEnv* env, jobject obj, jint fd,
jint type, jlong seconds, jlong nanoseconds)
{
    struct timespec ts;
    ts.tv_sec = seconds;
    ts.tv_nsec = nanoseconds;

    int result = ioctl(fd, ANDROID_ALARM_SET(type), &ts);
    if (result < 0)
    {
        ALOGE("Unable to set alarm to %lld.%09lld: %s\n", seconds, nanoseconds, strerror(errno));
    }
}
我们知道,PendingIntent只是frameworks一层的概念,和底层驱动是没有关系的。所以向底层设置alarm时只需要type信息以及激发时间信息就可以了。
在AlarmManagerService中真正设置alarm的函数是setImplLocked函数,在这个函数中把alarm添加到mAlarmBatchs中,mAlarmBatchs会把触发时间相近的Alarm放在同一个bach中,然后每个bach根据时间排序放在mAlarmBatchs中,前面的就是先要触发的alarm。
private void setImplLocked(int type, long when, long whenElapsed, long maxWhen, long interval,
		PendingIntent operation, boolean isStandalone, boolean doValidate,
		WorkSource workSource) {
	/**创建一个alarm,其中各参数的含义如下:
	 * type 闹钟类型 ELAPSED_REALTIME、RTC、RTC_WAKEUP等
	 * when 触发时间 UTC类型,绝对时间,通过System.currentTimeMillis()得到
	 * whenElapsed 相对触发时间,自开机算起,含休眠,通过SystemClock.elapsedRealtime()得到
	 * maxWhen 最大触发时间
	 * interval 触发间隔,针对循环闹钟有效
	 * operation 闹钟触发时的行为,PendingIntent类型
	 */
	Alarm a = new Alarm(type, when, whenElapsed, maxWhen, interval, operation, workSource);
	//根据PendingIntent删除之前已有的同一个闹钟
	removeLocked(operation);

	boolean reschedule;
	//尝试将alarm加入到合适的batch中,如果alarm是独立的或者无法找到合适的batch去容纳此alarm,返回-1
	int whichBatch = (isStandalone) ? -1 : attemptCoalesceLocked(whenElapsed, maxWhen);
	if (whichBatch < 0) {
		//没有合适的batch去容纳alarm,则新建一个batch
		Batch batch = new Batch(a);
		batch.standalone = isStandalone;
		//将batch加入mAlarmBatches中,并对mAlarmBatches进行排序:按开始时间升序排列
		reschedule = addBatchLocked(mAlarmBatches, batch);
	} else {
		//如果找到合适了batch去容纳此alarm,则将其加入到batch中
		Batch batch = mAlarmBatches.get(whichBatch);
		//如果当前alarm的加入引起了batch开始时间和结束时间的改变,则reschedule为true
		reschedule = batch.add(a);
		if (reschedule) {
			//由于batch的起始时间发生了改变,所以需要从列表中删除此batch并重新加入、重新对batch列表进行排序
			mAlarmBatches.remove(whichBatch);
			addBatchLocked(mAlarmBatches, batch);
		}
	}

	if (DEBUG_VALIDATE) {
		if (doValidate && !validateConsistencyLocked()) {
			Slog.v(TAG, "Tipping-point operation: type=" + type + " when=" + when
					+ " when(hex)=" + Long.toHexString(when)
					+ " whenElapsed=" + whenElapsed + " maxWhen=" + maxWhen
					+ " interval=" + interval + " op=" + operation
					+ " standalone=" + isStandalone);
			rebatchAllAlarmsLocked(false);
			reschedule = true;
		}
	}

	if (reschedule) {
		rescheduleKernelAlarmsLocked();
	}
}
rescheduleKernelAlarmsLocked函数主要用来选取alarm的触发时间设置到RTC中去。
    private void rescheduleKernelAlarmsLocked() {
        // Schedule the next upcoming wakeup alarm.  If there is a deliverable batch
        // prior to that which contains no wakeups, we schedule that as well.
        if (mAlarmBatches.size() > 0) {
            //查找第一个有wakeup类型alarm的batch
            final Batch firstWakeup = findFirstWakeupBatchLocked();
            //查找第一个batch
            final Batch firstBatch = mAlarmBatches.get(0);
            判断条件是为了防止重复设置
            if (firstWakeup != null && mNextWakeup != firstWakeup.start) {
                //将第一个有wakeup类型alarm的batch的时间设置到rtc中
                mNextWakeup = firstWakeup.start;
                setLocked(ELAPSED_REALTIME_WAKEUP, firstWakeup.start);
            }
            if (firstBatch != firstWakeup && mNextNonWakeup != firstBatch.start) {
                mNextNonWakeup = firstBatch.start;
                setLocked(ELAPSED_REALTIME, firstBatch.start);
            }
        }
    }
3.2.3 取消alarm
用户端是调用AlarmManager对象的cancel()函数来取消alarm的。这个函数内部其实是调用IAlarmManager的remove()函数。所以我们只来看AlarmManagerService的remove()就可以了。
public void remove(PendingIntent operation)
{
    if (operation == null) {
        return;
    }
    synchronized (mLock) {
        removeLocked(operation);
    }
}
注意,在取消alarm时,是以一个PendingIntent对象作为参数的。这个PendingIntent对象正是当初设置alarm时,所传入的那个operation参数。我们不能随便创建一个新的PendingIntent对象来调用remove()函数,否则remove()是不会起作用的。PendingIntent的运作细节不在本文论述范围之内,此处我们只需粗浅地知道,PendingIntent对象在AMS(Activity Manager Service)端会对应一个PendingIntentRecord实体,而ALMS在遍历逻辑闹钟列表时,是根据是否指代相同PendingIntentRecord实体来判断PendingIntent的相符情况的。如果我们随便创建一个PendingIntent对象并传入remove()函数的话,那么在ALMS端势必找不到相符的PendingIntent对象,所以remove()必然无效。
remove()中调用的removeLocked()如下:
public void removeLocked(PendingIntent operation)
{
    removeLocked(mRtcWakeupAlarms, operation);
    removeLocked(mRtcAlarms, operation);
    removeLocked(mElapsedRealtimeWakeupAlarms, operation);
    removeLocked(mElapsedRealtimeAlarms, operation);
}
简单地说就是,把4个逻辑闹钟数组都遍历一遍,删除其中所有和operation相符的Alarm节点。removeLocked()的实现代码如下:
private void removeLocked(ArrayList<Alarm> alarmList,
                               PendingIntent operation)
{
    if (alarmList.size() <= 0) {
        return;
    }

    // iterator over the list removing any it where the intent match
    Iterator<Alarm> it = alarmList.iterator();

    while (it.hasNext()) {
        Alarm alarm = it.next();
        if (alarm.operation.equals(operation)) {
            it.remove();
        }
    }
}
请注意,所谓的取消alarm,只是删除了对应的逻辑Alarm节点而已,并不会和底层驱动再打什么交道。也就是说,是不存在针对底层“实体闹钟”的删除动作的。所以,底层“实体闹钟”在到时之时,还是会被“激发”出来的,只不过此时在frameworks层,会因为找不到符合要求的“逻辑闹钟”而不做进一步的激发动作。
3.2.4 设置系统时间和时区
AlarmManager还提供设置系统时间的功能,设置者需要具有android.permission.SET_TIME权限。
public void setTime(long millis)
{
    mContext.enforceCallingOrSelfPermission("android.permission.SET_TIME", "setTime");
    SystemClock.setCurrentTimeMillis(millis);
}
另外,还具有设置时区的功能:
public void setTimeZone(String tz)
相应地,设置者需要具有android.permission.SET_TIME_ZONE权限。
3.3 运作细节
3.3.1 AlarmThread和Alarm的激发
AlarmManagerService内部是如何感知底层激发alarm的呢?首先,AlarmManagerService有一个表示线程的mWaitThread成员:
private final AlarmThread mWaitThread = new AlarmThread();
在AlarmManagerService构造之初,就会启动这个专门的“等待线程”。
public AlarmManagerService(Context context)
{
    mContext = context;
    mDescriptor = init();
    . . . . . .
    . . . . . .
    if (mDescriptor != -1)
    {
        mWaitThread.start();   // 启动线程!
    }
    else
    {
        Slog.w(TAG, "Failed to open alarm driver. Falling back to a handler.");
    }
}
3.3.1.1 AlarmThread中的run()
AlarmThread本身是AlarmManagerService中一个继承于Thread的内嵌类:
private class AlarmThread extends Thread
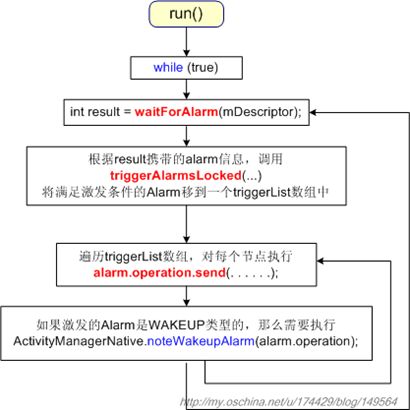
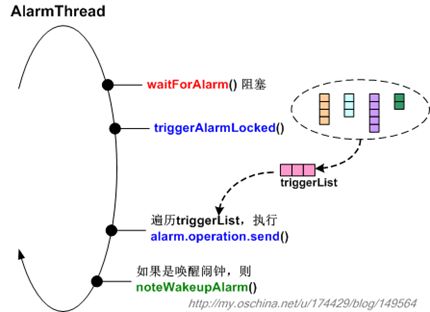
其最核心的run()函数的主要动作流程图如下:
我们分别来阐述上图中的关键步骤。
3.3.1.2 waitForAlarm()
首先,从上文的流程图中可以看到,AlarmThread线程是在一个while(true)循环里不断调用waitForAlarm()函数来等待底层alarm激发动作的。waitForAlarm()是一个native函数:
private native int waitForAlarm(int fd);
其对应的C++层函数是android_server_AlarmManagerService_waitForAlarm():
【com_android_server_AlarmManagerService.cpp】
static jint android_server_AlarmManagerService_waitForAlarm(JNIEnv* env, jobject obj, jint fd)
{
    int result = 0;

    do
    {
        result = ioctl(fd, ANDROID_ALARM_WAIT);
    } while (result < 0 && errno == EINTR);

    if (result < 0)
    {
        ALOGE("Unable to wait on alarm: %s\n", strerror(errno));
        return 0;
    }

    return result;
}
3.3.1.3 triggerAlarmsLocked()
一旦等到底层驱动的激发动作,AlarmThread会开始遍历相应的逻辑闹钟列表:
ArrayList<Alarm> triggerList = new ArrayList<Alarm>();
. . . . . .
final long nowRTC = System.currentTimeMillis();
final long nowELAPSED = SystemClock.elapsedRealtime();
. . . . . .
if ((result & RTC_WAKEUP_MASK) != 0)
    triggerAlarmsLocked(mRtcWakeupAlarms, triggerList, nowRTC);
if ((result & RTC_MASK) != 0)
    triggerAlarmsLocked(mRtcAlarms, triggerList, nowRTC);
if ((result & ELAPSED_REALTIME_WAKEUP_MASK) != 0)
    triggerAlarmsLocked(mElapsedRealtimeWakeupAlarms, triggerList, nowELAPSED);
if ((result & ELAPSED_REALTIME_MASK) != 0)
    triggerAlarmsLocked(mElapsedRealtimeAlarms, triggerList, nowELAPSED);
triggerAlarmsLocked函数主要将要发送的alarm降入triggerlist中
    private void triggerAlarmsLocked(ArrayList<Alarm> triggerList, long nowELAPSED, long nowRTC) {
        // batches are temporally sorted, so we need only pull from the
        // start of the list until we either empty it or hit a batch
        // that is not yet deliverable
        while (mAlarmBatches.size() > 0) {
            //获取第一个batch
            Batch batch = mAlarmBatches.get(0);
            if (batch.start > nowELAPSED) {
                // Everything else is scheduled for the future
                break;
            }

            // We will (re)schedule some alarms now; don't let that interfere
            // with delivery of this current batch
            //将第一个batch去除
            mAlarmBatches.remove(0);

            final int N = batch.size();
            for (int i = 0; i < N; i++) {
                Alarm alarm = batch.get(i);
                alarm.count = 1;
                //遍历加入triggerList
                triggerList.add(alarm);

                // Recurring alarms may have passed several alarm intervals while the
                // phone was asleep or off, so pass a trigger count when sending them.
                //如果有重复类型的,计算时间重新设置
                if (alarm.repeatInterval > 0) {
                    // this adjustment will be zero if we're late by
                    // less than one full repeat interval
                    alarm.count += (nowELAPSED - alarm.whenElapsed) / alarm.repeatInterval;

                    // Also schedule its next recurrence
                    final long delta = alarm.count * alarm.repeatInterval;
                    final long nextElapsed = alarm.whenElapsed + delta;
                    setImplLocked(alarm.type, alarm.when + delta, nextElapsed, alarm.windowLength,
                            maxTriggerTime(nowELAPSED, nextElapsed, alarm.repeatInterval),
                            alarm.repeatInterval, alarm.operation, batch.standalone, true,
                            alarm.workSource);
                }

            }
        }
    }
接下来,只需遍历一遍triggerList就可以了:
Iterator<Alarm> it = triggerList.iterator();
while (it.hasNext())
{
    Alarm alarm = it.next();
    . . . . . .
    alarm.operation.send(mContext, 0,
                         mBackgroundIntent.putExtra(Intent.EXTRA_ALARM_COUNT, alarm.count),
                         mResultReceiver, mHandler);

    // we have an active broadcast so stay awake.
    if (mBroadcastRefCount == 0) {
        setWakelockWorkSource(alarm.operation);
        mWakeLock.acquire();
    }
    mInFlight.add(alarm.operation);
    mBroadcastRefCount++;
    mTriggeredUids.add(new Integer(alarm.uid));
    BroadcastStats bs = getStatsLocked(alarm.operation);
    if (bs.nesting == 0) {
        bs.startTime = nowELAPSED;
    } else {
        bs.nesting++;
    }
    if (alarm.type == AlarmManager.ELAPSED_REALTIME_WAKEUP
        || alarm.type == AlarmManager.RTC_WAKEUP) {
        bs.numWakeup++;
        ActivityManagerNative.noteWakeupAlarm(alarm.operation);
    }
}
PendingIntent的send()函数代码是:
public void send(Context context, int code, Intent intent,
                    OnFinished onFinished, Handler handler) throws CanceledException
{
    send(context, code, intent, onFinished, handler, null);
}
调用了下面的send()函数:
public void send(Context context, int code, Intent intent,
                 OnFinished onFinished, Handler handler, String requiredPermission)
                 throws CanceledException
{
    try
    {
        String resolvedType = intent != null
                              ? intent.resolveTypeIfNeeded(context.getContentResolver())
                              : null;
        int res = mTarget.send(code, intent, resolvedType,
                               onFinished != null
                               ? new FinishedDispatcher(this, onFinished, handler)
                               : null,
                               requiredPermission);
        if (res < 0)
        {
            throw new CanceledException();
        }
    }
    catch (RemoteException e)
    {
        throw new CanceledException(e);
    }
}
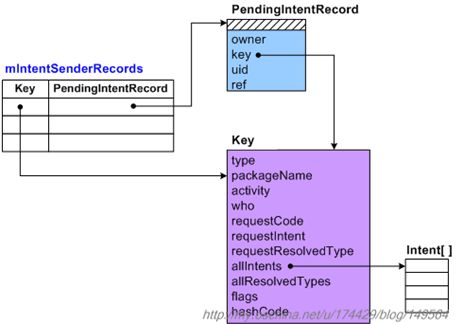
mTarget是个IPendingIntent代理接口,它对应AMS(Activity Manager Service)中的某个PendingIntentRecord实体。需要说明的是,PendingIntent的重要信息都是在AMS的PendingIntentRecord以及PendingIntentRecord.Key对象中管理的。AMS中有一张哈希表专门用于记录所有可用的PendingIntentRecord对象。
相较起来,在创建PendingIntent对象时传入的intent数组,其重要性并不太明显。这种intent数组主要用于一次性启动多个activity,如果你只是希望启动一个activity或一个service,那么这个intent的内容有可能在最终执行PendingIntent的send()动作时,被新传入的intent内容替换掉。
AMS中关于PendingIntentRecord哈希表的示意图如下:
AMS是整个Android平台中最复杂的一个核心service了,所以我们不在这里做过多的阐述,有兴趣的读者可以参考其他相关文档。
3.3.1.4 进一步处理“唤醒闹钟”
在AlarmThread.run()函数中while循环的最后,会进一步判断,当前激发的alarm是不是“唤醒闹钟”。如果闹钟类型为RTC_WAKEUP或ELAPSED_REALTIME_WAKEUP,那它就属于“唤醒闹钟”,此时需要通知一下AMS:
if (alarm.type == AlarmManager.ELAPSED_REALTIME_WAKEUP
    || alarm.type == AlarmManager.RTC_WAKEUP)
{
    bs.numWakeup++;
    ActivityManagerNative.noteWakeupAlarm(alarm.operation);
}
这两种alarm就是我们常说的0型和2型闹钟,它们和我们手机的续航时间息息相关。
AMS里的noteWakeupAlarm()比较简单,只是在调用BatteryStatsService服务的相关动作,但是却会导致机器的唤醒:
public void noteWakeupAlarm(IIntentSender sender)
{
    if (!(sender instanceof PendingIntentRecord))
    {
        return;
    }

    BatteryStatsImpl stats = mBatteryStatsService.getActiveStatistics();
    synchronized (stats)
    {
        if (mBatteryStatsService.isOnBattery())
        {
            mBatteryStatsService.enforceCallingPermission();
            PendingIntentRecord rec = (PendingIntentRecord)sender;
            int MY_UID = Binder.getCallingUid();
            int uid = rec.uid == MY_UID ? Process.SYSTEM_UID : rec.uid;
            BatteryStatsImpl.Uid.Pkg pkg = stats.getPackageStatsLocked(uid, rec.key.packageName);
            pkg.incWakeupsLocked();
        }
    }
}
好了,说了这么多,我们还是画一张AlarmThread示意图作为总结:
3.3.2 说说AlarmManagerService中的mBroadcastRefCount
下面我们说说AlarmManagerService中的mBroadcastRefCount,之所以要说它,仅仅是因为我在修改AlarmManagerService代码的时候,吃过它的亏。
我们先回顾一下处理triggerList列表的代码,如下:
Iterator<Alarm> it = triggerList.iterator();
while (it.hasNext())
{
    Alarm alarm = it.next();
    . . . . . .
    alarm.operation.send(mContext, 0,
                         mBackgroundIntent.putExtra(Intent.EXTRA_ALARM_COUNT, alarm.count),
                         mResultReceiver, mHandler);

    // we have an active broadcast so stay awake.
    if (mBroadcastRefCount == 0) {
        setWakelockWorkSource(alarm.operation);
        mWakeLock.acquire();
    }
    mInFlight.add(alarm.operation);
    mBroadcastRefCount++;
    . . . . . .
    . . . . . .
}
可以看到,在AlarmThread.run()中,只要triggerList中含有可激发的alarm,mBroadcastRefCount就会执行加一操作。一开始mBroadcastRefCount的值为0,所以会进入上面那句if语句,进而调用mWakeLock.acquire()。
后来我才知道,这个mBroadcastRefCount变量,是决定何时释放mWakeLock的计数器。AlarmThread的意思很明确,只要还有处于激发状态的逻辑闹钟,机器就不能完全睡眠。那么释放这个mWakeLock的地方又在哪里呢?答案就在alarm.operation.send()一句的mResultReceiver参数中。
mResultReceiver是AlarmManagerService的私有成员变量:
private final ResultReceiver mResultReceiver = newResultReceiver();
类型为ResultReceiver,这个类实现了PendingIntent.OnFinished接口:
class ResultReceiver implements PendingIntent.OnFinished
当send()动作完成后,框架会间接回调这个对象的onSendFinished()成员函数。
public void onSendFinished(PendingIntent pi, Intent intent, int resultCode,
                                String resultData, Bundle resultExtras)
{
    . . . . . .
    . . . . . .
    if (mBlockedUids.contains(new Integer(uid)))
    {
        mBlockedUids.remove(new Integer(uid));
    }
    else
    {
        if (mBroadcastRefCount > 0)
        {
            mInFlight.removeFirst();
            mBroadcastRefCount--;

            if (mBroadcastRefCount == 0)
            {
                mWakeLock.release();
            }
            . . . . . .
        }
        . . . . . .
    }
    . . . . . .
}
我一开始没有足够重视这个mBroadcastRefCount,所以把alarm.operation.send()语句包在了一条if语句中,也就是说在某种情况下,程序会跳过alarm.operation.send()一句,直接执行下面的语句。然而此时的mBroadcastRefCount还在坚定不移地加一,这直接导致mBroadcastRefCount再也减不到0了,于是mWakeLock也永远不会释放了。令人头痛的是,这个mWakeLock虽然不让手机深睡眠下去,却也不会点亮屏幕,所以这个bug潜藏了好久才被找到。还真是应了我说的那句话:“魔鬼总藏在细节中。”
也许一些使用alarmmanager做定时任务的同学遇到过这样的问题:设定alarm后,进入设置-->应用程序管理-->强行停止app后,定时任务就失效了。
简单的讲就是:force stop会导致alarm失效。
最典型的例子就是我碰到过的一个bug,使用android手机的时钟app设置一个闹钟,然后进入设置-->应用程序管理里面,将时钟这个app force stop掉,结果闹钟就不响了。
其实这不是bug,这是android系统的新加入的机制。下面我来详细分析一下来龙去脉。
1. 在设置的应用程序管理里面强行停止app:
这里会最终会调用到 ActivityManagerService的forceStopPackageLocked()
private void forceStopPackageLocked(final String packageName, int uid) {
        forceStopPackageLocked(packageName, uid, false, false, true, false);
        Intent intent = new Intent(Intent.ACTION_PACKAGE_RESTARTED,
                Uri.fromParts("package", packageName, null));
        if (!mProcessesReady) {
            intent.addFlags(Intent.FLAG_RECEIVER_REGISTERED_ONLY);
        }
        intent.putExtra(Intent.EXTRA_UID, uid);
        broadcastIntentLocked(null, null, intent,
                null, null, 0, null, null, null,
                false, false, MY_PID, Process.SYSTEM_UID);
    }
代码里面发送了一个广播:ACTION_PACKAGE_RESTARTED,这个广播大有文章。
最后来看UninstallReceiver,当AlarmManagerService接受到这个广播后,会把其那些alarm的包名传过来的给删除了。
class UninstallReceiver extends BroadcastReceiver {
        public UninstallReceiver() {
            IntentFilter filter = new IntentFilter();
            filter.addAction(Intent.ACTION_PACKAGE_REMOVED);
            filter.addAction(Intent.ACTION_PACKAGE_RESTARTED);
            filter.addAction(Intent.ACTION_QUERY_PACKAGE_RESTART);
            filter.addDataScheme("package");
            mContext.registerReceiver(this, filter);
             // Register for events related to sdcard installation.
            IntentFilter sdFilter = new IntentFilter();
            sdFilter.addAction(Intent.ACTION_EXTERNAL_APPLICATIONS_UNAVAILABLE);
            sdFilter.addAction(Intent.ACTION_USER_STOPPED);
            mContext.registerReceiver(this, sdFilter);
        }

        @Override
        public void onReceive(Context context, Intent intent) {
            synchronized (mLock) {
                String action = intent.getAction();
                String pkgList[] = null;
                if (Intent.ACTION_QUERY_PACKAGE_RESTART.equals(action)) {
                    pkgList = intent.getStringArrayExtra(Intent.EXTRA_PACKAGES);
                    for (String packageName : pkgList) {
                        if (lookForPackageLocked(packageName)) {
                            setResultCode(Activity.RESULT_OK);
                            return;
                        }
                    }
                    return;
                } else if (Intent.ACTION_EXTERNAL_APPLICATIONS_UNAVAILABLE.equals(action)) {
                    pkgList = intent.getStringArrayExtra(Intent.EXTRA_CHANGED_PACKAGE_LIST);
                } else if (Intent.ACTION_USER_STOPPED.equals(action)) {
                    int userHandle = intent.getIntExtra(Intent.EXTRA_USER_HANDLE, -1);
                    if (userHandle >= 0) {
                        removeUserLocked(userHandle);
                    }
                } else {
                    if (Intent.ACTION_PACKAGE_REMOVED.equals(action)
                            && intent.getBooleanExtra(Intent.EXTRA_REPLACING, false)) {
                        // This package is being updated; don't kill its alarms.
                        return;
                    }
                    Uri data = intent.getData();
                    if (data != null) {
                        String pkg = data.getSchemeSpecificPart();
                        if (pkg != null) {
                            pkgList = new String[]{pkg};
                        }
                    }
                }
                if (pkgList != null && (pkgList.length > 0)) {
                    for (String pkg : pkgList) {
                        //将这个pkg的alarm从AlarmManagerService中去除
                        removeLocked(pkg);
                        mBroadcastStats.remove(pkg);
                    }
                }
            }
        }
    }
为什么google要加入这样的机制呢?
应该是出于系统安全的考虑,google在4.0系统中在安全方面做了很多努力。
很多病毒程序都不希望自己的进程被用户强行停止,希望自己的病毒程序可以一直运行,而常见的方式就是通过设置alarm,在病毒进程被杀死后,通过定时发送广播来拉起病毒进程,来实现病毒进程的重新启动。
google也正是看到了这个一点,所以加入了forceStopPackage的这一机制,让用户能够有机会干掉病毒进程。
android系统的安全性一直是android系统的短板,google在提升系统安全性方面也在不断努力,在之后的文章中,我会再进行介绍。

