Manage and Create Invoices
Click ‘Navigator’ button, and select ‘Invoices’ under ‘Payables’, we can create and manage invoices.
Before we create a new invoice, we need to know some related basic knowledge for invoice. Invoice Type: If we choose ‘Standard’,it means an invoice from supplier represents an amount get from goods or services rendered. If we choose ‘Prepayment’ means an advanced payment to a supplier. If we choose ‘Interest’, it means an invoice for interest on overdue invoices that is automatically generated.
Invoice Structure: A payable invoice consists of the following components, header, lines, distributions, installments. The invoice header has common information, such as invoice number and invoice date.Invoice lines record details of goods and services. Distributions have invoice accounting details and installments consist of payment due and discount information.
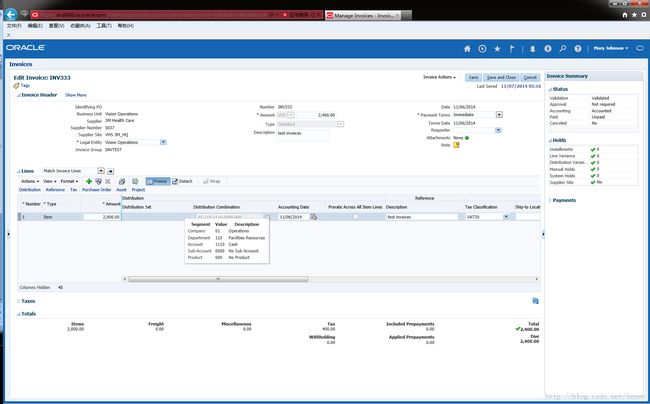
After you open ‘Invoice’ page, click ‘Create Invoice’ to create a new invoice. Ignore fields without symbol ‘*’. Select one of business unit and supplier. Find the supplier site which is suit to supplier.
We can define a new invoice group name for this invoice which you will create, after we created the invoice, this invoice group will be created automatically. Define a number for this invoice, the number has no limitation, we can fill like ‘INV333’. Choose payment currency and invoice type, the payment terms can be ‘immediate’.
We need to note during edit invoice header,the amount in the invoice header should be equal to or bigger than the sum of tax and amount of items. That means, the field of amount which we defined in invoice header is the total amount of this invoice. It includes tax and items amount. If this amount is smaller than the sum of tax and amount of items, it will show warning when you validate invoice: out of balance!
In ‘Lines’ table, we can click ‘add’ button to add details about goods or services from suppliers. We can click ‘Distribution ’to edit account number. When finished all lines, the tax in ‘Taxes’ table will be calculated automatically.
In ‘Totals’ table, it will shows amount details and total amount must be equal to or bigger than the sum of tax and items amount.
After you edit all information, click ‘Validate’ under ‘Invoice Actions’ to validate created invoice, if there is not any mistake during validation, this invoice will show validate successfully. Then we can click ‘Account and Post to Ledger’ under ‘Invoice Actions’ to post the invoice to ledgers.
Go back to Invoices page, click ‘Manage Invoice’ link to check the invoice which we just created. Input ‘Invoice Number’ and click ‘Search’ button. In ‘Search Results’ table, the invoice will be shown in the table. Right now we can seethe ‘Validation Status’ is validated. We click the number of this invoice to open it, and click ‘Edit’ under ‘Invoice Actions’ to edit this invoice information. We can see the Distribution Combination will be not edited anymore,because the invoice has been posted to ledger.
