Android 如何创建组合控件
开发中常常会碰到这种需求,图文混排的显示方式,实现方式很简单,比如在布局文件中添加 android:drawableXXX="" 属性(这里的XX代表上下左右4个方向), 也可以在代码中添加,txt.setCompoundDrawablesWithIntrinsicBounds 这样都可以为文本添加图片,但这种方法缺陷在于,不能控制图片大小,写出来的效果往往达不到要求。直接自定义view显得复杂了点,这里推荐一种非常简单,实用的方法,就是自己通过Android自己的控件,把TextView和ImageView整合到一起。
既然要自定义新控件自然要选择android的视图来重写,这里并不是去重写view,而是viewgroup。
实现方法
自定义的viewgroup可以继承Relativelayout,Linearlayout 这里选择的是去继承Relativelayout 因为相对布局有位置设置更加自由,方便。
public class TextImageView extends RelativeLayout{

    private TextView txt;
    private ImageView img;

    public TextImageView(Context context) {
        this(context,null);
    }

    public TextImageView(Context context, AttributeSet attrs) {
        super(context, attrs);
        txt = new TextView(context,attrs);
        img = new ImageView(context,attrs);
        //定义图片的大小为100dp
        int imgSize =(int)TypedValue.applyDimension(TypedValue.COMPLEX_UNIT_DIP,100,getResources().getDisplayMetrics());
        RelativeLayout.LayoutParams imgParams = new RelativeLayout.LayoutParams(imgSize,imgSize);
        RelativeLayout.LayoutParams txtParams = new RelativeLayout.LayoutParams(LayoutParams.WRAP_CONTENT,LayoutParams.WRAP_CONTENT);
        //设置上方边距让文字显示在图片的下方
        txtParams.topMargin = imgSize;
        this.addView(img,imgParams);
        this.addView(txt,txtParams);
   }
要实现RelativeLayout 起码需要实现的2个构造方法 public TextImageView(Context context) ,public TextImageView(Context context, AttributeSet attrs) ,其中只有context 上下文一个参数的方法用于在代码中new出视图,有2个参数的构造方法会去读取布局文件中的属性(这一点需要特别注意),来转化为视图,同时Xml中的属性会读取到AttributeSet attrs中。还需要注意这里在public TextImageView(Context context) ,构造方法中使用了 this()来调用实际干活的方法,这样可以确保能在xml布局文件中来实现自定义的控件。如果好奇的话可以将上面的this()改成 super() 试试看会发生什么。
位置的摆放使用了txtParams.topMargin,通过外边距来设定文本在图片的下方。
    <com.haibuzou.textimageview.TextImageView
        android:layout_width="wrap_content"
        android:layout_height="wrap_content"
        android:text = "guess who i am"
        android:textColor="#000000"
        android:textSize="15dp"
        android:src = "@mipmap/chaoxi"/>
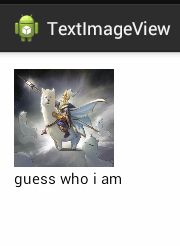
xml中的自定义控件中可以发现我们可以使用textview 和 imageview的传统属性 ,因为在上面的构造函数中 TextView txt = new TextView(context,attrs); 我们的控件是这样声明的,所以他自己会去用xml中的传统属性(也就是:android:text,android:src等等),来生成控件。这样就方便多了
这样一个简单的图文混排就出来了。不过即使是这样依然觉得需要自己写LayoutParams的属性还是太麻烦了,如果布局稍微复杂点还要写很多代码。ViewGroup本身就已经提供了onLayout()方法来设置控件的摆放位置,有现成的不用就太可惜了
    @Override
    protected void onLayout(boolean changed, int l, int t, int r, int b) {
        //获取图片view
        View imgView = getChildAt(0);
        //获取文字view
        View txtView = getChildAt(1);
        int imgheight = imgView.getMeasuredHeight();
        int imgWidth = imgView.getMeasuredWidth();
        int txtWidth = txtView.getMeasuredWidth();
        int txtHeight = txtView.getMeasuredHeight();
        //定义图片的位置
        imgView.layout(0, 0, imgWidth, imgheight);
        //定义文本的位置
        txtView.layout(0, imgheight,txtWidth, imgheight+txtHeight);
}其实onlayout的方法很好理解,就是画一个矩形,控件的位置就在这个矩形中,所以我们只需要定好矩形的对角线的2个点的坐标就可以了,同时为了实验效果去掉了txtParams.topMargin = imgSize; ,不去设定位置,接着运行一下
靠文字不见了,由于我们在xmllayout_width ,layout_height 设置的方案是wrap_content而自定义的viewgroup的测量默认只支持MeasureSpec.EXACTLY这个方案,初始化的时候我们的控件高度只有这个图片这么大,所以这里如果想让文本显示在图片下方的,文本会被画在控件之外,就无法显示了。这是控件测量的问题,只能重写一下onMeasure()方法来规定大小了
    @Override
    protected void onMeasure(int widthMeasureSpec, int heightMeasureSpec) {
        // 获取ViewGroup的推荐宽高和计算模式
        int widthMode = MeasureSpec.getMode(widthMeasureSpec);
        int width = MeasureSpec.getSize(widthMeasureSpec);
        int heightMode = MeasureSpec.getMode(heightMeasureSpec);
        int height = MeasureSpec.getSize(heightMeasureSpec);
        // 计算所有childview的宽高
        measureChildren(widthMeasureSpec, heightMeasureSpec);
        // 计算模式是wrap_content的时候的宽高
        int wrapWidth = 0;
        int wrapHeight = 0;
        int count = getChildCount();
        for (int i = 0; i < count; i++) {
            //获取每一个childview
            View childView = getChildAt(i);
            //获取宽高值
            int viewWidth = childView.getMeasuredWidth();
            int viewheight = childView.getMeasuredHeight();
            //单纯的对文本和字体的宽高进行相加操作
            wrapWidth += viewWidth;
            wrapHeight += viewheight;
        }

                //当模式是MeasureSpec.AT_MOST 也就是wrap_content的时候使用计算的累加的宽度或者高度值
        setMeasuredDimension(widthMode == MeasureSpec.AT_MOST ? wrapWidth
                : width, heightMode == MeasureSpec.AT_MOST ? wrapHeight
                : height);
测量的方法整体依然比较简单,主要为了让我们的自定义控件能够去支持wrap_content 所以在模式为wrap_content的时候把我们的图片和文本的高度加起来当做控件的高度,这样就可以显示出文本来了
最后
其实第一个构建方式已经可以满足需求,在xml传入属性,在构造函数中,设置位置。后面的onLayout,onMeasure,可以拿来熟悉一下Android的自定义ViewGroup的2个重要的方法。当然这个举例只是一个简单的例子,实际应用中还可以将所有属性写在xml配置中,然后直接使用LayoutInfalter.inflate出来 然后执行addview,这种方法留给大家自己试验。最后这个骑着羊驼的老头是谁


