iOS 数据持久化之CoreData(三)NSFetchedResultsController +Demo
原创Blog,转载请注明出处
blog.csdn.net/hello_hwc
欢饮关注我的iOS SDK详解专栏
http://blog.csdn.net/column/details/huangwenchen-ios-sdk.html
前言
NSFetchedResultsController提供了CoreData与TableView的纽带。通常使用它查询的结果作为tableview的主列表。它查询的结果是基于indexPath的,也就是说定义好了Section和row。直接使用即可。
同样,使用NSFetchController也能够方便的进行
- 监听ManagedContext中对象的变化,把变化会报给代理
- 可以使用cache来提高效率
基于这两点,一个controller通常有三种使用NSFetchedResultsController的模式
- 不跟踪context-代理为nil
fetched results controller不会进行对象变化的跟踪 - 仅在内存中跟踪context-代理不为nil,cacheName为nil
- 完整的跟踪context-代理不是nil,有cacheName
Demo
注:本文不会详细讲述demo的代码,因为写了这么多发现大篇幅的讲解如何实现一个工程的博客,结果貌似没什么人看。
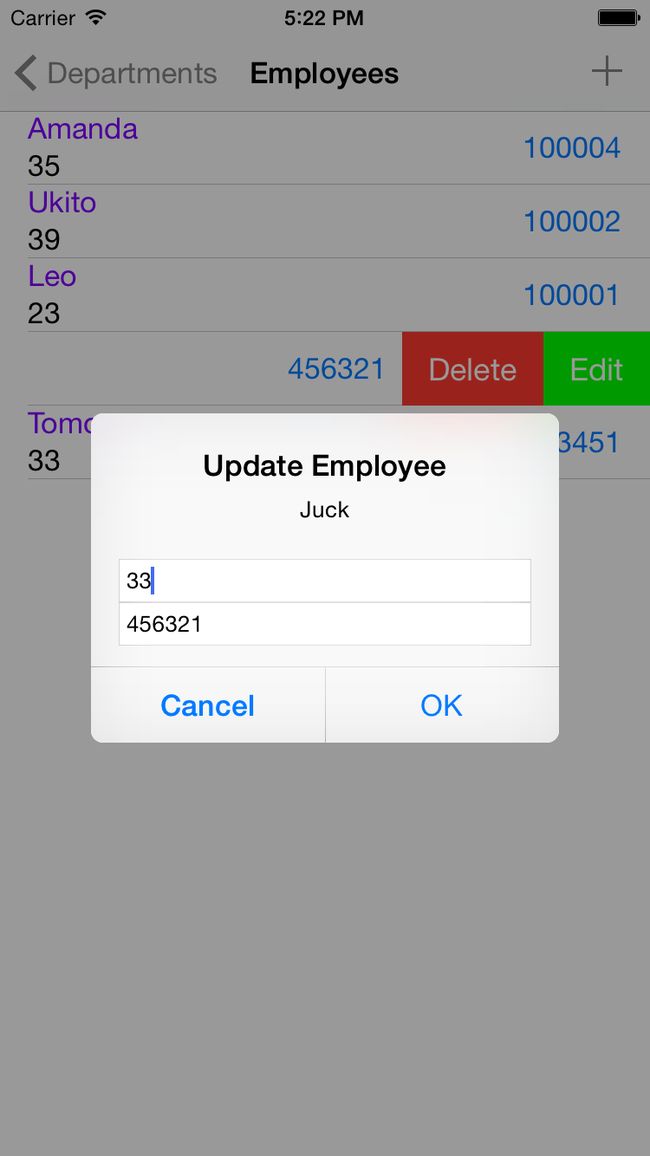
一个很简单的小软件,能够对公司部门进行管理,点开每个部门能看到对应员工的信息。
下载链接
http://download.csdn.net/detail/hello_hwc/8723837


对象图
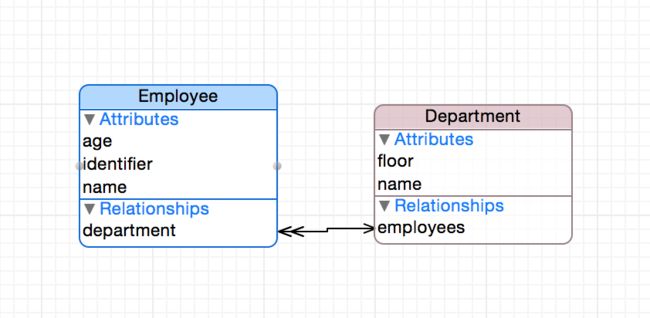
- Department表示部门,具有属性名称和楼层
- Employee表示员工,具有属性名称,年龄和工号。
- 一个Employee隶属与一个部门,一个部门可以包括多个员工。
如何使用NSFetchedResultsController
创建
Demo中使用的代码
-(NSFetchedResultsController *)fetchedResultsController{
    if (!_fetchedResultsController) {
        NSFetchRequest *fetchRequest = [[NSFetchRequest alloc] init];
        NSEntityDescription *entity = [NSEntityDescription entityForName:[Department entityName] inManagedObjectContext:[self managedcontext]];
        [fetchRequest setEntity:entity];
        // Specify how the fetched objects should be sorted
        NSSortDescriptor *sortDescriptor = [[NSSortDescriptor alloc] initWithKey:@"name"
                                                                       ascending:YES];
        NSSortDescriptor * sortDescriptor2 = [[NSSortDescriptor alloc] initWithKey:@"floor"
                                                                         ascending:YES];
        [fetchRequest setSortDescriptors:[NSArray arrayWithObjects:sortDescriptor,sortDescriptor2, nil]];
        _fetchedResultsController = [[NSFetchedResultsController alloc] initWithFetchRequest:fetchRequest
                                                                        managedObjectContext:[self managedcontext]
                                                                          sectionNameKeyPath:@"name" cacheName:@"DemoCache"];
    }
    return _fetchedResultsController;
}
所以,创建的时候需要指定
- 一个fetch request:这个Fetch Request指定了要查询什么样的数据,查询后的数据如何排序
- managed object context:用这个context来执行查询和监听变化
- section name:指定了查询的结果里,对应tableview的Section(可选)
- cache name:指定cache文件的名称,在大量查询的时候效果明显(可选)
tableview 的数据源
这也是一些通用的代码,可以在Demo工程的FetchTableHelper找到对应的代码,为了降低viewController的负担,我把数据源的代码封装到了这里。
- (NSInteger)numberOfSectionsInTableView:(UITableView *)tableView {
    return [[self.fetchresultcontroller sections] count];
}

- (NSInteger)tableView:(UITableView *)table numberOfRowsInSection:(NSInteger)section {
    if ([[self.fetchresultcontroller sections] count] > 0) {
        id <NSFetchedResultsSectionInfo> sectionInfo = [[self.fetchresultcontroller sections] objectAtIndex:section];
        return [sectionInfo numberOfObjects];
    } else
        return 0;
}

- (UITableViewCell *)tableView:(UITableView *)tableView cellForRowAtIndexPath:(NSIndexPath *)indexPath {

    NSManagedObject *managedObject = [self.fetchresultcontroller objectAtIndexPath:indexPath];
    UITableViewCell * cell = self.configure(tableView,indexPath,managedObject);
    // Configure the cell with data from the managed object.
    return cell;
}

- (NSString *)tableView:(UITableView *)tableView titleForHeaderInSection:(NSInteger)section {
    if ([[self.fetchresultcontroller sections] count] > 0) {
        id <NSFetchedResultsSectionInfo> sectionInfo = [[self.fetchresultcontroller sections] objectAtIndex:section];
        return [sectionInfo name];
    } else
        return nil;
}
-(BOOL)tableView:(UITableView *)tableView canEditRowAtIndexPath:(NSIndexPath *)indexPath{
    return YES;
}
- (BOOL)tableView:(UITableView *)tableView canMoveRowAtIndexPath:(NSIndexPath *)indexPath {
    return NO;
}
-(void)tableView:(UITableView *)tableView commitEditingStyle:(UITableViewCellEditingStyle)editingStyle forRowAtIndexPath:(NSIndexPath *)indexPath{

}
代理
代理提供了方法来监听 fetch results的变化,包括添加,删除,更新等。
- controllerWillChangeContent://将要改变 - controller:didChangeObject:atIndexPath:forChangeType:newIndexPath://改变了indexPath - controller:didChangeSection:atIndex:forChangeType://改变了Section - controllerDidChangeContent://内容改变了 - controller:sectionIndexTitleForSectionName://管理section name对应的Index关于代理有一点小trick
在有大量数据变化的时候(例如后台取大量数据),不要实现动画,直接实现controllerDidChangeContent来批量处理。
关于代理,很多方法是通用的,所以Demo里我把代理封装到一个单独的类中,对应代码
- (void)controllerWillChangeContent:(NSFetchedResultsController *)controller {

    // The fetch controller is about to start sending change notifications, so prepare the table view for updates.
    [self.tableView beginUpdates];
}

- (void)controller:(NSFetchedResultsController *)controller didChangeObject:(id)anObject atIndexPath:(NSIndexPath *)indexPath forChangeType:(NSFetchedResultsChangeType)type newIndexPath:(NSIndexPath *)newIndexPath {

    UITableView *tableView = self.tableView;

    switch(type) {

        case NSFetchedResultsChangeInsert:
            [tableView insertRowsAtIndexPaths:@[newIndexPath] withRowAnimation:UITableViewRowAnimationAutomatic];
            break;

        case NSFetchedResultsChangeDelete:
            [tableView deleteRowsAtIndexPaths:@[indexPath] withRowAnimation:UITableViewRowAnimationAutomatic];
            break;

        case NSFetchedResultsChangeUpdate:
            [tableView reloadRowsAtIndexPaths:@[indexPath] withRowAnimation:UITableViewAutomaticDimension];
            break;

        case NSFetchedResultsChangeMove:
            [tableView deleteRowsAtIndexPaths:@[indexPath] withRowAnimation:UITableViewRowAnimationAutomatic];
            [tableView insertRowsAtIndexPaths:@[newIndexPath] withRowAnimation:UITableViewRowAnimationAutomatic];
            break;
    }
}

- (void)controller:(NSFetchedResultsController *)controller didChangeSection:(id <NSFetchedResultsSectionInfo>)sectionInfo atIndex:(NSUInteger)sectionIndex forChangeType:(NSFetchedResultsChangeType)type
{
    switch(type) {

        case NSFetchedResultsChangeInsert:
            [self.tableView insertSections:[NSIndexSet indexSetWithIndex:sectionIndex] withRowAnimation:UITableViewRowAnimationAutomatic];
            break;
        case NSFetchedResultsChangeMove:
            break;
        case NSFetchedResultsChangeUpdate:
            break;
        case NSFetchedResultsChangeDelete:
            [self.tableView deleteSections:[NSIndexSet indexSetWithIndex:sectionIndex] withRowAnimation:UITableViewRowAnimationAutomatic];
            break;
    }
}

- (void)controllerDidChangeContent:(NSFetchedResultsController *)controller {

    // The fetch controller has sent all current change notifications, so tell the table view to process all updates.
    [self.tableView endUpdates];
}
Cache
Cache是和对应的viewController相关的,在使用cache的时候viewController会先寻找对应的cache文件
- 如果没找到cache文件,则取出相应的数据,写到磁盘上
- 如果找到了cache文件,则判断cache文件是否过期,如果过期,则写入新的有效信息;如果没过期,则使用这个cache文件
修改Fetch Requst
不能够直接修改fetch request来让查询有着不同的结果,要遵循以下几步
- 如果使用cache,先删除cache(
deleteCacheWithName:),注意,如果要修改fetch request的时候,正常情况下不应该使用cache。 - 修改fetch request
- 执行
performFetch:来修改fetched results
Demo的几个文件讲解
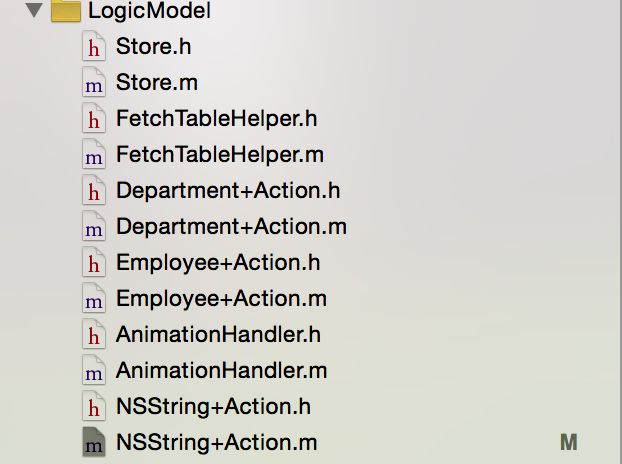
- Store 负责创建managedContext
- FetchTableHelper 封装了tableview datasource以及NSFetchedResultsControllerDelegate
- 名称+Action对应的辅助方法
- Animation Handler 负责一些动画