Android中利用ant进行多渠道循环批量打包(二)
三.下面我来说下build.xml的编写方法:
1.修改build.xml的第二行,修改方法如下:
<project name="HelloWorld" default="release">
其中name为你项目的名称,default设置为release。
2.循环替换AndroidManifest.xml中qudao的value值并进行自动签名打包,方法如下:
<import file="${sdk.dir}/tools/ant/build.xml" />
    <property name="out.unaligned.dir" value="/Users/moushou/Desktop/HelloWorld_${app_version}/" />
    <mkdir dir="${out.unaligned.dir}" />
    <target name="modify_update_file">
        <echo>*********************** make channel ${channel}</echo>

        <replaceregexp file="AndroidManifest.xml"
            match='channel'
            replace='${channel}'
            byline="false"
            encoding="utf-8"
        />
        <property name="out.unaligned.file" location="${out.unaligned.dir}/HelloWorld_${app_version}_${channel}_android.apk"/>

    </target>

    <target name="make_one_channels" depends="savemanifest,modify_update_file,release,replacemanifest,deletebin" description="description">
    </target>

    <target name="replacemanifest">
        <echo>*********************** replacemanifest</echo>
        <delete file="${basedir}\AndroidManifest.xml"/>
        <copy file="..\temp\build\META-INF\AndroidManifest.xml" todir="${basedir}" encoding="utf-8"/>
    </target>

    <target name="savemanifest">
        <echo>*********************** savemanifest</echo>
        <copy file="${basedir}\AndroidManifest.xml" todir="..\temp\build\META-INF" encoding="utf-8" />
    </target>

    <target name="deletebin">
        <delete dir="${basedir}\bin" />
    </target>

    <taskdef name="foreach" classname="net.sf.antcontrib.logic.ForEach" classpath="/Users/moushou/Downloads/AndroidSDK/tools/lib/ant-contrib-1.0b3.jar" />
    <target name="make_channels">
        <foreach target="make_one_channels" list="${market_channels}" delimiter="," param="channel">
        </foreach>
    </target>
其中:
1.out.unaligned.dir的value值为apk输出文件夹的绝对路径,文件夹采用HelloWorld结合app_version命名,app_version为ant.properties中的app_version
2.out.unaligned.file的location为apk最终的输出路径,apk命名采用HelloWorld加app_version加当前的channel加android方式
3.说一下打包的过程:
(1)第36行make_channels的target是ant的入口,该target中使用foreach循环调用名为make_one_channels的target(第17行)并把market_channels集合中的每个值替换给channel
(2)make_one_channels的target指定了每次打包的过程:
savemanifest:打包前先将原始的AndroidManifest.xml复制到与项目同一层级目录下的temp下build下META-INF中
modify_update_file:匹配到AndroidManifest.xml中的channel并将其替换
release:自动编译加签名
replacemanifest:删除AndroidManifest.xml,将temp/build/META-INF中的原始AndroidManifest.xml复制回项目根目录下
deletebin:删除bin文件(注:这步很重要,否则只能打出一个渠道的APK,当时做这块的时候碰到的问题)
4.第35行taskdef标签下的classpath是ant-contrib-1.0b3.jar的绝对路径
四.打包方法的使用
打开终端(cmd),执行:
cd /Users/moushou/Documents/workspace/HelloWorld
然后执行:
ant make_channels
此时,打包就开始进行啦!当出现BUILD SUCCESSFUL代表打包成功!如下图所示:
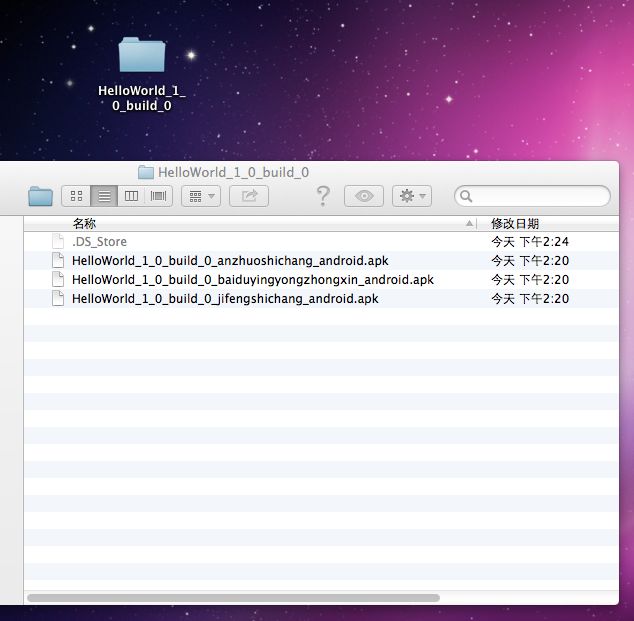
此时你会发现你输出的文件夹中多了三个APK,如下图:
注:1.每次打包前一定要删除掉temp/build/META-INF中的AndroidManifest.xml,特别是在给不同项目做打包时
2.打包前请检查AndroidManifest.xml中qudao的value值是否为channel,特别是打包失败后再次重新打包的时候一定要将value值改为channel
3.如果打包时出现Cannot recover key错误导致BUILD FAILD的话,请检查ant.properties中key.alias.password的值后面是否有多余的空格!有的话请把空格删除掉!
五.在代码中获取渠道值,方法如下:
	public static String getAppChannel(Context context) {
		String channel = "dudao";
		try {
			ApplicationInfo appInfo = context.getPackageManager()
					.getApplicationInfo(context.getPackageName(),
							PackageManager.GET_META_DATA);
			channel = appInfo.metaData.getString("dudao");
		} catch (NameNotFoundException e) {
			e.printStackTrace();
		}
		return channel;
	}

