Mybatis最入门---ResultMaps实例篇(一对一查询)
[一步是咫尺,一步即天涯]
前面我们花了两篇文章的篇幅叙述了Mybatis中最核心的resultMap配置,本文开始,我们来演示在实际开发中,如何配置和使用resultMap提供给我们强大功能。
准备工作:
a.操作系统 :win7 x64
b.基本软件:MySQL,Mybatis,Spring,SQLyog,Tomcat,web基础
特别的,作为演示程序,还请各位看官不要纠结数据库的细节内容
-----------------------------------------------------------------------------------------------------------------------------------------------------------1.首先,我们现在数据库中建立一张用户信息表。【之前我们已经有一张sysuser表】,如下:
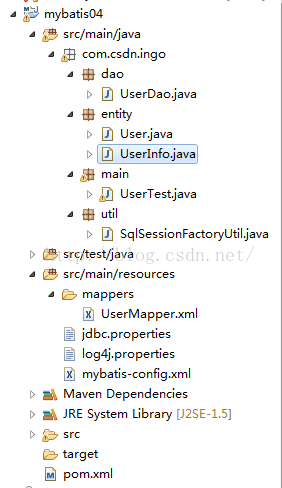
2.创建Mybatis04工程,工程结构图,如下:
3.修改pom文件,如下:(各位看官可以直接从前面工程复制过来即可)
<project xmlns="http://maven.apache.org/POM/4.0.0" xmlns:xsi="http://www.w3.org/2001/XMLSchema-instance"
	xsi:schemaLocation="http://maven.apache.org/POM/4.0.0 http://maven.apache.org/xsd/maven-4.0.0.xsd">
	<modelVersion>4.0.0</modelVersion>

	<groupId>com.java.mybatis</groupId>
	<artifactId>mybatis04</artifactId>
	<version>0.0.1-SNAPSHOT</version>
	<packaging>jar</packaging>

	<name>mybatis01</name>
	<url>http://maven.apache.org</url>

	<properties>
		<project.build.sourceEncoding>UTF-8</project.build.sourceEncoding>
	</properties>

	<dependencies>
		<dependency>
			<groupId>junit</groupId>
			<artifactId>junit</artifactId>
			<version>4.12</version>
			<scope>test</scope>
		</dependency>
		<dependency>
			<groupId>org.mybatis</groupId>
			<artifactId>mybatis</artifactId>
			<version>3.3.1</version>
		</dependency>
		<dependency>
			<groupId>mysql</groupId>
			<artifactId>mysql-connector-java</artifactId>
			<version>5.1.26</version>
		</dependency>
		<dependency>
			<groupId>log4j</groupId>
			<artifactId>log4j</artifactId>
			<version>1.2.17</version>
		</dependency>
	</dependencies>
</project>
4.修改User.java,具体内容如下:
package com.csdn.ingo.entity;

import java.io.Serializable;

/**
*@author 作者 E-mail:ingo
*@version 创建时间:2016年4月17日下午6:25:27
*类说明
*/
@SuppressWarnings("serial")
public class User implements Serializable{

	private String id;
	private String password;
	private UserInfo userInfo;

	public String getId() {
		return id;
	}
	public void setId(String id) {
		this.id = id;
	}
	public String getPassword() {
		return password;
	}
	public void setPassword(String password) {
		this.password = password;
	}
	public UserInfo getUserInfo() {
		return userInfo;
	}
	public void setUserInfo(UserInfo userInfo) {
		this.userInfo = userInfo;
	}
	public User() {
		super();
		// TODO Auto-generated constructor stub
	}
	public User(String id, String password, UserInfo userInfo) {
		super();
		this.id = id;
		this.password = password;
		this.userInfo = userInfo;
	}
	@Override
	public String toString() {
		return "User [id=" + id + ", password=" + password + ", userInfo=" + userInfo.toString() + "]";
	}
}
5.创建UserInfo.java,具体内容如下:
package com.csdn.ingo.entity;

import java.io.Serializable;

/**
*@author 作者 E-mail:ingo
*@version 创建时间:2016年4月20日下午7:19:18
*类说明
*/
@SuppressWarnings("serial")
public class UserInfo implements Serializable {

	private	String userid;
	private String department;
	private String position;
	private String mobile;
	private String gender;
	private String email;
	public String getUserid() {
		return userid;
	}
	public void setUserid(String userid) {
		this.userid = userid;
	}
	public String getDepartment() {
		return department;
	}
	public void setDepartment(String department) {
		this.department = department;
	}
	public String getPosition() {
		return position;
	}
	public void setPosition(String position) {
		this.position = position;
	}
	public String getMobile() {
		return mobile;
	}
	public void setMobile(String mobile) {
		this.mobile = mobile;
	}
	public String getGender() {
		return gender;
	}
	public void setGender(String gender) {
		this.gender = gender;
	}
	public String getEmail() {
		return email;
	}
	public void setEmail(String email) {
		this.email = email;
	}
	public UserInfo(String userid, String department, String position, String mobile, String gender, String email) {
		super();
		this.userid = userid;
		this.department = department;
		this.position = position;
		this.mobile = mobile;
		this.gender = gender;
		this.email = email;
	}
	public UserInfo() {
		super();
		// TODO Auto-generated constructor stub
	}
	@Override
	public String toString() {
		return "UserInfo [userid=" + userid + ", department=" + department + ", position=" + position + ", mobile="
				+ mobile + ", gender=" + gender + ", email=" + email + "]";
	}

}
6.修改UserDao.java,具体内容如下:
package com.csdn.ingo.dao;

import com.csdn.ingo.entity.User;

/**
*@author 作者 E-mail:ingo
*@version 创建时间:2016年4月17日下午6:26:40
*类说明
*/
public interface UserDao {
	User findUserInfoById(String id);
}
7.修改UserMapper.xml,具体内容如下;
<?xml version="1.0" encoding="UTF-8" ?>
<!DOCTYPE mapper
PUBLIC "-//mybatis.org//DTD Mapper 3.0//EN"
"http://mybatis.org/dtd/mybatis-3-mapper.dtd">
<mapper namespace="com.csdn.ingo.dao.UserDao">
	<resultMap type="User" id="UserResult">
		<id property="id" column="id"/>
		<result property="password" column="password"/>
		<result property="userInfo.userid" column="userid"/>
		<result property="userInfo.department" column="department"/>
		<result property="userInfo.position" column="position"/>
		<result property="userInfo.mobile" column="mobile"/>
		<result property="userInfo.gender" column="gender"/>
		<result property="userInfo.email" column="email"/>
	</resultMap>
	<select id="findUserInfoById" parameterType="String" resultMap="UserResult">
		select * from sysuser u,userinfo i where u.id=i.userid and u.id=#{id}
	</select>
</mapper>
8.我们这里再给出SqlSessionFactoryUtil.java的内容,如下:
package com.csdn.ingo.util;

import java.io.InputStream;

import org.apache.ibatis.io.Resources;
import org.apache.ibatis.session.SqlSession;
import org.apache.ibatis.session.SqlSessionFactory;
import org.apache.ibatis.session.SqlSessionFactoryBuilder;

public class SqlSessionFactoryUtil {

	private static SqlSessionFactory sqlSessionFactory;

	public static SqlSessionFactory getSqlSessionFactory(){
		if(sqlSessionFactory==null){
			InputStream inputStream=null;
			try{
				inputStream=Resources.getResourceAsStream("mybatis-config.xml");
				sqlSessionFactory=new SqlSessionFactoryBuilder().build(inputStream);
			}catch(Exception e){
				e.printStackTrace();
			}
		}
		return sqlSessionFactory;
	}

	public static SqlSession openSession(){
		return getSqlSessionFactory().openSession();
	}
}
9。修改单元测试方法,如下:
@Test
	public void testSelet() {
		UserDao userDao = sqlSession.getMapper(UserDao.class);
		String id = "admin";
		User curUser = userDao.findUserInfoById(id);
		if(curUser!=null){
			log.info("成功找到用户:"+curUser.toString());
		}
	}
10。鉴于篇幅的关系,其他文件请参考前文基本增改删查工程中的配置。
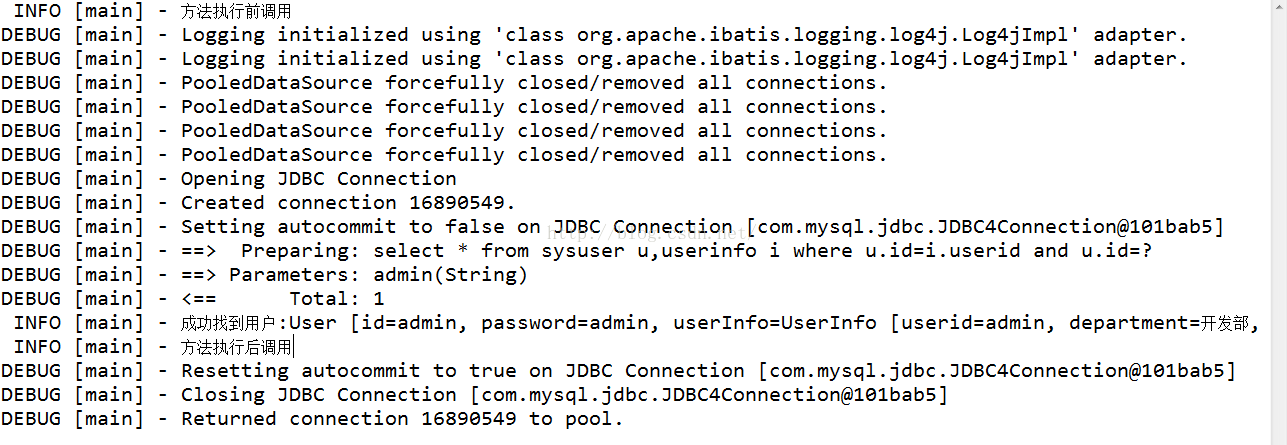
11.测试方法:运行单元测试方法即可。观察控制台输出,如下:
------------------------------------------------------------------------------------------------------------------------------------------------------
如果有阅读过前文的观众,一定知道这种写法是我们极为不推荐的做法。下面,介绍能够重用的写法:
------------------------------------------------------------------------------------------------------------------------------------------------------
1.为了使得集合能够重用,我们把userinfo的结果集合的写法,改造成如下内容:【其他内容保持不变】
<resultMap type="user" id="UserResult">
		<id property="id" column="id"/>
		<result property="password" column="password"/>
		<association property="userInfo" resultMap="UserInfoResult"></association>
	</resultMap>
	<resultMap type="userInfo" id="UserInfoResult">
		<id property="userid" column="userid"/>
		<result property="department" column="department"/>
		<result property="position" column="position"/>
		<result property="mobile" column="mobile"/>
		<result property="gender" column="gender"/>
		<result property="email" column="email"/>
	</resultMap>
2.注意这里的别名配置,如果各位看官没有配置别名的话,最好使用全路径对象名。防止找不到对象,即type属性中的值
3.重新运行单元测试方法即可。
------------------------------------------------------------------------------------------------------------------------------------------------------
假设UserInfo的结果集合只与User集合关联查询,下面的写法也是正确的,如下:
------------------------------------------------------------------------------------------------------------------------------------------------------
1.把结果集合的写法,改造成如下内容:【其他内容保持不变】
	<resultMap type="user" id="UserResult">
		<id property="id" column="id" />
		<result property="password" column="password" />
		<association property="userInfo" javaType="UserInfo">
			<id property="userid" column="userid" />
			<result property="department" column="department" />
			<result property="position" column="position" />
			<result property="mobile" column="mobile" />
			<result property="gender" column="gender" />
			<result property="email" column="email" />
		</association>
	</resultMap>
【特别注意,我们这里指定了<association>中的javaType属性,没有该属性,将会导致空指针异常】
-------------------------------------------------------------------------------------------------------------------------------------------------------
上面的这些做法都是,使用user的id属性来先查询user表,userinfo表。但是在实际开发中,我们经常是对每一个表都会创建对应的增改删查功能,并且也会配置其结果集合,即resultMap。所以,实际开发时,我们推荐下面的用法,仅供参考!
-------------------------------------------------------------------------------------------------------------------------------------------------------
1.我们增加对UserInfo查询的接口,UserInfoDao.java的具体内容如下:
public interface UserInfoDao {
	UserInfo findUserInfoById(String id);
}
2.创建UserInfoMapper.xml,具体内容如下:
<?xml version="1.0" encoding="UTF-8" ?>
<!DOCTYPE mapper
PUBLIC "-//mybatis.org//DTD Mapper 3.0//EN"
"http://mybatis.org/dtd/mybatis-3-mapper.dtd">
<mapper namespace="com.csdn.ingo.dao.UserInfoDao">
	<resultMap type="userInfo" id="UserInfoResult">
		<id property="userid" column="userid" />
		<result property="department" column="department" />
		<result property="position" column="position" />
		<result property="mobile" column="mobile" />
		<result property="gender" column="gender" />
		<result property="email" column="email" />
	</resultMap>
	<select id="findUserInfoById" parameterType="String" resultMap="UserInfoResult">
		select * from userinfo where userid=#{id}
	</select>
</mapper>
3.修改UserMapper.xml中的resultMap配置,具体内容如下:【其他内容不变】
<resultMap type="user" id="UserResult">
		<id property="id" column="id" />
		<result property="password" column="password" />
		<association property="userInfo" column="userid"
			select="com.csdn.ingo.dao.UserInfoDao.findUserInfoById"></association>
	</resultMap>
4.注意,这里请将UserInfoMapper.xml加入到mybatis-config.xml中的xml文件路径中,如下:
	<mappers>
		<mapper resource="mappers/UserMapper.xml" />
		<mapper resource="mappers/UserInfoMapper.xml" />
	</mappers>
或者采用包名配置即可
5.执行单元测试方法,观察控制台输出即可。
--------------------------------------------------------------------------------------------------------------------------------------------------------
至此,Mybatis最入门---ResultMaps实例篇(一对一查询)结束

