gradle整理汇总
本人用android studio也已经一年多了,现在回过头来总结总结Gradle的相关知识点,初学者可以看看!
1. gradle的基本配置
ApplicationId与PackageName的区别:
此前使用eclipse进行开发的时候,应用程序的包名是由manifest文件的package属性决定的:
<manifest xmlns:android="http://schemas.android.com/apk/res/android"
    package="com.xxx.xxxx"
    android:versionCode="1"
    android:versionName="1.0" >
然而在使用gradle构建的时候却多了一个applicationId:
defaultConfig {
        applicationId "com.xxx.xxxx"
        minSdkVersion 14
        targetSdkVersion 23
        versionCode 1
        versionName "1.0"
}
通常gradle中的applicationId和Manifest中的package是一样的。
官方解释说是:
applicationId是你的应用在商店的唯一标识;
package是引用资源的路径名,也就是R文件的包名。
我们也可以通过对不同的Flavor设置不同的applicationId,从而可以导出不同“包名”的apk,而不需要修改其他的代码。后面会仔细说明。
2. gradle的签名配置
关于签名的概念不懂得,可以参考这篇blog:Android从零单排之签名打包
我们通常运行项目都是使用debug的签名。不过有些使用到第三方sdk的时候,需要用到正式版的签名,通过打包正式签名的方式又不好调试。不过我们可以在gradle里面配置正式版的签名。
通常配置方法为:
android {
    signingConfigs {
        config_release {
            keyAlias 'releaseKey'
            keyPassword '123456'
            storePassword '123456'
            storeFile file('key/releaseKey.jks')
        }

        config_debug {
            keyAlias 'debugKey'
            keyPassword '123456'
            storePassword '123456'
            storeFile file('key/debugKey.jks')
        }
    }
    ......//省略其他配置
}
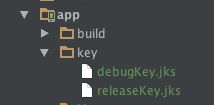
这里配置了两个签名。jsk都放在app下面的key文件夹中。所以使用的是相对路径。
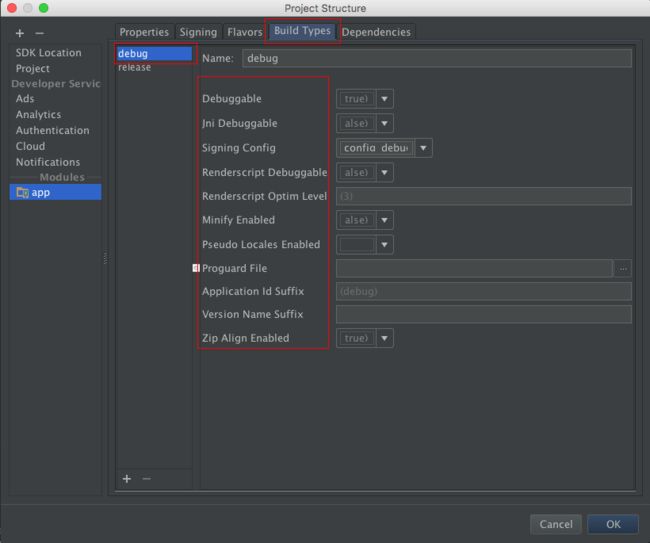
keyAlias 、keyPassword这些语法也可以在项目的【Project Structure】中找到,直接在这里设置也可以:
签名密码直接写在gradle中是不安全的,所以我们需要在 Gradle中隐藏Keystore密码
3. 配置buildTypes
一般在buildTypes{ }里面配置两个(release和debug):
buildTypes {
        release {
            signingConfig signingConfigs.config_release
            minifyEnabled false
            proguardFiles getDefaultProguardFile('proguard-android.txt'), 'proguard-rules.pro'
        }
        debug {
            signingConfig signingConfigs.config_debug
        }
}
这里可配置的信息很多,语法在项目的【Project Structure】中也能找到:
4. 配置productFlavor
多渠道打包,关键就在于定义多个productFlavor。
productFlavors { flavor_release { minSdkVersion 14 signingConfig signingConfigs.config_release targetSdkVersion 23 versionCode 2 versionName '2.0.1' applicationId 'com.huaihuai.android.release' }
        flavor_debug { minSdkVersion 10 signingConfig signingConfigs.config_debug versionCode 1 versionName '1.0.0' applicationId 'com.huaihuai.android.debug' }
}
最主要的是可以在这里配置applicationId,就是我们上面一开始说的打包多个不同“包名”的apk。
这样有一个应用场景就是,我们一般通过debug版本进行测试之后,在进行release版本的测试。不过同一个applicationId的apk在一个测试机上只能存在一个。现在我们通过配置多个flavor对应多个applicationId,就可以在测试机上运行测试版和正式版两个apk了。
productFlavors{ } 与 buildTypes{ }里面的配置是多对多的关系。
比如:
buildTypes {
    release {...}
    debug {...}
}
productFlavors {
    flavor_1 {...}
    flavor_2 {...}
}
此时的配置可以打包出四个apk,分别是:
我们在使用as的打包工具时,可以选择打包某一个Build type的某一个或多个Flavors:
如果在gradle里面配置了签名信息,那么在【Generate Signed APK】的第一步填写的签名信息是以在gradle里面配置并引用的为准。
我们还可以借助gradlew命令来打包:
比如打包flavor_1对应的release和debug版本:
![]()
实际上,我们不用再记住这些命令。AS里面的gradle插件就可以实现。
在AS的右侧会有【Gradle】tab页面。打开之后,先刷新一下。会看到如下图示:
通过双击右边的命令打包不同的版本。
5. manifest占位符
在打包多个版本的时候,会遇到修改应用名称等需求。不同的flavor有要求不通的名称。此时可以在Manifest文件中使用占位符,然后在build.gradle中替换占位符就行了。
首先定义占位符:
<application  android:allowBackup="true" android:icon="@mipmap/ic_launcher" android:label="${APP_NAME}" android:supportsRtl="true" android:theme="@style/AppTheme">
        <activity  android:name=".app.MainActivity" android:configChanges="orientation|keyboardHidden|screenSize" android:label="${APP_NAME}" android:screenOrientation="portrait">
            <intent-filter>
                <action android:name="android.intent.action.MAIN" />

                <category android:name="android.intent.category.LAUNCHER" />
            </intent-filter>
        </activity>
</application>
在build.gradle中替换:
buildTypes {
        release {
            signingConfig signingConfigs.config_release
            minifyEnabled false
            manifestPlaceholders = [APP_NAME: "@string/app_name1"]
            proguardFiles getDefaultProguardFile('proguard-android.txt'), 'proguard-rules.pro'
        }
        debug {
            signingConfig signingConfigs.config_debug
            manifestPlaceholders = [APP_NAME: "@string/app_name2"]
        }
}
productFlavors {
flavor_1 {
minSdkVersion 14
signingConfig signingConfigs.config_release
targetSdkVersion 23
versionCode 2
versionName '2.0.1'
applicationId 'com.huaihuai.android.release'
manifestPlaceholders = [APP_NAME: "@string/app_name1"]
}
flavor_2 {
minSdkVersion 10
signingConfig signingConfigs.config_debug
versionCode 1
versionName '1.0.0'
applicationId 'com.huaihuai.android.debug'
manifestPlaceholders = [APP_NAME: "@string/app_name2"]
}
}如果在productFlavors和buildTypes里面都进行了替换,那么是以productFlavors里面的为准。
如果不区分productFlavors和buildTypes的话,也可以在defaultConfig里进行替换:
defaultConfig {
        applicationId "com.huaihuai.android"
        minSdkVersion 14
        targetSdkVersion 23
        versionCode 1
        versionName "1.0"
        manifestPlaceholders = [APP_NAME: "@string/app_name"]
}
其实defaultConfig也是productFlavors的一个子集。
6. 添加自定义字段
Gradle在generateSources阶段为每一个flavor生成两个BuildConfig.java文件(对应在release和debug文件夹下)。
BuildConfig类默认会提供一些常量字段。
public final class BuildConfig {
  public static final boolean DEBUG = Boolean.parseBoolean("true");
  public static final String APPLICATION_ID = "com.huaihuai.android.release";
  public static final String BUILD_TYPE = "debug";
  public static final String FLAVOR = "flavor_1";
  public static final int VERSION_CODE = 2;
  public static final String VERSION_NAME = "2.0.1";
}
虽然通过上面的操作,我们可以同时打包出一个debug版本和一个release版本。但是我们还需要运行的时候有不同的表现。比如,release版本不显示一些控件。
我们可以通过buildConfigField,resValue在gradle里面自定义一些字段:
buildConfigField "String", "APP_TYPE", '"release"'
resValue "String", "build_time", '"11110000"'
添加完毕之后,就可以在代码中使用了:
System.out.println(BuildConfig.APP_TYPE);
System.out.println(getString(R.string.build_host))
两者使用方法不同外:
buildConfigField可定义字段为基本数据类型
buildConfigField定义的字段会显示在BuildConfig类中
resValue可定义字段有:string(待补充)
resValue定义的字段会显示在generated.xml中
7. 动态设置一些额外信息
假如想把当前的编译时间、编译的机器、最新的commit版本添加到apk,而这些信息又不好写在代码里,强大的gradle给了我创造可能的自信:
android {
    defaultConfig {
        resValue "string", "build_time", buildTime()
        resValue "string", "build_host", hostName()
        resValue "string", "build_revision", revision()
    }
}

def buildTime() {
    return new Date().format("yyyy-MM-dd HH:mm:ss")
}

def hostName() {
    return System.getProperty("user.name") + "@" + InetAddress.localHost.hostName
}

def revision() {
    def code = new ByteArrayOutputStream()
    exec {
        commandLine 'git', 'rev-parse', '--short', 'HEAD'
        standardOutput = code
    }
    return code.toString()
}
上述代码实现了动态的添加了3个字符串资源: build_time、build_host、build_revision, 然后在其他地方可像如引用字符串一样使用如下:
// 在Activity里调用
getString(R.string.build_time)  // 输出2015-11-07 17:01
getString(R.string.build_host)  // 输出jay@deepin,这是我的电脑的用户名和PC名
getString(R.string.build_revision) // 输出3dd5823, 这是最后一次commit的sha值
这个地方,如何从命令行读取返回结果,很有意思。
8. 给自己留个”后门”: 点七下
为了调试方便,我们往往会在debug版本留一个显示我们想看的界面(记得之前微博的一个iOS版本就泄露了一个调试界面),如何进入到一个界面,我们可以仿照android开发者选项的方式,点七下才显示,我们来实现一个:
private int clickCount = 0;
private long clickTime = 0;

sevenClickView.setOnClickListener(new View.OnClickListener() {
    @Override
    public void onClick(View view) {

        if (clickTime == 0) {
            clickTime = System.currentTimeMillis();
        }
        if (System.currentTimeMillis() - clickTime > 500) {
            clickCount = 0;
        } else {
            clickCount++;
        }
        clickTime = System.currentTimeMillis();

        if (clickCount > 6) {
            // 点七下条件达到,跳到debug界面
        }
    }
});
release版本肯定是不能暴露这个界面的,也不能让人用am在命令行调起,如何防止呢,可以在release版本把这个debug界面的exported设为false。
9. 自定义导出APK的名称
直接上代码
/*applicationVariants.all {
                variant ->
                    variant.outputs.each {
                        output ->
                            def outputFile = output.outputFile
                            if (outputFile != null && outputFile.name.endsWith('.apk')) {
                                def apkType = ""
                                if (variant.flavorName.equals("flavor_1")) {
                                    apkType = "flavor_1"
                                } else if (variant.flavorName.equals("flavor_2")) {
                                    apkType = "flavor_2"
                                }
                                def fileName = new File(output.outputFile.getParent(),
                                        "app-" + apkType + "-${variant.versionName}.apk")
                                output.outputFile = fileName
                            }
                    }
            }*/
            applicationVariants.all {
                variant ->
                    variant.outputs.each {
                        output ->
                            def outputFile = output.outputFile
                            if (outputFile != null && outputFile.name.endsWith('.apk')) {
                                def fileName = outputFile.name.replace(".apk",
                                        "-${defaultConfig.versionCode}-${defaultConfig.versionName}.apk")
                                output.outputFile = new File(outputFile.parent, fileName)
                            }
                    }
            }
这里有两种方式,大家运行一下测试一下就明白了。
参考文案:
http://blog.csdn.net/crazy1235/article/details/50465885
http://www.csdn.net/article/2015-08-10/2825420
http://blog.csdn.net/jjwwmlp456/article/details/44942109
未完待续…


