标签:
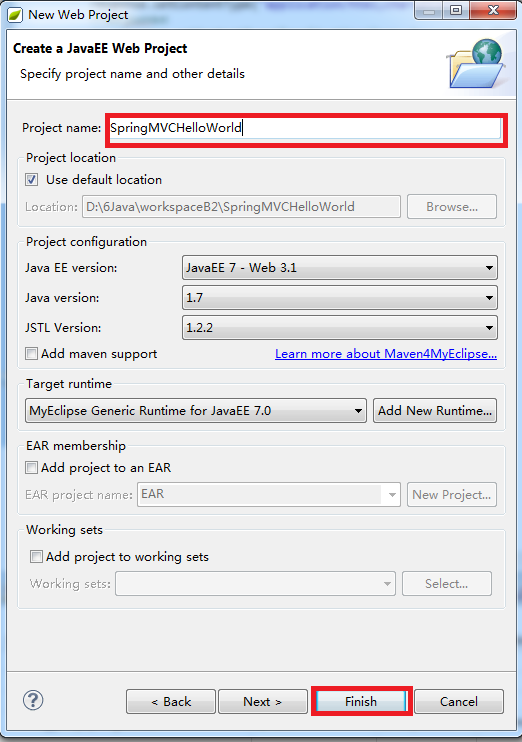
一、首先,建立空的web project项目:
1.
2.
3.

二、其次,导入先关jar包
1.将jar包导入SpringMVCHelloWorld\WebRoot\WEB-INF\lib目录下

三、接下来修改web.xml文件,在web中,指定我们的DispatcherServlet。(从这里进入SpringMVC的可控范围)。
1.
2.web.xml中的内容如下:
<?xml version="1.0" encoding="UTF-8"?>
<web-app xmlns:xsi="http://www.w3.org/2001/XMLSchema-instance"xmlns="http://java.sun.com/xml/ns/javaee" xsi:schemaLocation="http://java.sun.com/xml/ns/javaee http://java.sun.com/xml/ns/javaee/web-app_3_0.xsd" id="WebApp_ID" version="3.0">
<servlet>
<servlet-name>dispatcherServlet</servlet-name>
<servlet-class>org.springframework.web.servlet.DispatcherServlet</servlet-class>
<load-on-startup>1</load-on-startup>
</servlet>
<servlet-mapping>
<servlet-name>dispatcherServlet</servlet-name>
<url-pattern>/</url-pattern>
</servlet-mapping>
</web-app>
四、添加dispatcherServlet-servlet.xml文件
1.添加新文件至如下位置
2. dispatcherServlet-servlet.xml内容如下:
<?xml version="1.0" encoding="UTF-8"?>
<beans xmlns="http://www.springframework.org/schema/beans"
xmlns:xsi="http://www.w3.org/2001/XMLSchema-instance"
xmlns:context="http://www.springframework.org/schema/context"
xmlns:mvc="http://www.springframework.org/schema/mvc"
xsi:schemaLocation="http://www.springframework.org/schema/mvc
http://www.springframework.org/schema/mvc/spring-mvc-3.1.xsd
http://www.springframework.org/schema/beans
http://www.springframework.org/schema/beans/spring-beans-3.0.xsd
http://www.springframework.org/schema/context
http://www.springframework.org/schema/context/spring-context-3.0.xsd">
<!-- 自动扫描的包名 -->
<context:component-scan base-package="com.Ace.controller"></context:component-scan>
<!-- 默认的注解映射的支持 -->
<mvc:annotation-driven />
<!-- 视图解释类 -->
<bean
class="org.springframework.web.servlet.view.InternalResourceViewResolver">
<property name="prefix" value="/WEB-INF/Views/" />
<!--可为空,方便实现自已的依据扩展名来选择视图解释类的逻辑 -->
<property name="suffix" value=".jsp" />
</bean>
</beans>
其中:context:component-scan 指定了要扫描的Controller包。Prefix与suffix指明了路径的前缀与后缀。
五 添加Controller类。
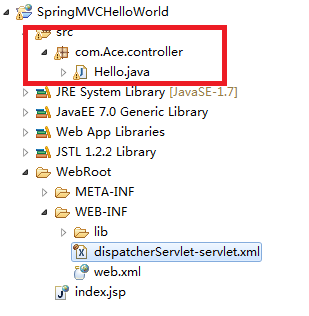
1.添加一个Hello.java文件。包名如下:

2. hello.java内容如下:
package com.Ace.controller;
import java.util.ArrayList;
import java.util.List;
import java.util.Map;
import javax.servlet.http.HttpServletRequest;
import javax.servlet.http.HttpServletResponse;
import org.springframework.stereotype.Controller;
import org.springframework.ui.Model;
import org.springframework.web.bind.annotation.RequestMapping;
import org.springframework.web.bind.annotation.RequestParam;
import org.springframework.web.bind.annotation.ResponseBody;
@Controller
public class Hello {
//hello world
@RequestMapping(value="/hello")
public String hello(){
System.out.println("spring mvc hello world!");
return "hello";
}
//hello world
@RequestMapping(value="/odadsafddddddddddd")
@ResponseBody
public Object ok(){
System.out.println("ok");
List<String> list=new ArrayList<String>();
list.add("电视机");
list.add("冰箱");
list.add("山东省");
list.add("多发点");
list.add("D大调");
list.add("规范");
list.add("啦啦啦");
list.add("咯就是");
list.add("阿瓦尔");
return list;
}
}
六、 部署
1.配置在MyEclipse中配置自己安装的Tomcat

2.发布网站


七、 启动tomcat,并在浏览器访问

八、 补充
1.注意到刚才在Hello.java中的hello方法我们返回到了名为hello的View,结合我们的前后缀配置,我们首先应该建立/WEB-INF/Views/目录
结果如下
2.添加hello.jsp文件,结果如下

内容如下
<%@ page language="java" import="java.util.*" pageEncoding="ISO-8859-1"%>
<%
String path = request.getContextPath();
String basePath = request.getScheme()+"://"+request.getServerName()+":"+request.getServerPort()+path+"/";
%>
<!DOCTYPE HTML PUBLIC "-//W3C//DTD HTML 4.01 Transitional//EN">
<html>
<head>
<base href="<%=basePath%>">
<title>My JSP 'index.jsp' starting page</title>
<meta http-equiv="pragma" content="no-cache">
<meta http-equiv="cache-control" content="no-cache">
<meta http-equiv="expires" content="0">
<meta http-equiv="keywords" content="keyword1,keyword2,keyword3">
<meta http-equiv="description" content="This is my page">
<!--
<link rel="stylesheet" type="text/css" href="styles.css">
-->
</head>
<body>
This is my JSdfsaffadfsadfaqqqqP page. <br>
<form action="odadsafddddddddddd" method="post"> <!-- 每一次添加一个action(uri)时,tomcat都要重启之后,新的uri才会有用 -->
<input type="submit" name="调价" />
</form>
</body>
</html>
3.重启tomcat并发布网站后可以浏览如下网页
下一种方法;
Myeclipse 8.5 使用Spring MVC3构建Web应用-初学笔记
2011-03-28 21:43:37| 分类: JAVA|举报|字号 订阅
活到老学到老。
it168有篇文章非常好,《使用Spring MVC3构建Web应用详细教程》。其所使用的eclipse比较古老,因此前面有些配置ant之类的东西。现在都Myeclipse8.5了。用不着。
下面把自己的操作记录一下。
一、建立一个新的web project。菜单file-new-web project. 名为SampleSpringMVC. 要Java EE 5.0, 不要Maven和JSTL.
二、加入Myeclipse8.5自带的spring3. 右键点击SampleSpringMVC项目,myeclipse-add spring capabilities. 默认已经选了3.0 core libraries, 增选spring 3.0 web libraries.
然后点击next. 去掉AOP,applicationContext.xml的目录选在WEB-INF下。点Finish.
三、修改web.xml如下
<?xml version="1.0" encoding="UTF-8"?>
<web-app id="WebApp_ID" version="2.4"
xmlns="http://java.sun.com/xml/ns/j2ee"xmlns:xsi="http://www.w3.org/2001/XMLSchema-instance"
xsi:schemaLocation="http://java.sun.com/xml/ns/j2eehttp://java.sun.com/xml/ns/j2ee/web-app_2_4.xsd">
<servlet>
<servlet-name>SampleSpringMVC</servlet-name>
<servlet-class>org.springframework.web.servlet.DispatcherServlet</servlet-class>
<load-on-startup>1</load-on-startup>
</servlet>
<servlet-mapping>
<servlet-name>SampleSpringMVC</servlet-name>
<url-pattern>*.htm</url-pattern>
</servlet-mapping>
<welcome-file-list>
<welcome-file>index.jsp</welcome-file>
</welcome-file-list>
</web-app>
四、修改index.jsp如下:
<%@ page language="java" session="false" contentType="text/html; charset=UTF-8"%>
<%@ taglib prefix="c" uri="http://java.sun.com/jsp/jstl/core" %>
<html>
<head>
 <title>Adobocode : Sample Spring MVC</title>
 </head>
 <body>
 <h2>Adobocode : 世界你好</h2>
 <br/>
<br/>
 <a href="<c:url value="personDisplay.htm"/>">人员列表</a>
 </body>
</html>
五、在WEB-INF中建立文件SampleSpringMVC-servlet.xml。这个文件第一次忘记建了,于是报告找不到这个文件,比较奇怪系统从哪里知道这个文件的名字的?是否文件名字遵循什么规则?比如说必须是web.xml中规定的servlet-name,再加上-servlet就是相应的servlet的xml文件名?
<?xml version="1.0" encoding="UTF-8"?>
<beans xmlns="http://www.springframework.org/schema/beans"
xmlns:xsi="http://www.w3.org/2001/XMLSchema-instance"
xmlns:p="http://www.springframework.org/schema/p"
xmlns:context="http://www.springframework.org/schema/context"
xsi:schemaLocation="
http://www.springframework.org/schema/beans
http://www.springframework.org/schema/beans/spring-beans-3.0.xsd
http://www.springframework.org/schema/context
http://www.springframework.org/schema/context/spring-context-3.0.xsd">
<bean class="org.springframework.web.servlet.mvc.annotation.DefaultAnnotationHandlerMapping"/>
<bean class="org.springframework.web.servlet.mvc.annotation.AnnotationMethodHandlerAdapter"/>
<context:component-scan base-package="paul.sydney.controller"/>
<context:component-scan base-package="paul.sydney.service"/>
<bean id="viewResolver" class="org.springframework.web.servlet.view.InternalResourceViewResolver">
<property name="viewClass"><value>org.springframework.web.servlet.view.JstlView</value></property>
<property name="prefix"><value>/WEB-INF/jsp/</value></property>
<property name="suffix"><value>.jsp</value></property>
</bean>
</beans>
原文是这样说的:“ 这里,我们利用了spring 3 mvc的新特性,自动扫描,通过context:component-scan base-package,设置了paul.syney.controller和paul.sydney.service两个包下的文件只要使用spring 3的标准注释都可以被扫描到。”
六、在WEB-INF下建立jsp目录,原文还要建立classes目录,不用了。可能是8.5的变化吧。然后在jsp下建立personDisplay.jsp:
<!-- Copyright : adobocode.com , 2010 -->
<%@ page language="java" session="false"
contentType="text/html; charset=UTF-8"%>
<%@ taglib uri="http://java.sun.com/jsp/jstl/core" prefix="c"%>
<jsp:useBean id="personList" scope="request" type="java.util.List<paul.sydney.model.Person>" />
<html>
<head>
<title>Adobocode : Sample Spring MVC using JSTL iteration</title>
</head>
<body>
<h2>
Adobocode : Person List 明明用了JSTL啊!
</h2>
<table border="1">
<tr>
<th>
Id
</th>
<th>
Name
</th>
<th>
Age
</th>
<th>
Address
</th>
</tr>
<c:forEach var="p" items="${personList}">
<tr>
<td>
<c:url var="editUrl" value="personForm.htm">
<c:param name="personId" value="${p.id}" />
</c:url>
<a href='<c:out value="${editUrl}"/>'>${p.id}</a>
</td>
<td>
${p.name}
</td>
<td>
${p.age}
</td>
<td>
${p.address}
</td>
</tr>
</c:forEach>
</table>
</body>
</html>
七. jsp目录下另一个文件personForm.jsp:
<!-- Copyright : adobocode.com , 2010 -->
<%@ page language="java" session="false"
contentType="text/html; charset=UTF-8"%>
<%@ taglib prefix="spring" uri="http://www.springframework.org/tags"%>
<%@ taglib prefix="form" uri="http://www.springframework.org/tags/form"%>
<html>
<head>
<title>Adobocode : Sample Spring MVC using Forms</title>
</head>
<body>
<h2>
Adobocode : Person Form
</h2>
<form:form modelAttribute="person">
<form:hidden path="id" />
<fieldset>
<table>
<tr>
<td>
Name名字!
</td>
<td>
<form:input path="name" />
</td>
</tr>
<tr>
<td>
Age年龄!
</td>
<td>
<form:input path="age" />
</td>
</tr>
<tr>
<td>
Address地址!
</td>
<td>
<form:input path="address" />
</td>
</tr>
<tr>
<td>咆哮体!!!</td>
<td>
<input type="submit" id="save" name="_eventId_save" value="Save" />
<input type="submit" onClick="history.go(-1);"
name="_eventId_cancel" value="Cancel" />
</td>
</tr>
</table>
</fieldset>
</form:form>
</body>
</html>
八、建立三个包
paul.sydney.controller
paul.sydney.model
paul.sydney.service
九、paul.sydney.controller,在这个包中,新建立一个类,命名为PersonDisplay,将代码修改如下:
package paul.sydney.controller;
import org.springframework.beans.factory.annotation.Autowired;
import org.springframework.stereotype.Controller;
import org.springframework.ui.ModelMap;
import org.springframework.web.bind.annotation.RequestMapping;
import paul.sydney.service.DummyService;
/**
* PersonDisplay class, display controller for the 'personDisplay.jsp' Copyright
* : adobocode.com , 2010
*
* @author Paul Sydney Orozco | [email protected]
*
*/
@Controller
public class PersonDisplay {
private final DummyService dummyService;
@Autowired
public PersonDisplay(DummyService dummyService) {
this.dummyService = dummyService;
}
@RequestMapping("/personDisplay.htm")
public ModelMap defaultHandler() {
return new ModelMap("personList", this.dummyService.getDummyList());
}
}
原文解释:“ 这里,使用注解@Controller表示这个是一个控制器,而 @RequestMapping("/personDisplay.htm")则表示对于personDisplay.htm这样的请求,使用defaultHandler这个方法去处理。而在defaultHandler中,又调用了逻辑服务层的
dummyService.getDummyList()方法获得人员列表,最后把列表存放到一个ModelMap中去(可以先理解为Map的一种数据结构)。”
十、在paul.sydney.controller包中,新建一个类PersonForm,
package paul.sydney.controller;
import org.springframework.beans.factory.annotation.Autowired;
import org.springframework.stereotype.Controller;
import org.springframework.ui.ModelMap;
import org.springframework.validation.BindingResult;
import org.springframework.web.bind.annotation.ModelAttribute;
import org.springframework.web.bind.annotation.RequestMapping;
import org.springframework.web.bind.annotation.RequestMethod;
import org.springframework.web.bind.annotation.RequestParam;
import org.springframework.web.bind.annotation.SessionAttributes;
import org.springframework.web.bind.support.SessionStatus;
import paul.sydney.model.Person;
import paul.sydney.service.DummyService;
@Controller
@RequestMapping("/personForm.htm")
@SessionAttributes("person")
public class PersonForm {
private final DummyService dummyService;
@Autowired
public PersonForm(DummyService dummyService) {
this.dummyService = dummyService;
}
@RequestMapping(method = RequestMethod.GET)
public String setupForm(@RequestParam("personId") int id, ModelMap model) {
Person person = this.dummyService.retrievePerson(id);
model.addAttribute("person", person);
return "personForm";
}
@RequestMapping(method = RequestMethod.POST)
public String processSubmit(@ModelAttribute("person") Person person,
BindingResult result, SessionStatus status) {
this.dummyService.savePerson(person);
status.setComplete();
return "redirect:personDisplay.htm";
}
}
原文:“ 这里,首先通过依赖注入,注入了服务层逻辑dummyService,然后在setupForm中,根据传入的参数personId,通过服务层逻辑dummyService找出这个人,然后将其保存到一个Model中去,返回给视图层personForm.jsp显示;而processSubmit是调用服务层逻辑保存用户的资料(通过this.dummyService.savePerson(person)实现),最后使用redirect跳转到personDisplay.htm。”
十一、构建业务实体模型。在src目录中,新建包命名为paul.sydney.model,在这个包下,再新建一个实体类,命名为Person,
package paul.sydney.model;
/**
* Copyright : adobocode.com , 2010
*
* @author Paul Sydney Orozco | [email protected]
*/
public class Person {
private int id;
private String name;
private int age;
private String address;
public int getId() {
return id;
}
public void setId(int id) {
this.id = id;
}
public String getName() {
return name;
}
public void setName(String name) {
this.name = name;
}
public int getAge() {
return age;
}
public void setAge(int age) {
this.age = age;
}
public String getAddress() {
return address;
}
public void setAddress(String address) {
this.address = address;
}
@Override
public String toString() {
StringBuilder sb = new StringBuilder();
sb.append("\nname : " + this.name);
sb.append("\nage : " + this.age);
sb.append("\naddress : " + this.address);
return sb.toString();
}
}
十二、 构建业务逻辑层。同样在src目录下新建一个包,命名为paul.sydney.service,并且新建一个类DummyService,
package paul.sydney.service;
import java.util.ArrayList;
import paul.sydney.model.Person;
import java.util.List;
import org.springframework.stereotype.Service;
/**
* Copyright : adobocode.com , 2010
*
* @author Paul Sydney Orozco | [email protected]
*/
@Service
public class DummyService {
/**
* This method supposed to be returning a Collection of Person objects from
* a DAO layer For this tutorial, let us just hard-code this List of Person
* objects
*/
public List<Person> getDummyList() {
List<Person> list = new ArrayList<Person>();
Person p1 = new Person();
p1.setId(12345);
p1.setName("Paul");
p1.setAge(27);
p1.setAddress("Dalaguete, Cebu");
Person p2 = new Person();
p2.setId(54321);
p2.setName("Sydney");
p2.setAge(25);
p2.setAddress("Cebu City");
list.add(p1);
list.add(p2);
return list;
}
/**
* This method supposed to be returning Person object from a DAO layer For
* this tutorial, let us just hard-code the Person instance
*/
public Person retrievePerson(int id) {
Person person = new Person();
person.setId(56789);
person.setName("Nikki");
person.setAge(63);
person.setAddress("Dalaguete, Cebu");
return person;
}
/**
* This method supposed to be persisting the passed Person object For this
* tutorial, let us include the persisting DAO layer and assume the method
* successful saved or updated the Person object
*/
public void savePerson(Person person) {
System.out.println("\n\nSaving" + person);
}
}
然后就可以run一个看看。


