Elasticsearch通过River可以与多种数据源Wikipedia, MongoDB, CouchDB, RabbitMQ, RSS, Sofa, JDBC, FileSystem,Dropbox等同步,公司的业务是用 MongoDB,今天测试环境虚拟机上配置了一下Elasticsearch 与 MongoDB的同步,作个大概的过程记录,主要利用richardwilly98 / elasticsearch-river-mongodb。
River通过读取mongodb的oplog来同步数据,oplog这个表来使集群中的不同机器数据同步的,可以保证es里面的数据和mongodb里面的是一样的,所以Mongdb必须是个集群才能拥有oplog.注意:该插件只支持集群环境下的mongodb,因为集群环境下的mongodb才有oplog这个
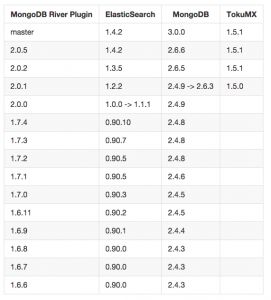
Elasticsearch 和 MongoDB需要安装对应的版本才能实现同步,我这里用了最新的Elasticsearch 1.4.2 和 MongoDB 3.0.0,相应的版本要求参考下表
elasticsearch-mongodb
MongDB是一个副本集的集群,具体副本集集群的搭建不详细写了,Elasticsearch的安装配置也省略。
1.安装elasticsearch-river-mongodb
2.建立river
01 |
curl -XPUT "http://10.253.1.70:9200/_river/threads_mongo_river/_meta"</span> -d' |
08 |
{ "host": "10.253.1.71", "port": 27017} |
11 |
"collection": "threads", |
这里只是简单的配置了建立连接的MongoDB以及相应的db,collection对于的elasticsearch index和type,还有详细的配置没有使用到,比如options等,具体根据业务可以配置,下面是一份详细的配置样例:
01 |
$ curl -XPUT "localhost:9200/_river/${es.river.name}/_meta" -d ' |
07 |
{ "host": ${mongo.instance1.host}, "port": ${mongo.instance1.port} }, |
08 |
{ "host": ${mongo.instance2.host}, "port": ${mongo.instance2.port} } |
11 |
"secondary_read_preference" : true, |
12 |
"drop_collection": ${mongo.drop.collection}, |
13 |
"exclude_fields": ${mongo.exclude.fields}, |
14 |
"include_fields": ${mongo.include.fields}, |
15 |
"include_collection": ${mongo.include.collection}, |
16 |
"import_all_collections": ${mongo.import.all.collections}, |
17 |
"initial_timestamp": { |
18 |
"script_type": ${mongo.initial.timestamp.script.type}, |
19 |
"script": ${mongo.initial.timestamp.script} |
21 |
"skip_initial_import" : ${mongo.skip.initial.import}, |
22 |
"store_statistics" : ${mongo.store.statistics}, |
26 |
{ "db": "local", "user": ${mongo.local.user}, "password": ${mongo.local.password} }, |
27 |
{ "db": "admin", "user": ${mongo.db.user}, "password": ${mongo.db.password} } |
29 |
"db": ${mongo.db.name}, |
30 |
"collection": ${mongo.collection.name}, |
31 |
"gridfs": ${mongo.is.gridfs.collection}, |
32 |
"filter": ${mongo.filter} |
35 |
"name": ${es.index.name}, |
36 |
"throttle_size": ${es.throttle.size}, |
37 |
"bulk_size": ${es.bulk.size}, |
38 |
"type": ${es.type.name} |
40 |
"actions": ${es.bulk.actions}, |
41 |
"size": ${es.bulk.size}, |
42 |
"concurrent_requests": ${es.bulk.concurrent.requests}, |
43 |
"flush_interval": ${es.bulk.flush.interval} |
一些配置项的解释如下,具体可以查看github的wiki:
- db为同步的数据库名,
- host mongodb的ip地址(默认为localhost)
- port mongodb的端口
- collection 要同步的表名
- fields 要同步的字段名(用逗号隔开,默认全部)
- gridfs 是否是gridfs文件(如果collection是gridfs的话就设置成true)
- local_db_user local数据库的用户名(没有的话不用写)
- local_db_password local数据库的密码(没有的话不用写)
- db_user 要同步的数据库的密码(没有的话不用写)
- db_password 要同步的数据库的密码(没有的话不用写)
- name 索引名(不能之前存在)
- type 类型
- bulk_size 批量添加的最大数
- bulk_timeout 批量添加的超时时间
3.测试是否成功
我测试的库中数据较少,所以就直接都查出来看看是否能查出来吧
01 |
$ curl -XGET "http://10.253.1.70:9200/test/threads/_search" -d ' |
18 |
"_id": "54fa32b22c44cf67cb6a9d1b", |
21 |
"_id": "54fa32b22c44cf67cb6a9d1b", |
22 |
"title": "where is my car", |
23 |
"content": "ask yourself" |
29 |
"_id": "54fa2f5c2c44cf67cb6a9d19", |
32 |
"_id": "54fa2f5c2c44cf67cb6a9d19", |
33 |
"title": "this is title", |
34 |
"content": "what is the fuck" |
40 |
"_id": "54fa2f892c44cf67cb6a9d1a", |
43 |
"_id": "54fa2f892c44cf67cb6a9d1a", |
44 |
"title": "are you ok", |
45 |
"content": "yes,i am ok" |
51 |
"_id": "54fa49ccc104e2264e02deea", |
54 |
"_id": "54fa49ccc104e2264e02deea", |
55 |
"title": "hello word", |
56 |
"content": "hello hello haha" |
看来数据已经同步过来了,然后在MongoDB 添加一条记录,执行同样的操作查找对于的记录或者 total已经+1那么同步完成了。