React Native系列——Navigator组件的使用介绍
一、介绍
导航组件Navigator可以让我们客户端在不同的页面见进行切换。为了达到这样的功能,Navigator提供了路由对象功能进行区分识别每一个页面。同时我们可以通过renderScene方法,Navaigator根据指定的路由进行渲染指定的界面。
支持:ios,android
大家先把完整代码看一遍,有个大概了解再开始看文章
二、属性
configureScene function 方法,该为可选的方法进行配置页面切换动画和手势。该会通过路由和路由栈两个参数调用,进行返回一个页面参数配置对象:(route, routeStack) => Navigator.SceneConfigs.FloatFromRight
initialRoute object 参数对象 进行设置导航初始化的路由页面。路由是标识导航器渲染标识每一个页面的对象。initialRoute必须为initialRouteStack中的路 由。同时initialRoute默认为initialRouteStack中路由栈的最后一项
initialRouteStack [object] 参数对象数组 该是一个初始化的路由数组进行初始化。如果initalRoute属性没有设置的话,那么就必须设置initialRouteStack属性,使用该最后 一项作为初始路由。 如果initalRouteStack属性没有设置的话,该会生成只包含initalRoute值的数组
navigationBar node 该为可选的参数,在页面切换中用来提供一个导航栏
navigator object 该为可选参数,可以从父类导航器中获取导航器对象
onDidFoucs function 该方法已经废弃,我们可以使用navigationContext.addListener('didfocus',callback)方法进行替代。该 会在每次页面切换完成或者初始化之后进行调用该方法。该参数为新页面的路由
onWillFocus function 该方法已经废弃,我们可以使用navigationContext.addListener('willfocus',callback)方法进行替代。该会页面每次进行切换之前调用
renderScene function 该为必须调用的方法,该用来渲染每一个路由指定的页面。参数为路由以及导航器对象两个参数,具体是方法如下:(route, navigator) =><MySceneComponent title={route.title} navigator={navigator} />
sceneStyle 样式风格,该继承了View视图的所有样式风格。可以参照:点击查看View样式。 该设置用于每个页面容器的风格
红色的三个是主要方法
三、页面跳转效果
为了改变页面切换的动画或者页面的手势,该组件提供的configureScene属性来进行获取指定路由页面的配置对象信息。对于页面切换动画或者更多的屏幕配置选项信息详情可以查看Navigator.SceneConfigs
关于动画手势有如下一些属性:
PushFromRight
FloatFromRight
FloatFromLeft
FloatFromBottom
FloatFromBottomAndroid
FadeAndroid
HorizontalSwipeJump
HorizontalSwipeJumpFromRight
VerticalUpSwipeJump
VerticalDownSwipeJump
更多属性大家可以进行修改NavigatorSceneConfigs.js该文件即可
四、页面跳转方法
getCurrentRoutes() 该进行返回存在的路由列表信息
jumpBack() 该进行回退操作 但是该不会卸载(删除)当前的页面
jumpForward() 进行跳转到相当于当前页面的下一个页面
jumpTo(route) 根据传入的一个路由信息,跳转到一个指定的页面(该页面不会卸载删除)
push(route) 导航切换到一个新的页面中,新的页面进行压入栈。通过jumpForward()方法可以回退过去
pop() 当前页面弹出来,跳转到栈中下一个页面,并且卸载删除掉当前的页面
replace(route) 只用传入的路由的指定页面进行替换掉当前的页面
replaceAtIndex(route,index) 传入路由以及位置索引,使用该路由指定的页面跳转到指定位置的页面
replacePrevious(route) 传入路由,通过指定路由的页面替换掉前一个页面
resetTo(route) 进行导航到新的界面,并且重置整个路由栈
immediatelyResetRouteStack(routeStack) 该通过一个路由页面数组来进行重置路由栈
popToRoute(route) 进行弹出相关页面,跳转到指定路由的页面,弹出来的页面会被卸载删除
popToTop() 进行弹出页面,导航到栈中的第一个页面,弹出来的所有页面会被卸载删除
说明
1、一个有意思的事情是,如果你的动画是从右边往左进入的,你从左往右滑动,可以回到前一个路由页面
2、这些方法要合理使用才能够达到最佳效果,比如筛选页面就应该弹出一个新页面而不把之前的页面卸载。
3、页面跳转方法中的route参数是什么
这些都是navigator可以用的public method,就是跳转用的,里面有些带参数的XXX(route),新手第一次看这个文档会疑惑,这个route参数是啥呢,这个route就是Navigator组件属性的initialRoute,是一个对象。
解惑
我最开始不理解他是怎么设置的,所以每次都会是渲染相同的页面,切换页面的效果也一样,如果所示
产生错误的代码,原因在注释中
class Rockq extends Component {
    render() {
        return (
            <Navigator
                initialRoute={{name: 'Home页面', index: 0}}
                configureScene={(route) => {
                    // 渲染的动画是固定的了
                    return Navigator.SceneConfigs.VerticalDownSwipeJump;
                }}
                renderScene={(route, navigator) =>{
                    const number=12;
                    // 渲染的组件是固定的了
                    return <Home number={number} {...route} navigator={navigator}/>
                }
              }
            />
        );
    }
}
疑问
1、一个应用中只需要一个Navigator吗?
导航组件中有这么一个属性(navigator object 该为可选参数,可以从父类导航器中获取导航器对象),所以我猜测Navigator可以嵌套,但最好用一个navigator,其实平常我们在根组件上用一个Navigator就可以了。
2、导航组件里面的栈的概念?
正是因为有了栈,才可以实现返回前进的操作。
3、这些跳转方法的区别?
时间不够,待完善。
4、navigationBar属性
这个组件我用了一下,就是在你手机屏幕的最下面展示你给的组件,弄不明白干什么用的,好像没什么大用,回头弄清楚了了再给完善进来。
5、组件上onDidFoucs onWillFocus 两个废弃的方法怎么使用
在组件中使用,但是你在用的时候就会发现从page1跳转到home页面的时候,page1中和home中的事件都触发了,可能因为在组件离开的时候忘了取消了,这是react中监听事件的问题。
componentWillMount(){
    this.props.navigator.navigationContext.addListener('willfocus', ()=>Alert.alert(
        'Alert Title',
        `将要进入路由${this.props.name}`
    ));
    this.props.navigator.navigationContext.addListener('didfocus', ()=>Alert.alert(
        'Alert Title',
        `进入路由${this.props.name}`
    ));
}
换行
componentWillUnmount(){
    this.props.navigator.navigationContext.removeListener('willfocus', ()=>Alert.alert(
        'Alert Title',
        `将要进入路由${this.props.name}`
    ));
    this.props.navigator.navigationContext.removeListener('didfocus', ()=>Alert.alert(
        'Alert Title',
        `进入路由${this.props.name}`
    ));
}
重要思考:
后来我又想了一下,发现不对,都是同一个navigator对象,不用添加那么多次所以这个方法可以加载组件的生命周期中,也可以加载Navigator组件中的renderScene方法中。
参考文章
http://bbs.reactnative.cn/topic/20/%E6%96%B0%E6%89%8B%E7%90%86%E8%A7%A3navigator%E7%9A%84%E6%95%99%E7%A8%8B/2
http://reactnative.cn/docs/0.24/navigator.html#content
http://www.lcode.org/%E3%80%90react-native%E5%BC%80%E5%8F%91%E3%80%91react-native%E6%8E%A7%E4%BB%B6%E4%B9%8Bnavigator%E7%BB%84%E4%BB%B6%E8%AF%A6%E8%A7%A3%E4%BB%A5%E5%8F%8A%E5%AE%9E%E4%BE%8B23/
免责说明
1、本博客中的文章摘自网上的众多博客,仅作为自己知识的补充和整理,并分享给其他需要的coder,不会用于商用。
2、因为很多博客的地址看完没有及时做保存,所以很多不会在这里标明出处,非常感谢各位大牛的分享,也希望大家理解。
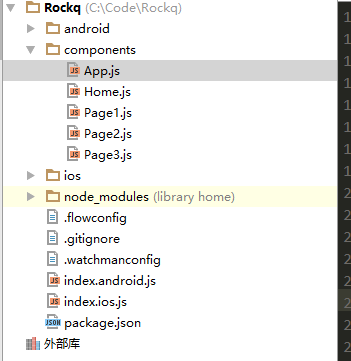
完整代码
项目结构
1、App.js代码
import React, {
    AppRegistry,
    Component,
    StyleSheet,
    Text,
    View,
    Navigator
} from 'react-native';

import Home from './Home';

export default class App extends Component {
    render() {
        return (
            <Navigator
                initialRoute={{params:{name:'Home页面'},component:Home}}
                configureScene={(route) => {
                    if (route.sceneConfig) {
                        return route.sceneConfig;
                    }
                    return Navigator.SceneConfigs.FloatFromBottom;
                }}
                renderScene={(route, navigator) =>{
                    let DefaultComponent=route.component;
                    let number=12;
                    return <DefaultComponent number={number} {...route.params} navigator={navigator}/>
                }
              }
            />
        );
    }
}

const styles = StyleSheet.create({
});
关键就在于configureScene中的动画不要写死,renderScene中渲染的组件不要写死
2、Home.js
import React, {
    AppRegistry,
    Component,
    StyleSheet,
    Text,
    TouchableHighlight,
    View,
    Navigator
} from 'react-native';

import Page1 from './Page1';
import Page2 from './Page2';
import Page3 from './Page3';


export default class Home extends Component {
    render() {
        return (
            <View style={styles.container}>
                <Text style={styles.title}>
                    {this.props.name}
                </Text>
                <TouchableHighlight
                    onPress={()=>this.props.navigator.push({
                        sceneConfig: Navigator.SceneConfigs.FloatFromRight,
                        component: Page1,
                        params:{
                            name: 'Page1页面'
                        }
                    })
                }>
                    <Text style={[styles.page1,styles.text]}>
                        跳转到Page1
                    </Text>
                </TouchableHighlight>
                <TouchableHighlight
                    onPress={()=>this.props.navigator.push({
                        sceneConfig: Navigator.SceneConfigs.FloatFromBottom,
                        component: Page2,
                        params:{
                            name: 'Page2页面'
                        }
                    })
                }>
                    <Text style={[styles.page2,styles.text]}>
                        跳转到Page2
                    </Text>
                </TouchableHighlight>
                <TouchableHighlight
                    onPress={()=>this.props.navigator.push({
                        sceneConfig: Navigator.SceneConfigs.HorizontalSwipeJumpFromRight,
                        component: Page3,
                        params:{
                            name: 'Page3页面'
                        }
                    })
                }>
                    <Text style={[styles.page3,styles.text]}>
                        跳转到Page3
                    </Text>
                </TouchableHighlight>
            </View>
        );
    }
}

const styles = StyleSheet.create({
    container: {
        flex: 1,
        justifyContent: 'center',
        alignItems: 'center',
        backgroundColor: '#F5FCFF',
    },
    title:{
        fontSize:60
    },
    text: {
        textAlign: 'center',
        color: '#333333',
        marginBottom: 5,
    },
    page1: {
        fontSize: 40,
        backgroundColor:'red'
    },
    page2: {
        fontSize: 40,
        backgroundColor:'blue'
    },
    page3: {
        fontSize: 40,
        backgroundColor:'yellow'
    },
});
3、Page1.js
import React, {
    AppRegistry,
    Component,
    StyleSheet,
    Text,
    TouchableHighlight,
    View,
    Navigator
} from 'react-native';

import Page2 from './Page2';


export default class Page1 extends Component {
    render() {
        return (
            <View style={styles.container}>
                <Text style={styles.title}>
                    {this.props.name}
                </Text>
                <TouchableHighlight
                    onPress={()=>this.props.navigator.push({
                        sceneConfig: Navigator.SceneConfigs.FloatFromRight,
                        component: Page2,
                        params:{
                            name: 'Page2页面'
                        }
                    })
                }>
                    <Text style={[styles.text]}>
                        跳转到Page2
                    </Text>
                </TouchableHighlight>
                <TouchableHighlight
                    onPress={()=>this.props.navigator.pop()
                }>
                    <Text style={[styles.text]}>
                        返回
                    </Text>
                </TouchableHighlight>
            </View>
        );
    }
}

const styles = StyleSheet.create({
    container: {
        flex: 1,
        justifyContent: 'center',
        alignItems: 'center',
        backgroundColor: '#F5FCFF',
    },
    title:{
        fontSize:60
    },
    text: {
        textAlign: 'center',
        color: '#333333',
        marginBottom: 5,
        backgroundColor:'#00ced1',
        fontSize: 40,
    }
});
