TensorFlow人工智能引擎入门教程之七 DNN深度神经网络 的原理 以及 使用
DNN 深度神经网络,就是 把原有的多层神经网络 扩展到深度学习里面,加上了BP 反馈,是的整理上 loss 收敛 直至不变,同时也有dropout 前面 有很多这个词 出现,dropout 是指 随机用一定概率 把一些 节点失效,进行参与训练 放置数据整理上陷入overfitting 局部最优解。
OK 我们现在打开前面的AlexNet的网络
DNN ,就是去掉C 之后 使用全连接层+dropout下降+relu激活 一层一层的WX+B的 网络模式
import input_data
mnist = input_data.read_data_sets("/tmp/data/", one_hot=True)

import tensorflow as tf

# Parameters
learning_rate = 0.001
training_iters = 100000
batch_size = 128
display_step = 10

# Network Parameters
n_input = 784 # MNIST data input (img shape: 28*28)
n_classes = 10 # MNIST total classes (0-9 digits)
dropout = 0.75 # Dropout, probability to keep units

# tf Graph input
x = tf.placeholder(tf.float32, [None, n_input])
y = tf.placeholder(tf.float32, [None, n_classes])
keep_prob = tf.placeholder(tf.float32) #dropout (keep probability)

# Create model
def conv2d(img, w, b):
    return tf.nn.relu(tf.nn.bias_add(tf.nn.conv2d(img, w, strides=[1, 1, 1, 1], padding='SAME'),b))

def max_pool(img, k):
    return tf.nn.max_pool(img, ksize=[1, k, k, 1], strides=[1, k, k, 1], padding='SAME')

def conv_net(_X, _weights, _biases, _dropout):
    # Reshape input picture
    _X = tf.reshape(_X, shape=[-1, 28, 28, 1])

    # Convolution Layer
    conv1 = conv2d(_X, _weights['wc1'], _biases['bc1'])
    # Max Pooling (down-sampling)
    conv1 = max_pool(conv1, k=2)
    # Apply Dropout
    conv1 = tf.nn.dropout(conv1, _dropout)

    # Convolution Layer
    conv2 = conv2d(conv1, _weights['wc2'], _biases['bc2'])
    # Max Pooling (down-sampling)
    conv2 = max_pool(conv2, k=2)
    # Apply Dropout
    conv2 = tf.nn.dropout(conv2, _dropout)

    # Fully connected layer
    dense1 = tf.reshape(conv2, [-1, _weights['wd1'].get_shape().as_list()[0]]) # Reshape conv2 output to fit dense layer input
    dense1 = tf.nn.relu(tf.add(tf.matmul(dense1, _weights['wd1']), _biases['bd1'])) # Relu activation
    dense1 = tf.nn.dropout(dense1, _dropout) # Apply Dropout

    # Output, class prediction
    out = tf.add(tf.matmul(dense1, _weights['out']), _biases['out'])
    return out

# Store layers weight & bias
weights = {
    'wc1': tf.Variable(tf.random_normal([5, 5, 1, 32])), # 5x5 conv, 1 input, 32 outputs
    'wc2': tf.Variable(tf.random_normal([5, 5, 32, 64])), # 5x5 conv, 32 inputs, 64 outputs
    'wd1': tf.Variable(tf.random_normal([7*7*64, 1024])), # fully connected, 7*7*64 inputs, 1024 outputs
    'out': tf.Variable(tf.random_normal([1024, n_classes])) # 1024 inputs, 10 outputs (class prediction)
}

biases = {
    'bc1': tf.Variable(tf.random_normal([32])),
    'bc2': tf.Variable(tf.random_normal([64])),
    'bd1': tf.Variable(tf.random_normal([1024])),
    'out': tf.Variable(tf.random_normal([n_classes]))
}

# Construct model
pred = conv_net(x, weights, biases, keep_prob)

# Define loss and optimizer
cost = tf.reduce_mean(tf.nn.softmax_cross_entropy_with_logits(pred, y))
optimizer = tf.train.AdamOptimizer(learning_rate=learning_rate).minimize(cost)

# Evaluate model
correct_pred = tf.equal(tf.argmax(pred,1), tf.argmax(y,1))
accuracy = tf.reduce_mean(tf.cast(correct_pred, tf.float32))

# Initializing the variables
init = tf.initialize_all_variables()

# Launch the graph
with tf.Session() as sess:
    sess.run(init)
    step = 1
    # Keep training until reach max iterations
    while step * batch_size < training_iters:
        batch_xs, batch_ys = mnist.train.next_batch(batch_size)
        # Fit training using batch data
        sess.run(optimizer, feed_dict={x: batch_xs, y: batch_ys, keep_prob: dropout})
        if step % display_step == 0:
            # Calculate batch accuracy
            acc = sess.run(accuracy, feed_dict={x: batch_xs, y: batch_ys, keep_prob: 1.})
            # Calculate batch loss
            loss = sess.run(cost, feed_dict={x: batch_xs, y: batch_ys, keep_prob: 1.})
            print "Iter " + str(step*batch_size) + ", Minibatch Loss= " + "{:.6f}".format(loss) + ", Training Accuracy= " + "{:.5f}".format(acc)
        step += 1
    print "Optimization Finished!"
    # Calculate accuracy for 256 mnist test images
    print "Testing Accuracy:", sess.run(accuracy, feed_dict={x: mnist.test.images[:256], y: mnist.test.labels[:256], keep_prob: 1.})
先去掉卷积部分 以及 maxpool部分
下面遵循 WX+B 即可 输入时候[Batchsize,768]
那么 W 应该 需要是[768 ,n] 接下来应该是[n,m]在接下来应该是[m,p]
也就是满足矩阵乘法
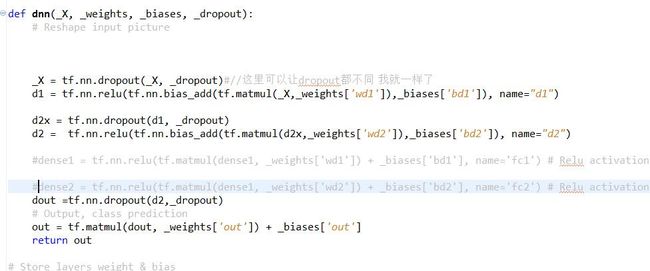
下面来看看我们定义的
修改相应的变量
weights = {
    'wd1': tf.Variable(tf.random_normal([784,600], stddev=0.01)),
    'wd2': tf.Variable(tf.random_normal([600,480], stddev=0.01)),
    'out': tf.Variable(tf.random_normal([480, 10]))
}
biases = {
    'bd1': tf.Variable(tf.random_normal([600])),
    'bd2': tf.Variable(tf.random_normal([480])),
    'out': tf.Variable(tf.random_normal([10])),
}
其实我们看出来了 就是三个全连接层 只不过通过dropout保证 loss一致收敛,不会陷入最优解问题,其实可能实际上的还会有norm 其他一些层 等优化 ,也许是tanh 或者 sigmoid 的激活函数 这是网络设计的问题,上面的就是一个简单的DNN网络 利用深度学习 比传统的多层网络有了更好的效果以及准确率
看上面Nonex768 768X600 600X480 480X10 = None x 10
ok 下面贴出全部的代码
import input_data
mnist = input_data.read_data_sets("/tmp/data/", one_hot=True)

import tensorflow as tf

# Parameters
learning_rate = 0.001
training_iters = 200000
batch_size = 64
display_step = 20

# Network Parameters
n_input = 784 # MNIST data input (img shape: 28*28)
n_classes = 10 # MNIST total classes (0-9 digits)
dropout = 0.8 # Dropout, probability to keep units

# tf Graph input
x = tf.placeholder(tf.float32, [None, n_input])
y = tf.placeholder(tf.float32, [None, n_classes])
keep_prob = tf.placeholder(tf.float32) # dropout (keep probability)
def init_weights(shape):
    return tf.Variable(tf.random_normal(shape, stddev=0.01))
# Create custom model
def conv2d(name, l_input, w, b):
    return tf.nn.relu(tf.nn.bias_add(tf.nn.conv2d(l_input, w, strides=[1, 1, 1, 1], padding='SAME'),b), name=name)

def max_pool(name, l_input, k):
    return tf.nn.max_pool(l_input, ksize=[1, k, k, 1], strides=[1, k, k, 1], padding='SAME', name=name)

def norm(name, l_input, lsize=4):
    return tf.nn.lrn(l_input, lsize, bias=1.0, alpha=0.001 / 9.0, beta=0.75, name=name)

def dnn(_X, _weights, _biases, _dropout):
    # Reshape input picture


    _X = tf.nn.dropout(_X, _dropout)#//这里可以让dropout都不同 我就一样了
    d1 = tf.nn.relu(tf.nn.bias_add(tf.matmul(_X,_weights['wd1']),_biases['bd1']), name="d1")

    d2x = tf.nn.dropout(d1, _dropout)
    d2 =  tf.nn.relu(tf.nn.bias_add(tf.matmul(d2x,_weights['wd2']),_biases['bd2']), name="d2")

    #dense1 = tf.nn.relu(tf.matmul(dense1, _weights['wd1']) + _biases['bd1'], name='fc1') # Relu activation

    #dense2 = tf.nn.relu(tf.matmul(dense1, _weights['wd2']) + _biases['bd2'], name='fc2') # Relu activation
    dout =tf.nn.dropout(d2,_dropout)
    # Output, class prediction
    out = tf.matmul(dout, _weights['out']) + _biases['out']
    return out

# Store layers weight & bias
weights = {
    'wd1': tf.Variable(tf.random_normal([784,600], stddev=0.01)),
    'wd2': tf.Variable(tf.random_normal([600,480], stddev=0.01)),
    'out': tf.Variable(tf.random_normal([480, 10]))
}
biases = {
    'bd1': tf.Variable(tf.random_normal([600])),
    'bd2': tf.Variable(tf.random_normal([480])),
    'out': tf.Variable(tf.random_normal([10])),
}

# Construct model
pred = dnn(x, weights, biases, keep_prob)

# Define loss and optimizer
cost = tf.reduce_mean(tf.nn.softmax_cross_entropy_with_logits(pred, y))
optimizer = tf.train.AdamOptimizer(learning_rate=learning_rate).minimize(cost)

# Evaluate model
correct_pred = tf.equal(tf.argmax(pred,1), tf.argmax(y,1))
accuracy = tf.reduce_mean(tf.cast(correct_pred, tf.float32))

# Initializing the variables
init = tf.initialize_all_variables()

# Launch the graph
with tf.Session() as sess:
    sess.run(init)

    step = 1
    # Keep training until reach max iterations
    while step * batch_size < training_iters:
        batch_xs, batch_ys = mnist.train.next_batch(batch_size)
        # Fit training using batch data
        sess.run(optimizer, feed_dict={x: batch_xs, y: batch_ys, keep_prob: dropout})
        if step % display_step == 0:
            # Calculate batch accuracy
            acc = sess.run(accuracy, feed_dict={x: batch_xs, y: batch_ys, keep_prob: 1.})
            # Calculate batch loss
            loss = sess.run(cost, feed_dict={x: batch_xs, y: batch_ys, keep_prob: 1.})
            print "Iter " + str(step*batch_size) + ", Minibatch Loss= " + "{:.6f}".format(loss) + ", Training Accuracy= " + "{:.5f}".format(acc)

        step += 1
    print "Optimization Finished!"
    # Calculate accuracy for 256 mnist test images
    print "Testing Accuracy:", sess.run(accuracy, feed_dict={x: mnist.test.images[:256], y: mnist.test.labels[:256], keep_prob: 1.})
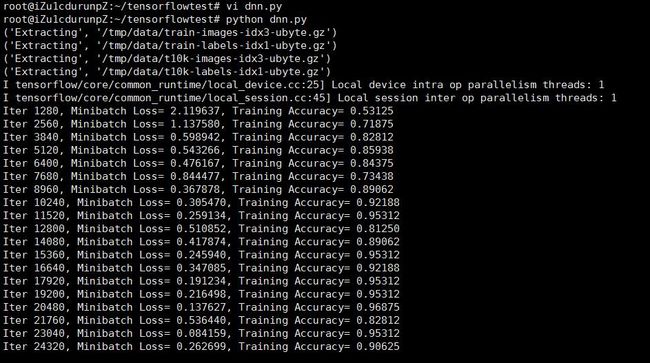
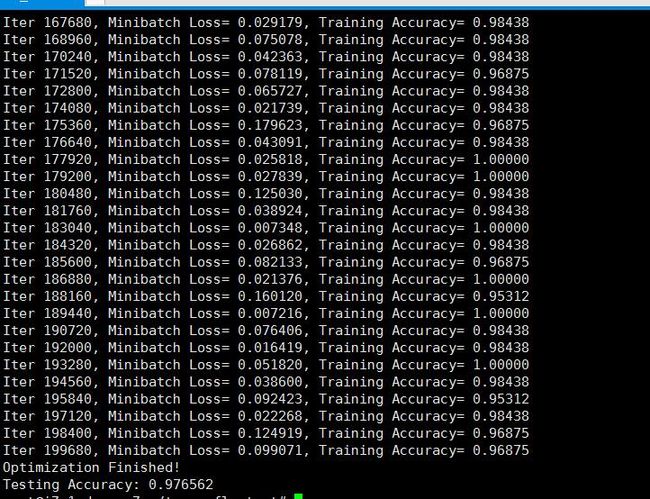
下面我们来运行测试看看
有人问我 图片文件夹 怎么读取。。。数据怎么读取。。。。。。可以看看input的代码 ,,,这是python的知识 。。。不属于tensorflow 不过tensorflow也带了一些record 读取。后面比如数据推荐系统就可能会使用哪个电影文件的 ,那时候我在使用下。


