使用databus实现oracle和内存数据库redis之间的数据同步
最近需要做oracle和redis的数据同步,找到了databus作为中间件,这个玩意是linkin的开源项目(奥巴马的封箱段子秀上说要在linkin上投简历,来头不小啊)。
资料大多是英文,而且用了gradle做编译打包工具,原理性的东西github上有介绍,https://github.com/linkedin/databus/wiki
把操作步骤分享出来:
1.新建用户
脚本:
命令:
./createUser.sh xjglxt xjglxt 192.168.11.129:1521/ORCL1 tbs_xjglxt /mnt/u001/oracle/data/DB > /tmp/createUser.out
2.导入数据(测试库)
3.为数据库添加字段、视图、package、procedure、trigger等
把需要监控的表和视图建起来,增加txn(transaction number)字段,类型为number
把表名和视图名的文件放到一个文件夹下;比如:
放到~/database/文件夹下
其中每个需要监控的表都要新建一个tab文件和view文件,对已有的表,可将表结构导出来
如果要监控多个表,编写多个.tab和.view文件
执行
./createSchema.sh xjglxt/ [email protected]:1521/ORCL1 ~/script/database > /tmp/createSchema.out
为数据库添加package、index、主键、procedure、trigger等
重复执行会在
sy$sources表和
sync_core_settings表中形成重复数据,需删。
4.生成EventSchema
进入
databus-util-cmdline\databus2-cmdline-tools-pkg下,执行gradle assemble,打包EventSchema生成工具
解压,进入bin文件夹
执行:
./dbus2-avro-schema-gen.sh -namespace com.linkedin.events.example.xjglxt -recordName Xs \
-viewName "sy\$zxxs_xs_jbxx" -avroOutDir /root/databus-master
/databus2-example
/databus2-example-relay-pkg/schemas_registry -avroOutVersion 1 \
-javaOutDir /root/databus-master/databus2-example/databus2-example-person/src/main/java \
-database jdbc:oracle:thin:@192.168.11.129:1521:ORCL1 -userName xjglxt -password xjglxt
生成的文件放到相应目录下
注意:生成的.avsc文件要放到databus2-example-relay-pkg下的schemas_registry中
多个表要修改-recordName和-viewName属性
5.编写relay和client代码
复制databus的原生例子person中的文件进行修改
b. PersonRelayServer -> XjglRelayServer(relay端的主类)
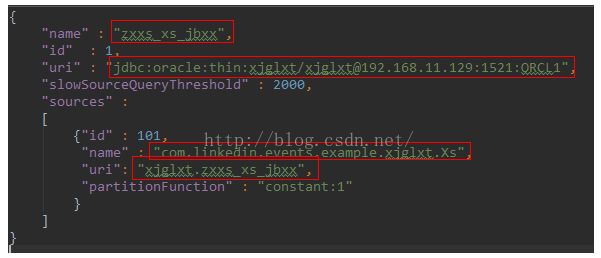
d.在index.schemas_registry中加入
com.linkedin.events.example.xjglxt.Xs.1.avsc
e.
start-example-relay.sh中PersonRelayServer 改成 XjglRelayServer
![]()
改为:
----------------------------------------------------------------------------------------------------------------------
client端
f.client_person.properties -> client_xjgl.properties
g.
PersonConsumer
->
XjglConsumer
在ConsumerCallbackResult方法中写业务逻辑
h.start-example-client.sh中将client端的主类改掉
6.编译打包
分别进入到
databus2-example-client-pkg和
databus2-example-relay-pkg下,运行命令:
gradle -Dopen_source=true clean assemble test
将databus-master/build下
databus2-example-client-pkg和databus2-example-relay-pkg下distribution文件夹下的tar包拷到linux下,解压,在bin下运行./start-example-relay.sh xjgl 和 ./start-example-client.sh xjgl
参考 https://github.com/linkedin/databus/wiki/Databus-2.0-Example


